Controlling Step Flow
With the ability to group steps together within an owning job comes the need to be able
to control how the job “flows” from one step to another. The failure of a Step does not
necessarily mean that the Job should fail. Furthermore, there may be more than one type
of “success” that determines which Step should be executed next. Depending upon how a
group of Steps is configured, certain steps may not even be processed at all.
|
Step bean method proxying in flow definitions
A step instance must be unique within a flow definition. When a step has multiple outcomes in a flow definition,
it is important that the same instance of the step is passed to the flow definition methods ( In the following examples, steps are injected as parameters to the flow or job bean definition methods. This dependency injection style guarantees the uniqueness of steps in the flow definition.
However, if the flow is defined by calling step definition methods annotated with Please refer to the Using the @Configuration annotation section for more details about bean method proxying in Spring Framework. |
Sequential Flow
The simplest flow scenario is a job where all of the steps execute sequentially, as the following image shows:
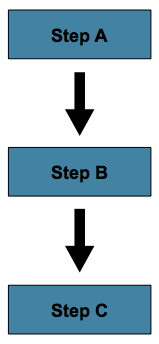
This can be achieved by using next in a step.
-
Java
-
XML
The following example shows how to use the next() method in Java:
@Bean
public Job job(JobRepository jobRepository, Step stepA, Step stepB, Step stepC) {
	return new JobBuilder("job", jobRepository)
				.start(stepA)
				.next(stepB)
				.next(stepC)
				.build();
}
The following example shows how to use the next attribute in XML:
<job id="job">
    <step id="stepA" parent="s1" next="stepB" />
    <step id="stepB" parent="s2" next="stepC"/>
    <step id="stepC" parent="s3" />
</job>
In the scenario above, stepA runs first because it is the first Step listed. If
stepA completes normally, stepB runs, and so on. However, if step A fails,
the entire Job fails and stepB does not execute.
With the Spring Batch XML namespace, the first step listed in the configuration is
always the first step run by the Job. The order of the other step elements does not
matter, but the first step must always appear first in the XML.
|
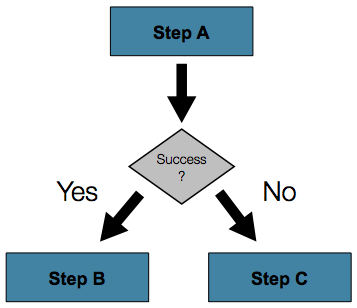
Conditional Flow
In the preceding example, there are only two possibilities:
-
The
stepis successful, and the nextstepshould be executed. -
The
stepfailed, and, thus, thejobshould fail.
In many cases, this may be sufficient. However, what about a scenario in which the
failure of a step should trigger a different step, rather than causing failure? The
following image shows such a flow:
-
Java
-
XML
The Java API offers a fluent set of methods that let you specify the flow and what to do
when a step fails. The following example shows how to specify one step (stepA) and then
proceed to either of two different steps (stepB or stepC), depending on whether
stepA succeeds:
@Bean
public Job job(JobRepository jobRepository, Step stepA, Step stepB, Step stepC) {
	return new JobBuilder("job", jobRepository)
				.start(stepA)
				.on("*").to(stepB)
				.from(stepA).on("FAILED").to(stepC)
				.end()
				.build();
}
To handle more complex scenarios, the Spring Batch XML namespace lets you define transitions
elements within the step element. One such transition is the next
element. Like the next attribute, the next element tells the Job which Step to
execute next. However, unlike the attribute, any number of next elements are allowed on
a given Step, and there is no default behavior in the case of failure. This means that, if
transition elements are used, all of the behavior for the Step transitions must be
defined explicitly. Note also that a single step cannot have both a next attribute and
a transition element.
The next element specifies a pattern to match and the step to execute next, as
the following example shows:
<job id="job">
    <step id="stepA" parent="s1">
        <next on="*" to="stepB" />
        <next on="FAILED" to="stepC" />
    </step>
    <step id="stepB" parent="s2" next="stepC" />
    <step id="stepC" parent="s3" />
</job>-
Java
-
XML
When using java configuration, the on() method uses a simple pattern-matching scheme to
match the ExitStatus that results from the execution of the Step.
When using XML configuration, the on attribute of a transition element uses a simple
pattern-matching scheme to match the ExitStatus that results from the execution of the
Step.
Only two special characters are allowed in the pattern:
-
*matches zero or more characters -
?matches exactly one character
For example, c*t matches cat and count, while c?t matches cat but not count.
While there is no limit to the number of transition elements on a Step, if the Step
execution results in an ExitStatus that is not covered by an element, the
framework throws an exception and the Job fails. The framework automatically orders
transitions from most specific to least specific. This means that, even if the ordering
were swapped for stepA in the preceding example, an ExitStatus of FAILED would still go
to stepC.
Batch Status Versus Exit Status
When configuring a Job for conditional flow, it is important to understand the
difference between BatchStatus and ExitStatus. BatchStatus is an enumeration that
is a property of both JobExecution and StepExecution and is used by the framework to
record the status of a Job or Step. It can be one of the following values:
COMPLETED, STARTING, STARTED, STOPPING, STOPPED, FAILED, ABANDONED, or
UNKNOWN. Most of them are self explanatory: COMPLETED is the status set when a step
or job has completed successfully, FAILED is set when it fails, and so on.
-
Java
-
XML
The following example contains the on element when using Java Configuration:
...
.from(stepA).on("FAILED").to(stepB)
...
The following example contains the next element when using XML configuration:
<next on="FAILED" to="stepB" />At first glance, it would appear that on references the BatchStatus of the Step to
which it belongs. However, it actually references the ExitStatus of the Step. As the
name implies, ExitStatus represents the status of a Step after it finishes execution.
-
Java
-
XML
When using Java configuration, the on() method shown in the preceding
Java configuration example references the exit code of ExitStatus.
More specifically, when using XML configuration, the next element shown in the
preceding XML configuration example references the exit code of ExitStatus.
In English, it says: “go to stepB if the exit code is FAILED”. By default, the exit
code is always the same as the BatchStatus for the Step, which is why the preceding entry
works. However, what if the exit code needs to be different? A good example comes from
the skip sample job within the samples project:
-
Java
-
XML
The following example shows how to work with a different exit code in Java:
@Bean
public Job job(JobRepository jobRepository, Step step1, Step step2, Step errorPrint1) {
	return new JobBuilder("job", jobRepository)
			.start(step1).on("FAILED").end()
			.from(step1).on("COMPLETED WITH SKIPS").to(errorPrint1)
			.from(step1).on("*").to(step2)
			.end()
			.build();
}
The following example shows how to work with a different exit code in XML:
<step id="step1" parent="s1">
    <end on="FAILED" />
    <next on="COMPLETED WITH SKIPS" to="errorPrint1" />
    <next on="*" to="step2" />
</step>
step1 has three possibilities:
-
The
Stepfailed, in which case the job should fail. -
The
Stepcompleted successfully. -
The
Stepcompleted successfully but with an exit code ofCOMPLETED WITH SKIPS. In this case, a different step should be run to handle the errors.
The preceding configuration works. However, something needs to change the exit code based on the condition of the execution having skipped records, as the following example shows:
public class SkipCheckingListener extends StepExecutionListenerSupport {
    public ExitStatus afterStep(StepExecution stepExecution) {
        String exitCode = stepExecution.getExitStatus().getExitCode();
        if (!exitCode.equals(ExitStatus.FAILED.getExitCode()) &&
              stepExecution.getSkipCount() > 0) {
            return new ExitStatus("COMPLETED WITH SKIPS");
        }
        else {
            return null;
        }
    }
}
The preceding code is a StepExecutionListener that first checks to make sure the Step was
successful and then checks to see if the skip count on the StepExecution is higher than
0. If both conditions are met, a new ExitStatus with an exit code of
COMPLETED WITH SKIPS is returned.
Configuring for Stop
After the discussion of BatchStatus and ExitStatus,
one might wonder how the BatchStatus and ExitStatus are determined for the Job.
While these statuses are determined for the Step by the code that is executed, the
statuses for the Job are determined based on the configuration.
So far, all of the job configurations discussed have had at least one final Step with
no transitions.
-
Java
-
XML
In the following Java example, after the step executes, the Job ends:
@Bean
public Job job(JobRepository jobRepository, Step step1) {
	return new JobBuilder("job", jobRepository)
				.start(step1)
				.build();
}
In the following XML example, after the step executes, the Job ends:
<step id="step1" parent="s3"/>If no transitions are defined for a Step, the status of the Job is defined as
follows:
-
If the
Stepends withExitStatusofFAILED, theBatchStatusandExitStatusof theJobare bothFAILED. -
Otherwise, the
BatchStatusandExitStatusof theJobare bothCOMPLETED.
While this method of terminating a batch job is sufficient for some batch jobs, such as a
simple sequential step job, custom defined job-stopping scenarios may be required. For
this purpose, Spring Batch provides three transition elements to stop a Job (in
addition to the next element that we discussed previously).
Each of these stopping elements stops a Job with a particular BatchStatus. It is
important to note that the stop transition elements have no effect on either the
BatchStatus or ExitStatus of any Steps in the Job. These elements affect only the
final statuses of the Job. For example, it is possible for every step in a job to have
a status of FAILED but for the job to have a status of COMPLETED.
Ending at a Step
Configuring a step end instructs a Job to stop with a BatchStatus of COMPLETED. A
Job that has finished with a status of COMPLETED cannot be restarted (the framework throws
a JobInstanceAlreadyCompleteException).
-
Java
-
XML
When using Java configuration, the end method is used for this task. The end method
also allows for an optional exitStatus parameter that you can use to customize the
ExitStatus of the Job. If no exitStatus value is provided, the ExitStatus is
COMPLETED by default, to match the BatchStatus.
When using XML configuration, you can use the end element for this task. The end element
also allows for an optional exit-code attribute that you can use to customize the
ExitStatus of the Job. If no exit-code attribute is given, the ExitStatus is
COMPLETED by default, to match the BatchStatus.
Consider the following scenario: If step2 fails, the Job stops with a
BatchStatus of COMPLETED and an ExitStatus of COMPLETED, and step3 does not run.
Otherwise, execution moves to step3. Note that if step2 fails, the Job is not
restartable (because the status is COMPLETED).
-
Java
-
XML
The following example shows the scenario in Java:
@Bean
public Job job(JobRepository jobRepository, Step step1, Step step2, Step step3) {
	return new JobBuilder("job", jobRepository)
				.start(step1)
				.next(step2)
				.on("FAILED").end()
				.from(step2).on("*").to(step3)
				.end()
				.build();
}
The following example shows the scenario in XML:
<step id="step1" parent="s1" next="step2">

<step id="step2" parent="s2">
    <end on="FAILED"/>
    <next on="*" to="step3"/>
</step>

<step id="step3" parent="s3">
Failing a Step
Configuring a step to fail at a given point instructs a Job to stop with a
BatchStatus of FAILED. Unlike end, the failure of a Job does not prevent the Job
from being restarted.
When using XML configuration, the fail element also allows for an optional exit-code
attribute that can be used to customize the ExitStatus of the Job. If no exit-code
attribute is given, the ExitStatus is FAILED by default, to match the
BatchStatus.
Consider the following scenario: If step2 fails, the Job stops with a
BatchStatus of FAILED and an ExitStatus of EARLY TERMINATION and step3 does not
execute. Otherwise, execution moves to step3. Additionally, if step2 fails and the
Job is restarted, execution begins again on step2.
-
Java
-
XML
The following example shows the scenario in Java:
@Bean
public Job job(JobRepository jobRepository, Step step1, Step step2, Step step3) {
	return new JobBuilder("job", jobRepository)
			.start(step1)
			.next(step2).on("FAILED").fail()
			.from(step2).on("*").to(step3)
			.end()
			.build();
}
The following example shows the scenario in XML:
<step id="step1" parent="s1" next="step2">

<step id="step2" parent="s2">
    <fail on="FAILED" exit-code="EARLY TERMINATION"/>
    <next on="*" to="step3"/>
</step>

<step id="step3" parent="s3">
Stopping a Job at a Given Step
Configuring a job to stop at a particular step instructs a Job to stop with a
BatchStatus of STOPPED. Stopping a Job can provide a temporary break in processing,
so that the operator can take some action before restarting the Job.
-
Java
-
XML
When using Java configuration, the stopAndRestart method requires a restart attribute
that specifies the step where execution should pick up when the Job is restarted.
When using XML configuration, a stop element requires a restart attribute that specifies
the step where execution should pick up when the Job is restarted.
Consider the following scenario: If step1 finishes with COMPLETE, the job then
stops. Once it is restarted, execution begins on step2.
-
Java
-
XML
The following example shows the scenario in Java:
@Bean
public Job job(JobRepository jobRepository, Step step1, Step step2) {
	return new JobBuilder("job", jobRepository)
			.start(step1).on("COMPLETED").stopAndRestart(step2)
			.end()
			.build();
}
The following listing shows the scenario in XML:
<step id="step1" parent="s1">
    <stop on="COMPLETED" restart="step2"/>
</step>

<step id="step2" parent="s2"/>
Programmatic Flow Decisions
In some situations, more information than the ExitStatus may be required to decide
which step to execute next. In this case, a JobExecutionDecider can be used to assist
in the decision, as the following example shows:
public class MyDecider implements JobExecutionDecider {
    public FlowExecutionStatus decide(JobExecution jobExecution, StepExecution stepExecution) {
        String status;
        if (someCondition()) {
            status = "FAILED";
        }
        else {
            status = "COMPLETED";
        }
        return new FlowExecutionStatus(status);
    }
}-
Java
-
XML
In the following example, a bean implementing the JobExecutionDecider is passed
directly to the next call when using Java configuration:
@Bean
public Job job(JobRepository jobRepository, MyDecider decider, Step step1, Step step2, Step step3) {
	return new JobBuilder("job", jobRepository)
			.start(step1)
			.next(decider).on("FAILED").to(step2)
			.from(decider).on("COMPLETED").to(step3)
			.end()
			.build();
}
In the following sample job configuration, a decision specifies the decider to use as
well as all of the transitions:
<job id="job">
    <step id="step1" parent="s1" next="decision" />

    <decision id="decision" decider="decider">
        <next on="FAILED" to="step2" />
        <next on="COMPLETED" to="step3" />
    </decision>

    <step id="step2" parent="s2" next="step3"/>
    <step id="step3" parent="s3" />
</job>

<beans:bean id="decider" class="com.MyDecider"/>
Split Flows
Every scenario described so far has involved a Job that executes its steps one at a
time in a linear fashion. In addition to this typical style, Spring Batch also allows
for a job to be configured with parallel flows.
-
Java
-
XML
Java-based configuration lets you configure splits through the provided builders. As the
following example shows, the split element contains one or more flow elements, where
entire separate flows can be defined. A split element can also contain any of the
previously discussed transition elements, such as the next attribute or the next,
end, or fail elements.
@Bean
public Flow flow1(Step step1, Step step2) {
	return new FlowBuilder<SimpleFlow>("flow1")
			.start(step1)
			.next(step2)
			.build();
}

@Bean
public Flow flow2(Step step3) {
	return new FlowBuilder<SimpleFlow>("flow2")
			.start(step3)
			.build();
}

@Bean
public Job job(JobRepository jobRepository, Flow flow1, Flow flow2, Step step4) {
	return new JobBuilder("job", jobRepository)
				.start(flow1)
				.split(new SimpleAsyncTaskExecutor())
				.add(flow2)
				.next(step4)
				.end()
				.build();
}
The XML namespace lets you use the split element. As the following example shows,
the split element contains one or more flow elements, where entire separate flows can
be defined. A split element can also contain any of the previously discussed transition
elements, such as the next attribute or the next, end, or fail elements.
<split id="split1" next="step4">
    <flow>
        <step id="step1" parent="s1" next="step2"/>
        <step id="step2" parent="s2"/>
    </flow>
    <flow>
        <step id="step3" parent="s3"/>
    </flow>
</split>
<step id="step4" parent="s4"/>
Externalizing Flow Definitions and Dependencies Between Jobs
Part of the flow in a job can be externalized as a separate bean definition and then re-used. There are two ways to do so. The first is to declare the flow as a reference to one defined elsewhere.
-
Java
-
XML
The following Java example shows how to declare a flow as a reference to a flow defined elsewhere:
@Bean
public Job job(JobRepository jobRepository, Flow flow1, Step step3) {
	return new JobBuilder("job", jobRepository)
				.start(flow1)
				.next(step3)
				.end()
				.build();
}

@Bean
public Flow flow1(Step step1, Step step2) {
	return new FlowBuilder<SimpleFlow>("flow1")
			.start(step1)
			.next(step2)
			.build();
}
The following XML example shows how to declare a flow as a reference to a flow defined elsewhere:
<job id="job">
    <flow id="job1.flow1" parent="flow1" next="step3"/>
    <step id="step3" parent="s3"/>
</job>

<flow id="flow1">
    <step id="step1" parent="s1" next="step2"/>
    <step id="step2" parent="s2"/>
</flow>
The effect of defining an external flow, as shown in the preceding example, is to insert the steps from the external flow into the job as if they had been declared inline. In this way, many jobs can refer to the same template flow and compose such templates into different logical flows. This is also a good way to separate the integration testing of the individual flows.
The other form of an externalized flow is to use a JobStep. A JobStep is similar to a
FlowStep but actually creates and launches a separate job execution for the steps in
the flow specified.
-
Java
-
XML
The following example shows an example of a JobStep in Java:
@Bean
public Job jobStepJob(JobRepository jobRepository, Step jobStepJobStep1) {
	return new JobBuilder("jobStepJob", jobRepository)
				.start(jobStepJobStep1)
				.build();
}

@Bean
public Step jobStepJobStep1(JobRepository jobRepository, JobLauncher jobLauncher, Job job, JobParametersExtractor jobParametersExtractor) {
	return new StepBuilder("jobStepJobStep1", jobRepository)
				.job(job)
				.launcher(jobLauncher)
				.parametersExtractor(jobParametersExtractor)
				.build();
}

@Bean
public Job job(JobRepository jobRepository) {
	return new JobBuilder("job", jobRepository)
				// ...
				.build();
}

@Bean
public DefaultJobParametersExtractor jobParametersExtractor() {
	DefaultJobParametersExtractor extractor = new DefaultJobParametersExtractor();

	extractor.setKeys(new String[]{"input.file"});

	return extractor;
}
The following example hows an example of a JobStep in XML:
<job id="jobStepJob" restartable="true">
   <step id="jobStepJob.step1">
      <job ref="job" job-launcher="jobLauncher"
          job-parameters-extractor="jobParametersExtractor"/>
   </step>
</job>

<job id="job" restartable="true">...</job>

<bean id="jobParametersExtractor" class="org.spr...DefaultJobParametersExtractor">
   <property name="keys" value="input.file"/>
</bean>
The job parameters extractor is a strategy that determines how the ExecutionContext for
the Step is converted into JobParameters for the Job that is run. The JobStep is
useful when you want to have some more granular options for monitoring and reporting on
jobs and steps. Using JobStep is also often a good answer to the question: “How do I
create dependencies between jobs?” It is a good way to break up a large system into
smaller modules and control the flow of jobs.

