Running a Job
At a minimum, launching a batch job requires two things: the
Job to be launched and a
JobLauncher. Both can be contained within the same
context or different contexts. For example, if you launch jobs from the
command line, a new JVM is instantiated for each Job. Thus, every
job has its own JobLauncher. However, if
you run from within a web container that is within the scope of an
HttpRequest, there is usually one
JobLauncher (configured for asynchronous job
launching) that multiple requests invoke to launch their jobs.
Running Jobs from the Command Line
If you want to run your jobs from an enterprise
scheduler, the command line is the primary interface. This is because
most schedulers (with the exception of Quartz, unless using
NativeJob) work directly with operating system
processes, primarily kicked off with shell scripts. There are many ways
to launch a Java process besides a shell script, such as Perl, Ruby, or
even build tools, such as Ant or Maven. However, because most people
are familiar with shell scripts, this example focuses on them.
The CommandLineJobRunner
Because the script launching the job must kick off a Java
Virtual Machine, there needs to be a class with a main method to act
as the primary entry point. Spring Batch provides an implementation
that serves this purpose:
CommandLineJobRunner. Note
that this is just one way to bootstrap your application. There are
many ways to launch a Java process, and this class should in no way be
viewed as definitive. The CommandLineJobRunner
performs four tasks:
-
Load the appropriate
ApplicationContext. -
Parse command line arguments into
JobParameters. -
Locate the appropriate job based on arguments.
-
Use the
JobLauncherprovided in the application context to launch the job.
All of these tasks are accomplished with only the arguments passed in. The following table describes the required arguments:
|
The location of the XML file that is used to
create an |
|
The name of the job to be run. |
These arguments must be passed in, with the path first and the name second. All arguments
after these are considered to be job parameters, are turned into a JobParameters object,
and must be in the format of name=value.
-
Java
-
XML
The following example shows a date passed as a job parameter to a job defined in Java:
<bash$ java CommandLineJobRunner io.spring.EndOfDayJobConfiguration endOfDay schedule.date=2007-05-05,java.time.LocalDateThe following example shows a date passed as a job parameter to a job defined in XML:
<bash$ java CommandLineJobRunner endOfDayJob.xml endOfDay schedule.date=2007-05-05,java.time.LocalDate|
By default, the In the following example, You can override this behavior by using a custom |
-
Java
-
XML
In most cases, you would want to use a manifest to declare your main class in a jar. However,
for simplicity, the class was used directly. This example uses the EndOfDay
example from the The Domain Language of Batch. The first
argument is io.spring.EndOfDayJobConfiguration, which is the fully qualified class name
to the configuration class that contains the Job. The second argument, endOfDay, represents
the job name. The final argument, schedule.date=2007-05-05,java.time.LocalDate, is converted
into a JobParameter object of type java.time.LocalDate.
The following example shows a sample configuration for endOfDay in Java:
@Configuration
@EnableBatchProcessing
public class EndOfDayJobConfiguration {

    @Bean
    public Job endOfDay(JobRepository jobRepository, Step step1) {
        return new JobBuilder("endOfDay", jobRepository)
    				.start(step1)
    				.build();
    }

    @Bean
    public Step step1(JobRepository jobRepository, PlatformTransactionManager transactionManager) {
        return new StepBuilder("step1", jobRepository)
    				.tasklet((contribution, chunkContext) -> null, transactionManager)
    				.build();
    }
}
In most cases, you would want to use a manifest to declare your main class in a jar. However,
for simplicity, the class was used directly. This example uses the EndOfDay
example from the The Domain Language of Batch. The first
argument is endOfDayJob.xml, which is the Spring ApplicationContext that contains the
Job. The second argument, endOfDay, represents the job name. The final argument,
schedule.date=2007-05-05,java.time.LocalDate, is converted into a JobParameter object of type
java.time.LocalDate.
The following example shows a sample configuration for endOfDay in XML:
<job id="endOfDay">
    <step id="step1" parent="simpleStep" />
</job>

<!-- Launcher details removed for clarity -->
<beans:bean id="jobLauncher"
         class="org.springframework.batch.core.launch.support.TaskExecutorJobLauncher" />
The preceding example is overly simplistic, since there are many more requirements to a
run a batch job in Spring Batch in general, but it serves to show the two main
requirements of the CommandLineJobRunner: Job and JobLauncher.
Exit Codes
When launching a batch job from the command-line, an enterprise
scheduler is often used. Most schedulers are fairly dumb and work only
at the process level. This means that they only know about some
operating system process (such as a shell script that they invoke).
In this scenario, the only way to communicate back to the scheduler
about the success or failure of a job is through return codes. A
return code is a number that is returned to a scheduler by the process
to indicate the result of the run. In the simplest case, 0 is
success and 1 is failure. However, there may be more complex
scenarios, such as “If job A returns 4, kick off job B, and, if it returns 5, kick
off job C.” This type of behavior is configured at the scheduler level,
but it is important that a processing framework such as Spring Batch
provide a way to return a numeric representation of the exit code
for a particular batch job. In Spring Batch, this is encapsulated
within an ExitStatus, which is covered in more
detail in Chapter 5. For the purposes of discussing exit codes, the
only important thing to know is that an
ExitStatus has an exit code property that is
set by the framework (or the developer) and is returned as part of the
JobExecution returned from the
JobLauncher. The
CommandLineJobRunner converts this string value
to a number by using the ExitCodeMapper
interface:
public interface ExitCodeMapper {

    public int intValue(String exitCode);

}
The essential contract of an
ExitCodeMapper is that, given a string exit
code, a number representation will be returned. The default
implementation used by the job runner is the SimpleJvmExitCodeMapper
that returns 0 for completion, 1 for generic errors, and 2 for any job
runner errors such as not being able to find a
Job in the provided context. If anything more
complex than the three values above is needed, a custom
implementation of the ExitCodeMapper interface
must be supplied. Because the
CommandLineJobRunner is the class that creates
an ApplicationContext and, thus, cannot be
'wired together', any values that need to be overwritten must be
autowired. This means that if an implementation of
ExitCodeMapper is found within the BeanFactory,
it is injected into the runner after the context is created. All
that needs to be done to provide your own
ExitCodeMapper is to declare the implementation
as a root level bean and ensure that it is part of the
ApplicationContext that is loaded by the
runner.
Running Jobs from within a Web Container
Historically, offline processing (such as batch jobs) has been
launched from the command-line, as described earlier. However, there are
many cases where launching from an HttpRequest is
a better option. Many such use cases include reporting, ad-hoc job
running, and web application support. Because a batch job (by definition)
is long running, the most important concern is to launch the
job asynchronously:
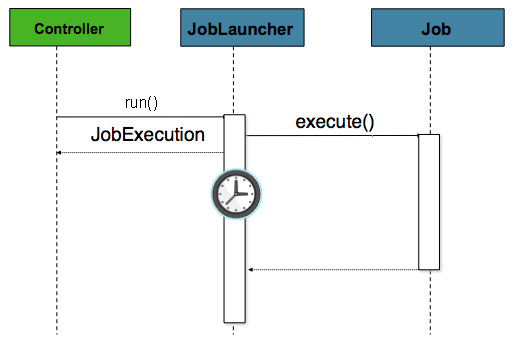
The controller in this case is a Spring MVC controller. See the
Spring Framework Reference Guide for more about Spring MVC.
The controller launches a Job by using a
JobLauncher that has been configured to launch
asynchronously, which
immediately returns a JobExecution. The
Job is likely still running. However, this
nonblocking behavior lets the controller return immediately, which
is required when handling an HttpRequest. The following listing
shows an example:
@Controller
public class JobLauncherController {

    @Autowired
    JobLauncher jobLauncher;

    @Autowired
    Job job;

    @RequestMapping("/jobLauncher.html")
    public void handle() throws Exception{
        jobLauncher.run(job, new JobParameters());
    }
}
