
In this chapter we'll build an app step-by-step together in a relatively fast manner so that you can see how to typically use Roo in a normal project. We'll leave detailed features and side-steps to other sections of this manual.
In this tutorial you will learn to create a complete Web application from scratch using Roo. The application we are going to develop will demonstrate many of the core features offered by Roo. In particular you will learn how to use the Roo shell for:
project creation
creation and development of domain objects (JPA entities)
adding fields of different types to the domain objects
creating relationships between domain objects
automatic creation of integration tests
creating workspace artifacts to import the project into your IDE
automatic scaffolding of a Web tier
running the application in a Web container
controlling and securing access to different views in the application
customizing the look and feel of the Web UI for our business domain
creating and running Selenium tests
deployment and backup of your application
In addition to the tutorial in this chapter, we've published a separate step-by-step tutorial in the form of a blog entry. This blog entry covers the process of building a wedding RSVP application. It is kept updated to reflect the current major version of Roo, and features a number of interesting Roo capabilities:
Standard MVC web application with JPA entities etc
Spring Security usage, including login page customisation
Sending emails via SMTP
Testing both via JUnit and Selenium
Usage with Eclipse
Creating a WAR for deployment
You can find the wedding tutorial at http://blog.springsource.com/2009/05/27/roo-part-2/.
To demonstrate the development of an application using Spring Roo we will create a Web site for a Pizza Shop. The requirements for the Roo Pizza Shop application include the ability to create new Pizza types by the staff of the Roo Pizza Shop. A pizza is composed of a base and one or more toppings. Furthermore, the shop owner would like to allow online orders of Pizzas by his customers for delivery.
After this short discussion with the Pizza Shop owner, we have created a simple class diagram for the initial domain model:
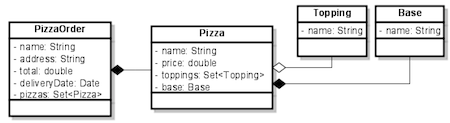
While this class diagram represents a simplified model of the problem domain for the pizza shop problem domain, it is a good starting point for the project at hand in order to deliver a first prototype of the application to the Pizza Shop owner. Later tutorials will expand this domain model to demonstrate more advanced features of Spring Roo.
Now that we have spoken with our client (the Pizza Shop owner) to gather the first ideas and requirements for the project we can get started with the development of the project. After installing a JDK, Spring Roo and Maven, we create a new directory for our project:
> mkdir pizza
> cd pizza
pizza>
Next, we start Spring Roo and type 'hint' to obtain context-sensitive guidance from the Roo shell:
pizza> roo
    ____  ____  ____
   / __ \/ __ \/ __ \
  / /_/ / / / / / / /
 / _, _/ /_/ / /_/ /
/_/ |_|\____/\____/    1.2.1.RELEASE [rev 6eae723]


Welcome to Spring Roo. For assistance press TAB or type "hint" then hit ENTER.
roo>
roo> hint
Welcome to Roo! We hope you enjoy your stay!

Before you can use many features of Roo, you need to start a new project.

To do this, type 'project' (without the quotes) and then hit TAB.

Enter a --topLevelPackage like 'com.mycompany.projectname' (no quotes).
When you've finished completing your --topLevelPackage, press ENTER.
Your new project will then be created in the current working directory.

Note that Roo frequently allows the use of TAB, so press TAB regularly.
Once your project is created, type 'hint' and ENTER for the next suggestion.
You're also welcome to visit http://forum.springframework.org for Roo help.
roo>
There are quite a few usability features within the Roo shell. After typing hint you may have noticed that this command guides you in a step-by-step style towards the completion of your first project. Or if you type help you will see a list of all commands available to you in the particular context you are in. In our case we have not created a new project yet so the help command only reveals higher level commands which are available to you at this stage. To create an actual project we can use the project command:
roo> project --topLevelPackage com.springsource.roo.pizzashop
Created ROOT/pom.xml
Created SRC_MAIN_RESOURCES
Created SRC_MAIN_RESOURCES/log4j.properties
Created SPRING_CONFIG_ROOT
Created SPRING_CONFIG_ROOT/applicationContext.xml
com.springsource.roo.pizzashop roo>
When you used the project command, Roo created you a
Maven pom.xml file as well as a Maven-style directory
structure. The top level package you nominated in this command was then
used as the <groupId> within the pom.xml.
When typing later Roo commands, you can use the "~" shortcut
key to refer to this top-level-package (it is read in by the Roo shell
from the pom.xml each time you load Roo).
The following folder structure now exists in your file system:
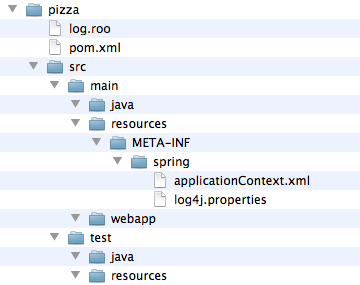
For those familiar with Maven you will notice that this folder structure follows standard Maven conventions by creating separate folders for your main project resources and tests. Roo also installs a default application context and a log4j configuration for you. Finally, the project pom file contains all required dependencies and configurations to get started with our Pizza Shop project.
Once the project structure is created by Roo you can go ahead and install a persistence configuration for your application. Roo leverages the Java Persistence API (JPA) which provides a convenient abstraction to achieve object-relational mapping. JPA takes care of mappings between your persistent domain objects (entities) and their underlying database tables. To install or change the persistence configuration in your project you can use the jpa setup command (note: try using the <TAB> as often as you can to auto-complete your commands, options and even obtain contextual help):
com.springsource.roo.pizzashop roo> hint
Roo requires the installation of a persistence configuration,
for example, JPA or MongoDB.

For JPA, type 'jpa setup' and then hit TAB three times.
We suggest you type 'H' then TAB to complete "HIBERNATE".
After the --provider, press TAB twice for database choices.
For testing purposes, type (or TAB) HYPERSONIC_IN_MEMORY.
If you press TAB again, you'll see there are no more options.
As such, you're ready to press ENTER to execute the command.

Once JPA is installed, type 'hint' and ENTER for the next suggestion.

Similarly, for MongoDB persistence, type 'mongo setup' and ENTER.
com.springsource.roo.pizzashop roo>
com.springsource.roo.pizzashop roo> jpa setup --provider HIBERNATE --database HYPERSONIC_IN_MEMORY
Created SPRING_CONFIG_ROOT/database.properties
Updated SPRING_CONFIG_ROOT/applicationContext.xml
Created SRC_MAIN_RESOURCES/META-INF/persistence.xml
Updated ROOT/pom.xml [added dependencies org.hsqldb:hsqldb:1.8.0.10, org.hibernate:hibernate-core:3.6.9.Final,
org.hibernate:hibernate-entitymanager:3.6.9.Final, org.hibernate.javax.persistence:hibernate-jpa-2.0-api:1.0.1.Final,
org.hibernate:hibernate-validator:4.2.0.Final, javax.validation:validation-api:1.0.0.GA, cglib:cglib-nodep:2.2.2,
javax.transaction:jta:1.1, org.springframework:spring-jdbc:${spring.version},
org.springframework:spring-orm:${spring.version}, commons-pool:commons-pool:1.5.6, commons-dbcp:commons-dbcp:1.3]
com.springsource.roo.pizzashop roo>
So in this case we have installed Hibernate as the object-relational mapping (ORM)-provider. Hibernate is one of ORM providers which Roo currently offers. EclipseLink, OpenJPA, and DataNucleus represent the alternative choices. In a similar fashion we have chosen the Hypersonic in-memory database as our target database. Hypersonic is a convenient database for Roo application development because it relieves the developer from having to install and configure a production scale database.
When you are ready to test or install your application in a
production setting, the jpa setup command can
be repeated. This allows you to nominate a different database, or even
ORM. Roo offers TAB completion for production databases including
Postgres, MySQL, Microsoft SQL Server, Oracle, DB2, Sybase, H2, Hypersonic
and more. Another important step is to edit the
SRC_MAIN_RESOURCES/META-INF/persistence.xml file and modify
your JPA provider's DDL (schema management) configuration setting so it
preserves the database between restarts of your application. To help you
with this, Roo automatically lists the valid settings for your JPA
provider as a comment in that file. Note that by default your JPA provider
will drop all database tables each time it reloads. As such you'll
certainly want to change this setting.
Please note: The Oracle and DB2 JDBC drivers are not available in
public maven repositories. Roo will install standard dependencies for
these drivers (if selected) but you may need to adjust the version number
or package name according to your database version. You can use the
following maven command to install your driver into your local maven
repository: mvn install:install-file -DgroupId=com.oracle
-DartifactId=ojdbc14 -Dversion=10.2.0.2 -Dpackaging=jar
-Dfile=/path/to/file (example for the Oracle driver)
Now it is time to create our domain objects and fields which we have
identified in our class diagram. First, we can use the entity
jpa command to create the actual domain object. The
entity jpa command has a number of optional attributes and one
required attribute which is --class. In addition to the
required --class attribute we use the
--testAutomatically attribute which conveniently creates
integration tests for a domain object. So let's start with the
Topping domain object:
com.springsource.roo.pizzashop roo> hint
You can create entities either via Roo or your IDE.
Using the Roo shell is fast and easy, especially thanks to the TAB completion.

Start by typing 'ent' and then hitting TAB twice.
Enter the --class in the form '~.domain.MyEntityClassName'
In Roo, '~' means the --topLevelPackage you specified via 'create project'.

After specify a --class argument, press SPACE then TAB. Note nothing appears.
Because nothing appears, it means you've entered all mandatory arguments.
However, optional arguments do exist for this command (and most others in Roo).
To see the optional arguments, type '--' and then hit TAB. Mostly you won't
need any optional arguments, but let's select the --testAutomatically option
and hit ENTER. You can always use this approach to view optional arguments.

After creating an entity, use 'hint' for the next suggestion.
com.springsource.roo.pizzashop roo>
com.springsource.roo.pizzashop roo> entity jpa --class ~.domain.Topping --testAutomatically
Created SRC_MAIN_JAVA/com/springsource/roo/pizzashop/domain
Created SRC_MAIN_JAVA/com/springsource/roo/pizzashop/domain/Topping.java
Created SRC_TEST_JAVA/com/springsource/roo/pizzashop/domain
Created SRC_TEST_JAVA/com/springsource/roo/pizzashop/domain/ToppingDataOnDemand.java
Created SRC_TEST_JAVA/com/springsource/roo/pizzashop/domain/ToppingIntegrationTest.java
Created SRC_MAIN_JAVA/com/springsource/roo/pizzashop/domain/Topping_Roo_Configurable.aj
Created SRC_MAIN_JAVA/com/springsource/roo/pizzashop/domain/Topping_Roo_ToString.aj
Created SRC_MAIN_JAVA/com/springsource/roo/pizzashop/domain/Topping_Roo_Jpa_Entity.aj
Created SRC_MAIN_JAVA/com/springsource/roo/pizzashop/domain/Topping_Roo_Jpa_ActiveRecord.aj
Created SRC_TEST_JAVA/com/springsource/roo/pizzashop/domain/ToppingDataOnDemand_Roo_Configurable.aj
Created SRC_TEST_JAVA/com/springsource/roo/pizzashop/domain/ToppingDataOnDemand_Roo_DataOnDemand.aj
Created SRC_TEST_JAVA/com/springsource/roo/pizzashop/domain/ToppingIntegrationTest_Roo_Configurable.aj
Created SRC_TEST_JAVA/com/springsource/roo/pizzashop/domain/ToppingIntegrationTest_Roo_IntegrationTest.aj
You will notice that besides the creation of Java and AspectJ sources, the entity jpa command in the Roo shell takes care of creating the appropriate folder structure in your project for the top level package you defined earlier. You will notice that we used the '~' character as a placeholder for the project's top level package. While this serves a convenience to abbreviate long commands, you can also tab-complete the full top level package in the Roo shell.
As a next step we need to add the 'name' field to our
Topping domain class. This can be achieved by using the
field command as
follows:
~.domain.Topping roo> hint
You can add fields to your entities using either Roo or your IDE.

To add a new field, type 'field' and then hit TAB. Be sure to select
your entity and provide a legal Java field name. Use TAB to find an entity
name, and '~' to refer to the top level package. Also remember to use TAB
to access each mandatory argument for the command.

After completing the mandatory arguments, press SPACE, type '--' and then TAB.
The optional arguments shown reflect official JSR 303 Validation constraints.
Feel free to use an optional argument, or delete '--' and hit ENTER.

If creating multiple fields, use the UP arrow to access command history.

After adding your fields, type 'hint' for the next suggestion.
To learn about setting up many-to-one fields, type 'hint relationships'.
~.domain.Topping roo>
~.domain.Topping roo> field string --fieldName name --notNull --sizeMin 2
Updated SRC_MAIN_JAVA/com/springsource/roo/pizzashop/domain/Topping.java
Updated SRC_TEST_JAVA/com/springsource/roo/pizzashop/domain/ToppingDataOnDemand_Roo_DataOnDemand.aj
Created SRC_MAIN_JAVA/com/springsource/roo/pizzashop/domain/Topping_Roo_JavaBean.aj
As explained in the documentation by typing the hint command you
can easily add constraints to your fields by using optional attributes
such as --notNull and --sizeMin 2. These
attributes result in standards-compliant JSR-303
annotations which Roo will add to your field definition in your Java
sources. You will also notice that the Roo shell is aware of the current
context within which you are using the field command. It
knows that you have just created a Topping entity and therefore assumes
that the field command should be applied to the Topping Java source. Roo's
current context is visible in the shell prompt.
If you wish to add the field to a different target type you can
specify the --class attribute as part of the field command
which then allows you to tab complete to any type in your project.
As a next step you can create the Base and the
Pizza domain object in a similar fashion by issuing the
following commands (shell output omitted):
entity jpa --class ~.domain.Base --testAutomatically
field string --fieldName name --notNull --sizeMin 2
entity jpa --class ~.domain.Pizza --testAutomatically
field string --fieldName name --notNull --sizeMin 2
field number --fieldName price --type java.lang.Float
After
adding the name and the price field to the Pizza domain class
we need to deal with its relationships to Base and
Topping. Let's start with the m:m (one Pizza can
have many Toppings and one Topping can be
applied to many Pizzas) relationship between
Pizza and Toppings. To create such many-to-many
relationships Roo offers the field set
command:
~.domain.Pizza roo> field set --fieldName toppings --type ~.domain.ToppingAs
you can see it is easy to define this relationship even without knowing
about the exact JPA annotations needed to create this mapping in our
Pizza domain entity. In a similar way you can define the m:1
relationship between the Pizza and Base domain
entities by using the field reference
command:
~.domain.Pizza roo> field reference --fieldName base --type ~.domain.BaseIn
a similar fashion we can then continue to create the
PizzaOrder domain object and add its fields by leveraging the
field date and
field
number commands:
entity jpa --class ~.domain.PizzaOrder --testAutomatically
field string --fieldName name --notNull --sizeMin 2
field string --fieldName address --sizeMax 30
field number --fieldName total --type java.lang.Float
field date --fieldName deliveryDate --type java.util.Date
field set --fieldName pizzas --type ~.domain.Pizza
This concludes this step since the initial version of the domain model is now complete.
Once you are done with creating the first iteration of your domain model you naturally want to see if it works. Luckily we have instructed Roo to create integration tests for our domain objects all along. Hint: if you have not created any integration tests while developing your domain model you can still easily create them using the test integration command. Once your tests are in place it is time to run them using the perform tests command:
~.domain.PizzaOrder roo> perform tests
...
-------------------------------------------------------
 T E S T S
-------------------------------------------------------

Tests run: 36, Failures: 0, Errors: 0, Skipped: 0

[INFO] ------------------------------------------------------------------------
[INFO] BUILD SUCCESS
[INFO] ------------------------------------------------------------------------
[INFO] Total time: 3.860s
[INFO] Finished at: Tue Feb 14 18:01:45 EST 2012
[INFO] Final Memory: 6M/81M
[INFO] ------------------------------------------------------------------------
As you can see Roo has issued a Maven command (equivalent to running
'mvn test' outside the Roo shell) in order to execute the
integration tests. All tests have passed, Roo has generated 9 integration
tests per domain object resulting in a total of 36 integration tests for
all 4 domain objects.
Of course Roo projects can be used in your favorite IDE. We recommend the use of SpringSource Tool Suite (STS), which is available at no charge from SpringSource. If you're not using SpringSource Tool Suite, please refer to the IDE usage section of this reference guide for a more detailed discussion of IDE interoperability.
By default Roo projects do not contain any IDE-specific workspace configuration artifacts. This means your IDE won't be able to import your Pizza Shop project by default. The Roo shell can help us create IDE-specific workspace configuration artifacts by means of the perform eclipse command. However, you should not use this command if you have the m2eclipse plugin installed. If you're an STS user, you have the m2eclipse plugin installed and as such you can skip the "perform eclipse" command. All people not using STS or m2eclipse should use the following command:
~.domain.PizzaOrder roo> perform eclipse
...
[INFO] Adding support for WTP version 2.0.
[INFO] Using Eclipse Workspace: null
[INFO] Adding default classpath container: org.eclipse.jdt.launching.JRE_CONTAINER
[INFO] Wrote settings to /Users/stewarta/projects/roo-test/pizzashop/.settings/org.eclipse.jdt.core.prefs
[INFO] Wrote Eclipse project for "pizzashop" to /Users/stewarta/projects/roo-test/pizzashop.
[INFO] n.PizzaOrder roo>
       Javadoc for some artifacts is not available.
       Please run the same goal with the -DdownloadJavadocs=true parameter in order to check remote repositories for javadoc.
       List of artifacts without a javadoc archive:
         o org.springframework.roo:org.springframework.roo.annotations:1.2.1.RELEASE
...
[INFO] ------------------------------------------------------------------------
[INFO] BUILD SUCCESS
[INFO] ------------------------------------------------------------------------
[INFO] Total time: 1.685s
[INFO] Finished at: Tue Feb 14 18:04:20 EST 2012
[INFO] Final Memory: 7M/81M
[INFO] ------------------------------------------------------------------------
Note, when issuing this command for the first time you can expect delays while Maven downloads the dependencies and their sources into your local repository. Once this command has completed you are ready to import your project into STS by clicking 'File > Import > General > Existing Projects into Workspace'. Once your project is imported into STS you can take a look at the Java sources. For example you can run the included JUnit tests by right clicking the pizzashop project and then selecting 'Run As > JUnit Test'.
If you're using STS or have installed m2eclipse into an Eclipse-based IDE, as mentioned earlier you can skip the perform eclipse command entirely. In this case you simply need to select in STS/Eclipse the 'File > Import > General > Maven Projects' menu option.
As detailed in the Application
Architecture chapter of this documentation Roo projects leverage
AspectJ Intertype declarations extensively. This does not, however, affect
your ability to use code completion features offered by STS. To see code
completion working in action you can open an existing integration test and
use the testMarkerMethod() method to test it. For example you
can open the BaseIntegrationTest.java source file and try it
out:
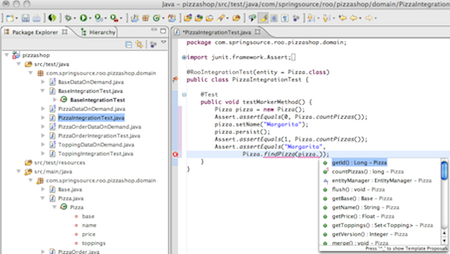
Note, most of the methods visible in the STS code assist are actually not in the Java sources but rather part of the AspectJ ITD and are therefore introduced into the Java bytecode at compile time.
As a next step we want to scaffold a Web tier for the Pizza Shop application. This is accomplished via the web mvc commands. The most convenient way to generate controllers and all relevant Web artifacts is to use the web mvc setup command followed by the web mvc all command:
~.domain.PizzaOrder roo> web mvc setup

~.domain.PizzaOrder roo> web mvc all --package ~.web
This command will scan the Pizza Shop
project for any domain entities and scaffold a Spring MVC controller for
each entity detected. The --package attribute is needed to
specify in which package the controllers should be installed. This command
can be issued from your normal Roo shell or from the Roo shell, which
ships with STS. In order to use the integrated Roo shell within STS you
need to right click on the pizzashop application and select 'Spring Tools
> Open Roo Shell'.
Note, that with the web mvc setup command the nature of the project changes from a normal Java project nature to a Web project nature in STS. This command will also add additional dependencies such as Spring MVC, Tiles, etc to your project. In order to update the project classpath within STS with these new dependencies you can issue 'perform eclipse' again, followed by a project refresh in STS.
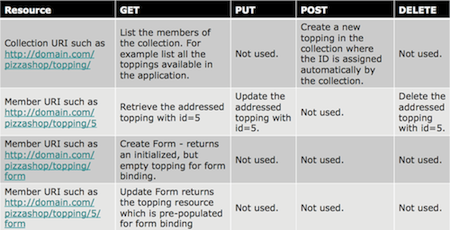
All newly added Web artifacts which are needed for the view
scaffolding can be found under the src/main/webapp folder.
This folder includes graphics, cascading style sheets, Java Server pages,
Tiles configurations and more. The purpose of these folders is summarized
in the UI customization section. The
Roo generated Spring MVC controllers follow the REST pattern as much as
possible by leveraging new features introduced with the release of Spring
Framework v3. The following URI - Resource mappings are applied in Roo
generated controllers:
To deploy your application in a Web container during project development you have several options available:
Deploy from your shell / command line (without the need to assemble a war archive):
Deploy to a integrated Web container configured in STS:
Drag your project to the desired Web container inside the STS server view
Right-click your project and select 'Run As > Run on Server' to deploy to the desired Web container
After selecting your preferred deployment method you should see the Web container starting and the application should be available under the following URL http://localhost:8080/pizzashop

As discussed with the Pizza Shop owner we need to control access to certain views in the Web frontend. Securing access to different views in the application is achieved by installing the Spring Security addon via the security setup command:
~.web roo> security setup
Created SPRING_CONFIG_ROOT/applicationContext-security.xml
Created SRC_MAIN_WEBAPP/WEB-INF/views/login.jspx
Updated SRC_MAIN_WEBAPP/WEB-INF/views/views.xml
Updated ROOT/pom.xml [added property 'spring-security.version' = '3.1.0.RELEASE'; added dependencies
org.springframework.security:spring-security-core:${spring-security.version},
org.springframework.security:spring-security-config:${spring-security.version},
org.springframework.security:spring-security-web:${spring-security.version},
org.springframework.security:spring-security-taglibs:${spring-security.version}]
Updated SRC_MAIN_WEBAPP/WEB-INF/web.xml
Updated SRC_MAIN_WEBAPP/WEB-INF/spring/webmvc-config.xml
Note, the Roo shell will hide the security
setup command until you have created a Web layer. As
shown above, the security setup command manages the project
pom.xml file. This means additional dependencies have been
added to the project. To add these dependencies to the STS workspace you
should run the perform eclipse command again followed by a
project refresh (if you're using STS or m2eclipse, the "perform eclipse"
command should be skipped as it will automatically detect and handle the
addition of Spring Security to your project).
In order to secure the views for the Topping,
Base, and Pizza resources in the Pizza Shop
application you need to open the
applicationContext-security.xml file in the
src/main/resources/META-INF/spring folder:
<!-- HTTP security configurations -->
<http auto-config="true" use-expressions="true">
   <form-login login-processing-url="/static/j_spring_security_check" login-page="/login" ↩
                                          authentication-failure-url="/login?login_error=t"/>
   <logout logout-url="/static/j_spring_security_logout"/>
   <!-- Configure these elements to secure URIs in your application -->
   <intercept-url pattern="/pizzas/**" access="hasRole('ROLE_ADMIN')"/>
   <intercept-url pattern="/toppings/**" access="hasRole('ROLE_ADMIN')"/>
   <intercept-url pattern="/bases/**" access="hasRole('ROLE_ADMIN')"/>
   <intercept-url pattern="/resources/**" access="permitAll" />
   <intercept-url pattern="/static/**" access="permitAll" />
   <intercept-url pattern="/**" access="permitAll" />
</http>
As a next step you can use the Spring Security
JSP tag library to restrict access to the relevant menu items in the
menu.jspx file:
<div xmlns:jsp="..." xmlns:sec="http://www.springframework.org/security/tags" id="menu" version="2.0">
   <jsp:directive.page contentType="text/html;charset=UTF-8"/>
   <jsp:output omit-xml-declaration="yes"/>
   <menu:menu id="_menu" z="nZaf43BjUg1iM0v70HJVEsXDopc=">
       <sec:authorize ifAllGranted="ROLE_ADMIN">
           <menu:category id="c_topping" z="Xm13w68rCIyzL6WIzqBtcpfiNQU=">
              <menu:item id="i_topping_new" .../>
              <menu:item id="i_topping_list" .../>
           </menu:category>
           <menu:category id="c_base" z="yTpmmNMm/hWoy3yf+aPcdUX2At8=">
              <menu:item id="i_base_new" .../>
              <menu:item id="i_base_list" .../>
           </menu:category>
           <menu:category id="c_pizza" z="mXqKC1ELexS039/pkkCrZVcSry0=">
              <menu:item id="i_pizza_new" .../>
              <menu:item id="i_pizza_list" .../>
           </menu:category>
        </sec:authorize>
        <menu:category id="c_pizzaorder" z="gBYiBODEJrzQe3q+el5ktXISc4U=">
            <menu:item id="i_pizzaorder_new" .../>
            <menu:item id="i_pizzaorder_list" .../>
        </menu:category>
    </menu:menu>
</div>
This leaves the pizza order view visible to the public.
Obviously the delete and the update use case for the pizza order view are
not desirable. The easiest way to take care of this is to adjust the
@RooWebScaffold annotation in the
PizzaOrderController.java source:
@RooWebScaffold(path = "pizzaorder",
                formBackingObject = PizzaOrder.class,
                delete=false,
                update=false)
This
will trigger the Roo shell to remove the delete and the update method from
the PizzaOrderController and also adjust the relevant view
artifacts.
With these steps completed you can restart the application and the 'admin' user can navigate to http://localhost:8080/pizzashop/login to authenticate.
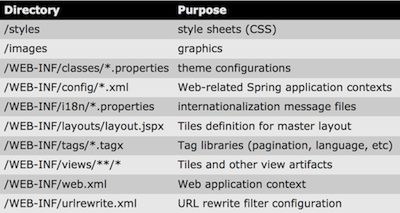
Roo generated Web UIs can be customized in various ways. To find your way around the installed Web-tier artifacts take a look at the following table:
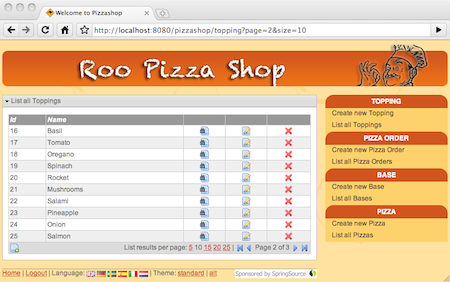
The easiest way to customize the look & feel of the Roo Web UI is to change CSS and image resources to suit your needs. The following look & feel was created for the specific purpose of the Pizza Shop application:
Spring Roo also configures theming support offered by Spring framework so you can leverage this feature with ease.
To achieve a higher level of customization you can change the default Tiles template (WEB-INF/layouts/default.jspx) and adjust the JSP pages (WEB-INF/views/*.jspx). WIth release 1.1 of Spring Roo jspx artifacts can now be adjusted by the user while Roo can still make adjustments as needed if domain layer changes are detected. See the JSP Views section for details.
Furthermore the Spring Roo 1.1 release introduced a set of JSP tags which not only reduce the scaffolded jspx files by 90% but also offer the most flexible point for view customization. Roo will install these tags into the user project where they can be accessed and customized to meet specific requirements of the project. For example it would be fairly easy to remove the integrated Spring JS / Dojo artifacts and replace them with your JS framework of choice. To make these changes available for installation in other projects you can create a simple add-on which replaces the default tags installed by Roo with your customized tags.
Roo offers a core addon which can generate Selenium test scripts for you. You can create the Selenium scripts by using the selenium test command. Tests are generated for each controller and are integrated in a test suite:
~.web roo> selenium test --controller ~.web.ToppingController
~.web roo> selenium test --controller ~.web.BaseController
~.web roo> selenium test --controller ~.web.PizzaController
~.web roo> selenium test --controller ~.web.PizzaOrderController
The
generated tests are located in the src/main/webapp/selenium
folder and can be run via the following maven command (executed from
command line, not the Roo shell):
pizza> mvn selenium:selenese
Running the maven selenium addon will start a new instance of the FireFox browser and run tests against the Pizza Shop Web UI by using Roo generated seed data.
Please note that the maven selenium plugin configured in the project
pom.xml assumes that the FireFox
Web browser is already installed in your environment. Running the maven
selenium plugin also assumes that your application is already started as
discussed in step 6. Finally, there are limitations with regards to
locales used by the application. Please refer to the known issues section for
details.
One other very useful command is the backup command. Issuing this command will create you a backup of the current workspace with all sources, log files and the script log file (excluding the target directory):
~.web roo> backup
Created ROOT/pizzashop_2012-02-14_18:10:19.zip
Backup completed in 35 ms
~.web roo>
Finally, you may wish to deploy your application to a production Web container. For this you can easily create a war archive by taking advantage of the perform package command:
~.web roo> perform package
[INFO] Scanning for projects...
[INFO] ------------------------------------------------------------------------
[INFO] Building pizzashop
[INFO]    task-segment: [package]
[INFO] ------------------------------------------------------------------------
...
[INFO] [war:war {execution: default-war}]
[INFO] Exploding webapp...
[INFO] Assembling webapp pizzashop in /Users/stewarta/projects/roo-test/pizzashop/target/pizzashop-0.1.0-SNAPSHOT
[INFO] Copy webapp webResources to /Users/stewarta/projects/roo-test/pizzashop/target/pizzashop-0.1.0-SNAPSHOT
[INFO] Generating war /Users/stewarta/projects/roo-test/pizza/target/pizzashop-0.1.0-SNAPSHOT.war
[INFO] Building war: /Users/stewarta/projects/roo-test/pizza/target/pizzashop-0.1.0-SNAPSHOT.war
[INFO] ------------------------------------------------------------------------
[INFO] BUILD SUCCESS
[INFO] ------------------------------------------------------------------------
[INFO] Total time: 5.881s
[INFO] Finished at: Tue Feb 14 18:07:54 EST 2012
[INFO] Final Memory: 8M/81M
[INFO] ------------------------------------------------------------------------
~.web roo>
This command produces your war file which can then be easily copied into your production Web container.
Congratuations! You've now completed the Roo Pizza Shop tutorial. You're now in a good position to try Roo for your own projects. While reading the next few chapters of this reference guide will help you understand more about how to use Roo, we suggest the following specific sections if you'd like to know more about commonly-used Roo add-ons:
Spring Web Flow addon
Logging addon
JMS addon
Email (SMTP) addon