9. JMS Messaging
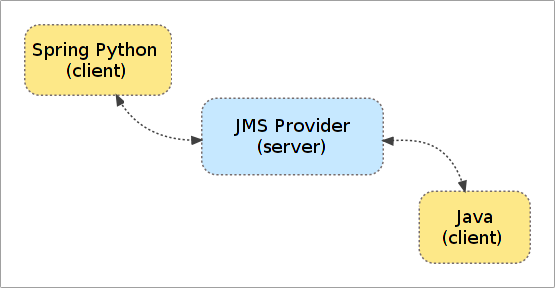
Java Message Service has been a well known means for decoupling the Java application’s parts or to provide an integration service for otherwise disconnected Java applications. Thanks to JMS being purely an API, Spring Python offers a way for connecting to JMS providers and to participate in JMS messaging scenarios. JMS messages sent and received by a Spring Python powered application are no different than messages produced and consumed by Java applications, in fact, you can use Spring Python and JMS with no Java applications participating in message exchanging at all.
Spring Python works as a JMS client, you still need a JMS provider, the server part, for message brokering. The only JMS provider currently supported by Spring Python is IBM’s WebSphere MQ, formerly known as MQSeries.
Although Spring Python’s JMS API is loosely based on Spring Java’s, it’s not a direct port and features a highly Pythonic look and feel.
Note
Througout the chapter pure Python code or YAML syntax is used to illustrate the support for JMS however it only represents the author’s preferences and it’s worth noting that you can use any of Spring Python’s formats to configure the IoC container. Or you can use no IoC at all as it’s a completely optional feature and one that’s not strictly required by JMS.
9.1. Introduction
JMS messaging with Spring Python revolves around the idea of using a connection factory for obtaining a connection to a JMS provider and springpython.jms.core.JmsTemplate as a means for sending and receiving messages. A JmsTemplate instance is tied to a connection factory however a single connection factory may be safely reused across multiple JmsTemplates.
In addition to that, springpython.jms.listener.SimpleMessageListenerContainer allows for a purely configuration-driven way to set up background JMS listeners to receive messages from JMS providers.
9.2. Dependencies
Support for JMS messaging with WebSphere MQ is built on top of the CPython-only PyMQI library which provides Python applications an access to WebSphere MQ queue managers. You need to separately install PyMQI in order to use springpython.jms.factory.WebSphereMQConnectionFactory. PyMQI, in turn, needs a WebSphere MQ client, a runtime library which may be freely downloaded from IBM’s site.
springpython.jms.listener.SimpleMessageListenerContainer, a Spring Python component which helps with running background JMS listeners, requires the installation of Circuits 1.2+ and threadpool 1.2.7 or newer.
9.3. Quick start
Here’s a few quick examples that will get you started with Spring Python and JMS. Both Python code and IoC with YAML syntax are shown. It’s assumed there’s a QM.1 queue manager running on host 192.168.1.121 with its listener on port 1434 and connections are made through the server connection channel SVRCONN.1 to queues TEST.1 and TEST.2.
9.3.1. Sending
First, let’s send a message using nothing but pure Python code:
from springpython.jms.core import JmsTemplate
from springpython.jms.factory import WebSphereMQConnectionFactory

qm_name = "QM.1"
channel = "SVRCONN1.1"
host = "192.168.1.121"
listener_port = "1434"
queue1 = "TEST.1"

# The connection factory we're going to use.
factory = WebSphereMQConnectionFactory(qm_name, channel, host, listener_port)

# Every JmsTemplate uses a connection factory for actually communicating with a JMS provider.
jms_template = JmsTemplate(factory)

# And that's it, now we put the mandatory "Hello world" message on a queue.
jms_template.send("Hello world", queue1)

# We're not using an IoC so we must shut down the connection factory ourselves.
factory.destroy()
Now do the same but use an IoC container configured via springpython.config.YamlConfig. The configuration should be saved in a “jms-context.yml” file in the same directory the Python code using it will be saved in:
objects:
    - object: MyConnectionFactory
      class: springpython.jms.factory.WebSphereMQConnectionFactory
      properties:
          queue_manager: QM.1
          channel: SVRCONN.1
          host: 192.168.1.121
          listener_port: "1434"

    - object: MyTemplate
      class: springpython.jms.core.JmsTemplate
      properties:
          factory: {ref: MyConnectionFactory}

    - object: MyQueue
      str: TEST.1
And the Python code using the above IoC configuration:
from springpython.context import ApplicationContext
from springpython.config import YamlConfig

container = ApplicationContext(YamlConfig("./jms-context.yml"))

# Read the objects definitions from configuration.
queue1 = container.get_object("MyQueue")
jms_template = container.get_object("MyTemplate")

# Send the message.
jms_template.send("Hello world", queue1)

# The connection factory is now being managed by the IoC container which takes
# care of shutting down the factory. No need for manually destroying it.
An obvious change is that the configuration is now kept separately from the implementation but another advantage is that the container will shut down the connection factory on itself as springpython.jms.factory.WebSphereMQConnectionFactory is a subclass of springpython.context.DisposableObject which means its .destroy method will be executed when the container will be shutting down.
9.3.2. Receiving
The very same connection factory and JmsTemplate can be used for both sending and receiving. Examples below use the same definitions of objects as the sending examples do, they are repeated here for the sake of completness:
from springpython.jms.core import JmsTemplate
from springpython.jms.factory import WebSphereMQConnectionFactory

qm_name = "QM.1"
channel = "SVRCONN.1"
host = "192.168.1.121"
listener_port = "1434"
queue1 = "TEST.1"

# The connection factory we're going to use.
factory = WebSphereMQConnectionFactory(qm_name, channel, host, listener_port)

# Every JmsTemplate uses a connection factory for actually communicating with a JMS provider.
jms_template = JmsTemplate(factory)

# Get a message off the queue. The call to receive will by default time out
# after 1000ms and raise springpython.jms.NoMessageAvailableException then.
jms_template.receive(queue1)

# We're not using an IoC so we need to shut down the connection factory ourselves.
factory.destroy()
And here’s a complementary example showing the usage of YamlConfig. The configuration should be saved in a “jms-context.yml” file in the same directory the Python code using it will be saved in. Note that it’s the same configuration that was used in the sending example:
objects:
    - object: MyConnectionFactory
      class: springpython.jms.factory.WebSphereMQConnectionFactory
      properties:
          queue_manager: QM.1
          channel: SVRCONN.1
          host: 192.168.1.121
          listener_port: "1434"

    - object: MyTemplate
      class: springpython.jms.core.JmsTemplate
      properties:
          factory: {ref: MyConnectionFactory}

    - object: MyQueue
      str: TEST.1
The Python code used for receiving a message from a queue configured using the YamlConfig:
from springpython.context import ApplicationContext
from springpython.config import YamlConfig

container = ApplicationContext(YamlConfig("./jms-context.yml"))

# Read the objects definitions from configuration
queue1 = container.get_object("MyQueue")
jms_template = container.get_object("MyTemplate")

# Get a message off the queue. The call to receive will by default time out
# after 1000ms and raise springpython.jms.NoMessageAvailableException then.
jms_template.receive(queue1)

# The connection factory is now being managed by the IoC container which takes
# care of shutting down the factory. No need for manually destroying it.
Here’s a sample YAML context utilizing the SimpleMessageListenerContainer component and an accompanying Python code using it. As you can see, a mere fact of providing the configuration allows for receiving the messages:
objects:
    - object: connection_factory
      class: springpython.jms.factory.WebSphereMQConnectionFactory
      properties:
          queue_manager: QM.1
          channel: SVRCONN.1
          host: 192.168.1.121
          listener_port: "1434"

    - object: message_handler
      class: app.MyMessageHandler

    - object: listener_container
      class: springpython.jms.listener.SimpleMessageListenerContainer
      properties:
          factory: {ref: connection_factory}
          handler: {ref: message_handler}
          destination: TEST.1
# app.py

from springpython.config import YamlConfig
from springpython.context import ApplicationContext

class MyMessageHandler(object):
    def handle(self, message):
        print "Got message!", message

if __name__ == "__main__":

    # Obtaining a context will automatically start the SimpleMessageListenerContainer and its listeners in background.
    container = ApplicationContext(YamlConfig("./context.yml"))

    while True:
        # Here goes the application's logic. Any JMS messages, as configured
        # in ./context.yml, will be passed in to a singleton MyMessageHandler instance.
        pass
9.4. Connection factories
9.4.1. WebSphereMQConnectionFactory
springpython.jms.factory.WebSphereMQConnectionFactory implements access to WebSphere MQ JMS provider. Along with JmsTemplate and SimpleMessageListenerContainer it’s the class you’ll be most frequently using for sending and receiving of messages.
Each WebSphereMQConnectionFactory object will hold at most one connection to WebSphere MQ, which will be lazily established when it’ll be actually needed, e.g. when a message will need to be put on a queue for the first time. The connection will always be started in WebSphere MQ’s client mode, there’s no support for connecting in the bindings mode.
Like all Spring Python’s classes WebSphereMQConnectionFactory can be configured using pure Python or you can use Spring Python’s IoC to separate your business code from configuration. Using IoC has an added benefit of taking care of destroying any open queues and closing the connection when the IoC shuts down - we’ll get to it in a moment.
WebSphereMQConnectionFactory provides several options that let you customize its behaviour and apart from the obvious ones which you must provide (like, the queue manager’s host) all other options have sensible defaults which you’ll rarely need to change, if at all.
Here’s a full initializer method reproduced for convenience and the explanation of default values used:
def __init__(self, queue_manager=None, channel=None, host=None, listener_port=None,
        cache_open_send_queues=True, cache_open_receive_queues=True,
        use_shared_connections=True, dynamic_queue_template="SYSTEM.DEFAULT.MODEL.QUEUE",
        ssl=False, ssl_cipher_spec=None, ssl_key_repository=None):
| queue_manager | default: None Must be set manually Name of the queue manager, e.g. EAI.QM.1 |
| channel | default: None Must be set manually Name of a server connection (SVRCONN) channel through which the connection will be established, e.g. EAI.SVRCONN.1 |
| host | default: None Must be set manually Host name or IP on which the queue manager is running, e.g. 192.168.1.103 |
| listener_port | default: None Must be set manually Port on which the queue manager’s listener is accepting TCP connections, e.g. 1434 |
| cache_open_send_queues | default: True By default, WebSphereMQConnectionFactory will keep references to open queues in a cache for later re-use. This speeds-up most operations as there’s usually no need for closing a queue if it’s going to be used in subsequent calls to queue manager. At times however, it’s prefered to close the queues as soon as possible and cache_open_send_queues controls whether queues open for putting the messages on are to be kept in the cache. |
| cache_open_receive_queues | default: True This setting controls whether queues open for receving of messages should be kept in a cache. If set to False, they will be closed after the call to get a message off the queue will have finished. |
| use_shared_connections | default: True A single WebSphereMQConnectionFactory object may be shared between multiple threads to provide better performance. This setting allows for marking the underlying connection to a queue manager as a non-shareable and makes sure that only one thread will be able to use it, any call to the factory from a thread that didn’t open the connection will result in a springpython.jms.JMSException being raised. The setting should only set to False when connecting to queue managers running on z/OS systems as it otherwise can hurt the performance of multi-threaded applications. It has no impact on performance of single-threaded applications. |
| dynamic_queue_template | default: SYSTEM.DEFAULT.MODEL.QUEUE The name of a model queue basing on which the dynamic queues will be created. It is usually desirable to override the default value as, unless customized, SYSTEM.DEFAULT.MODEL.QUEUE is a non-shared (NOSHARE in MQ speak) queue and doesn’t allow for opening the dynamic queues for both sending and receiving. |
| ssl | default: False A boolean value which indicates whether connections to the queue manager should use a client SSL/TLS certificate. ssl_cipher_spec and ssl_key_repository must also be provided if ssl is True. |
| ssl_cipher_spec | default: None An SSL/TLS cipher spec to use for encrypted connections, its value must be equal to that of the MQ SVRCONN channel’s SSLCIPH attribute. |
| ssl_key_repository | default: None On-disk location of an SSL/TLS client certificates repository. The repository must be of type CMS, such a repository can be created using gsk6cmd/gsk7cmd command line tools. Note that the value of this attribute must not contain a suffix; for instance, if there are following files in /var/mqm/security: client-repo.crl, client-repo.kdb, client-repo.rdb and client-repo.sth, then ssl_key_repository must be set to “/var/mqm/security/client-repo”. |
Here’s an example of programatically creating a WebSphereMQConnectionFactory object:
from springpython.jms.factory import WebSphereMQConnectionFactory

qm_name = "QM.1"
channel = "SVRCONN.1"
host = "192.168.1.121"
listener_port = "1434"

factory = WebSphereMQConnectionFactory(qm_name, channel, host, listener_port)

# ... use factory here.

# Always destroy the factory when not using an IoC container.
factory.destroy()
An example of using YamlConfig for configuring WebSphereMQConnectionFactory inside of an IoC container:
objects:
    - object: MyConnectionFactory
      class: springpython.jms.factory.WebSphereMQConnectionFactory
      properties:
          queue_manager: QM.1
          channel: SVRCONN.1
          host: 192.168.1.121
          listener_port: "1434"
All cached queues will not be closed by a factory until after its .destroy will have been called which will happen automatically if you’re using an IoC container. If the factory is configured programatically in Python you must call .destroy yourself in your code. A call to .destroy also closes the factory’s connection to a queue manager.
WebSphereMQConnectionFactory objects are thread-safe and may be shared between multiple threads if the queue manager supports sharing a single connection which is the case on all platforms except for z/OS.
Note
For the curious one
springpython.jms.factory.WebSphereMQConnectionFactory and springpython.jms.factory.MQRFH2JMS wrap the WebSphere MQ’s native MQRFH2 wire-level format in a set of Python classes and hide any intricate details of communicating with queue managers. From the programmer’s viewpoint, MQRFH2JMS is irrelevant, however it might be of interest to anyone willing to improve or expand Spring Python’s JMS support.
9.5. JmsTemplate
springpython.jms.core.JmsTemplate is the class to use for sending JMS messages; along with SimpleMessageListenerContainer it may also be used in order to receive them. A template must be associated with a connection factory and once configured, may be used for communicating in both directions. It’s up to you to decide whether in your circumstances it makes sense to reuse a single template for all communications, to have a single template for each queue involved or perhaps to use separate, dedicated, templates, one for sending and one for receiving. Note however that JmsTemplate instances are not guaranteed to be thread-safe and no attempt has been made to make them be so.
Remember that factories postpone connecting to a queue manager and creating a JmsTemplate instance doesn’t necessarily mean there will be no connection errors when it will be first time used for sending or receiving.
Here’s how a JmsTemplate may be instantiated using Python code:
from springpython.jms.core import JmsTemplate
from springpython.jms.factory import WebSphereMQConnectionFactory

qm_name = "QM.1"
channel = "SVRCONN1.1"
host = "192.168.1.121"
listener_port = "1434"

factory = WebSphereMQConnectionFactory(qm_name, channel, host, listener_port)
jms_template = JmsTemplate(factory)

# Always destroy the factory when not using IoC
factory.destroy()
An example of using YamlConfig to configure a JmsTemplate:
objects:
    - object: MyConnectionFactory
      class: springpython.jms.factory.WebSphereMQConnectionFactory
      properties:
          queue_manager: QM.1
          channel: SVRCONN.1
          host: 192.168.1.121
          listener_port: "1434"

    - object: jms_template
      class: springpython.jms.core.JmsTemplate
      properties:
          factory: {MyConnectionFactory}
JmsTemplate allows for a number of options to customize its behaviour. The only options required to set manually is the factory parameter. Except for factory, all the parameters may be overriden by individual calls to sending or receiving of messages:
def __init__(self, factory=None, delivery_persistent=None,
        priority=None, time_to_live=None, message_converter=None,
        default_destination=None):
| factory | default: None Must be set manually A JMS connection factory associated with this JmsTemplate. |
| delivery_persistent | default: None Tells whether messages sent to a JMS provider are by default persistent. If not set, the persistency of messages is controlled on a per messages basis (and defaults to a persistent delivery). |
| priority | default: None Messages sent to the provider may be of different priority, usually on a scale from 1 to 9. The setting controls the default priority of all messages sent by this JmsTemplate, unless overridden by individual messages. A JMS provider will set the default priority if no value is given here or when sending the individual messages. |
| time_to_live | default: None JMS allows for expiry of messages after a certain time expressed in milliseconds. The time to live of a message may be set here and it will be applied to all messages sent or can be set per each message sent. If no value is provided here and when sending the message to a destination, the message expiry time is left to the discretion of a JMS provider. |
| message_converter | default: None It is sometimes desirable to not have to deal with raw messages taken from or sent to JMS provider from within a JmsTemplate object, it may make more sense to delegate converting the objects from and to JMS representation to an external helper class. A message converter is an object that helps decoupling the domain objects from the fact that JMS is the transportation layer used for communicating. A single converter may be used for converting the incoming as well as outgoing messages. See the section on message converters for more details and code examples. Setting the message converter here will take precedence over setting it on a per-message basis. |
| default_destination | default: None It is sometimes desirable to not have to deal with raw messages taken from or sent to JMS provider from within a JmsTemplate object, it may make more sense to delegate converting the objects from and to JMS representation to an external helper class. A message converter is an object that helps decoupling the domain objects from the fact that JMS is the transportation layer used for communicating. A single converter may be used for converting the incoming as well as outgoing messages. See the section on message converters for more details and code examples. Setting the message converter here will take precedence over setting it on a per-message basis. |
9.5.1. Sending
The basic approach is to send ASCII strings or unicode objects, which must allow for encoding into UTF-8:
# -*- coding: utf-8 -*-

from springpython.jms.core import JmsTemplate
from springpython.jms.factory import WebSphereMQConnectionFactory

qm_name = "QM.1"
channel = "SVRCONN.1"
host = "192.168.1.121"
listener_port = "1434"
queue1 = "TEST.1"

# The connection factory we're going to use.
factory = WebSphereMQConnectionFactory(qm_name, channel, host, listener_port)

# Every JmsTemplate uses a connection factory for actually communicating with a JMS provider.
jms_template = JmsTemplate(factory)
jms_template.default_destination = queue1

# Send some ASCII
jms_template.send("Hi, Spring Python here")

# Send unicode
jms_template.send(u"Cześć, z tej strony Spring Python")

# We're not using an IoC so we need to shut down the connection factory ourselves.
factory.destroy()
Note that in an example above the message’s destination has been taken from JmsTemplate. We can also specify it on send time or we can combine both approaches, like here:
# -*- coding: utf-8 -*-

from springpython.jms.core import JmsTemplate
from springpython.jms.factory import WebSphereMQConnectionFactory

qm_name = "QM.1"
channel = "SVRCONN.1"
host = "192.168.1.121"
listener_port = "1434"
queue1 = "TEST.1"
queue2 = "TEST.2"

# The connection factory we're going to use.
factory = WebSphereMQConnectionFactory(qm_name, channel, host, listener_port)

# Every JmsTemplate uses a connection factory for actually communicating with a JMS provider.
jms_template = JmsTemplate(factory)
jms_template.default_destination = queue1

# Send some ASCII to one queue
jms_template.send("Hi, Spring Python here")

# Send unicode to another queue
jms_template.send(u"Cześć, z tej strony Spring Python", queue2)

# We're not using an IoC so we need to shut down the connection factory ourselves.
factory.destroy()
Sending is not limited to strings or unicode objects though. You can customize a lot of message’s properties by sending a springpython.jms.core.TextMessage instead. The following example shows how a custom message ID and reply to destination can be specified for an outgoing message:
# stdlib
from uuid import uuid4

# Spring Python
from springpython.jms.core import JmsTemplate, TextMessage
from springpython.jms.factory import WebSphereMQConnectionFactory

qm_name = "QM.1"
channel = "SVRCONN.1"
host = "192.168.1.121"
listener_port = "1434"
queue1 = "TEST.1"

# The connection factory we're going to use.
factory = WebSphereMQConnectionFactory(qm_name, channel, host, listener_port)

# Every JmsTemplate uses a connection factory for actually communicating with a JMS provider.
jms_template = JmsTemplate(factory)
jms_template.default_destination = queue1

# Generate the correlation ID
jms_correlation_id = uuid4().hex

message = TextMessage("Hi, Spring Python here")
message.jms_correlation_id = jms_correlation_id
message.jms_reply_to = "REPLY.TO.QUEUE"

# Send the message
jms_template.send(message)

# We're not using an IoC so we need to shut down the connection factory ourselves.
factory.destroy()
Using TextMessage instances instead of plain strings or unicode objects is also recommended when you’re interested in values a JMS provider has given to JMS properties of a message after the message had been sent. Here you can see the values which were assigned automatically by the provider to jms_timestamp and jms_message_id properties:
from springpython.jms.core import JmsTemplate, TextMessage
from springpython.jms.factory import WebSphereMQConnectionFactory

qm_name = "QM.1"
channel = "SVRCONN.1"
host = "192.168.1.121"
listener_port = "1434"
queue1 = "TEST.1"

# The connection factory we're going to use.
factory = WebSphereMQConnectionFactory(qm_name, channel, host, listener_port)

# Every JmsTemplate uses a connection factory for actually communicating with a JMS provider.
jms_template = JmsTemplate(factory)
jms_template.default_destination = queue1

# Create a TextMessage instance.
message = TextMessage("Hi, Spring Python here")

# Send the message
jms_template.send(message)

print "jms_timestamp = %s" % message.jms_timestamp
print "jms_message_id = %s" % message.jms_message_id

# We're not using an IoC so we need to shut down the connection factory ourselves.
factory.destroy()

#
# Shows the following here:
#
# $ python jms_properties_overriding.py
# jms_timestamp = 1255885622380
# jms_message_id = ID:414d5120514d2e312020202020202020283cdb4a02220020
# $
Take a look here for more information about how to use TextMessages.
9.5.2. Receiving
The same JmsTemplate instance may be used for both sending and receiving of messages. When you receive messages you may optionally provide a timeout value in milliseconds after exceeding which a springpython.jms.NoMessageAvailableException will be raised if no message will have been available for a given JMS destination. Default timeout is 1000 milliseconds.
JmsTemplate may use a default JMS destination for each call to .receive or you can explicitly specify the destination’s name when you receive messages:
from springpython.jms.core import JmsTemplate, TextMessage
from springpython.jms.factory import WebSphereMQConnectionFactory

qm_name = "QM.1"
channel = "SVRCONN.1"
host = "192.168.1.121"
listener_port = "1434"
queue1 = "TEST.1"
queue2 = "TEST.2"

# The connection factory we're going to use.
factory = WebSphereMQConnectionFactory(qm_name, channel, host, listener_port)

# Every JmsTemplate uses a connection factory for actually communicating with a JMS provider.
jms_template = JmsTemplate(factory)
jms_template.default_destination = queue1

# Send a message to the first queue which is a default destination ..
jms_template.send("Hi there!")

# .. and now receive it.
print jms_template.receive()

# Now send a message to the second one ..
jms_template.send("Hi there again!", queue2)

# .. and now receive it ..
print jms_template.receive(queue2)

# .. try to receive a message again, this time requesting a timeout of 2 seconds.
print jms_template.receive(queue2, 2000)

# We're not using an IoC so we need to shut down the connection factory ourselves.
factory.destroy()
Note that SimpleMessageListenerContainer provides a complementary way for receiving the messages, particularly well suited for long-running processes, such as servers.
9.5.3. Dynamic queues
A dynamic queue is a usually short-lived object created on-demand by JMS applications, most often found in request-reply scenarios when there’s no need for the response to be persistently stored. An application initiating the communication will create a dynamic temporary queue, send the request to the other side providing the name of the dynamic queue as a destination for the responses to be sent to and wait for a certain amount of time. With Spring Python and WebSphere MQ, the requesting side must then explicitly close the dynamic queue regardless of whether the response will be received or if the request timeouts.
The following example shows two JmsTemplate objects communicating via a dynamic queue and imitating an exchange of messages between two dispersed applications. You can observe than from the responding application’s point of view a dynamic queue’s name is like any other queue’s name, the application doesn’t need to be - and indeed isn’t - aware that it’s responding to a dynamic queue and not to a predefined one. For the requesting end a dynamic queue is also like a regular queue in that its name must be provided to the JmsTemplate’s .receive method. Note that WebSphere MQ allows only non-persistent messages to be put on temporary dynamic queues which are the kind of dynamic queues you get by default with Spring Python:
from springpython.jms import DELIVERY_MODE_NON_PERSISTENT
from springpython.jms.core import JmsTemplate, TextMessage
from springpython.jms.factory import WebSphereMQConnectionFactory

qm_name = "QM.1"
channel = "SVRCONN.1"
host = "192.168.1.121"
listener_port = "1434"

exchange_queue = "TEST.1"

# The connection factory we're going to use.
factory = WebSphereMQConnectionFactory(qm_name, channel, host, listener_port)

requesting_side = JmsTemplate(factory)
requesting_side.default_destination = exchange_queue

responding_side = JmsTemplate(factory)
responding_side.default_destination = exchange_queue

# Create a dynamic queue.
dyn_queue_name = requesting_side.open_dynamic_queue()

# Note that we wrap the whole conversation in a try/finally block as we must
# always close a WebSphere MQ dynamic queue.

try:
    # Create a request message.
    message = TextMessage("Hey, what's up on the other side?")

    # WebSphere MQ messages sent to dynamic temporary queues must not
    # be persistent.
    message.jms_delivery_mode = DELIVERY_MODE_NON_PERSISTENT

    # Tell the other side where to send responses.
    message.jms_reply_to = dyn_queue_name

    # Send the request
    requesting_side.send(message)

    # Receive the request ..
    request = responding_side.receive()

    # .. prepare the response ..
    response = TextMessage("A bit stormy today!")
    response.jms_delivery_mode = DELIVERY_MODE_NON_PERSISTENT

    # .. and send our response to a jms_reply_to destination which as we know
    # is a dynamic queue in this example.
    responding_side.send(response, request.jms_reply_to)

    # Receive the response. It's being read as usual, as from any other queue,
    # there's no special JmsTemplate's method for getting messages
    # off dynamic queues.
    print requesting_side.receive(dyn_queue_name)

finally:
    requesting_side.close_dynamic_queue(dyn_queue_name)

# We're not using an IoC so we need to shut down the connection factory ourselves.
factory.destroy()
It’s worth mentioning again that you must close WebSphere MQ dynamic queues yourself as Spring Python won’t do that for you - it’s a slight deviation from how Java JMS works.
9.5.4. Message converters
It’s quite possible that you’ll like to separate the code responsible for core JMS communication with outside systems from the logic needed for converting your business domain’s objects back and forth to strings needed for passing into JmsTemplate’s methods. You may utilize your own converting classes for it or you can use the Spring Python’s converters for such a work. A converter is a subclass of springpython.jms.core.MessageConverter which must implement at least one of the to_message or from_message methods. There’s nothing magical about MessageConverter objects and they won’t do any automatic convertions for you, they’re just interfaces you can implement as you’ll likely need some sort of separation between the objects you deal with and the JMS API.
There’s one difference you must take into account when using message converters - you don’t use the standard send and receive methods but dedicated convert_and_send and receive_and_convert ones. Other than that, the JMS API and features are exactly the same.
The code below shows a sample usage of MessageConverters. Note that you don’t need to implement both to_message and from_message if that’s not appropriate in your situation however it makes sense for the example below to handle requests and responses using only one converter object:
from springpython.jms.factory import WebSphereMQConnectionFactory
from springpython.jms.core import JmsTemplate, MessageConverter, TextMessage

qm_name = "QM.1"
channel = "SVRCONN.1"
host = "192.168.1.121"
listener_port = "1434"

# Note that it's the same queue so we're going to later receive the same invoice we sent.
request_queue = response_queue = "TEST.1"

# One of the business domain's objects our application deals with.
class Invoice(object):
    def __init__(self, customer_account_id=None, month=None, amount=None):
        self.customer_account_id = customer_account_id
        self.month = month
        self.amount = amount

    def __str__(self):
        return "<%s at %s, customer_account_id=%s, month=%s, amount=%s>" % (
            self.__class__.__name__, hex(id(self)), self.customer_account_id,
            self.month, self.amount)

# Let's imagine the other side of a JMS link wants to receive and send CSV data.
class InvoiceConverter(MessageConverter):

    def to_message(self, invoice):
        """ Converts a business object to CSV.
        """
        text = ";".join((invoice.customer_account_id, invoice.month, invoice.amount))

        return TextMessage(text)

    def from_message(self, message):
        """ Produces a business object out of CSV data.
        """

        customer_account_id, month, amount = message.text.split(";")

        invoice = Invoice()
        invoice.customer_account_id = customer_account_id
        invoice.month = month
        invoice.amount = amount

        return invoice

# The connection factory we're going to use.
factory = WebSphereMQConnectionFactory(qm_name, channel, host, listener_port)

# Our JmsTemplate.
jms_template = JmsTemplate(factory)

# Here we tell the template to use our converter.
invoice_converter = InvoiceConverter()
jms_template.message_converter = invoice_converter

# See how we're now dealing only with business objects at the JmsTemplate level.

invoice = Invoice("00033010118", "200909", "136.32")
jms_template.convert_and_send(invoice, request_queue)

print jms_template.receive_and_convert(response_queue)

# We're not using an IoC so we need to shut down the connection factory ourselves.
factory.destroy()
9.6. SimpleMessageListenerContainer and background JMS listeners
springpython.jms.listener.SimpleMessageListenerContainer is a configuration-driven component which is used to receive messages from JMS destinations. Once configured, the container starts as many background listeners as requested and each listener gets assigned a pool of threads to handle the incoming requests. The number of listeners started and threads in a pool is fixed upon the configuration is read and the container is started, they cannot be dynamically altered in runtime.
The advantage of using SimpleMessageListenerContainer comes from the fact that all you need to do in order to receive the messages is to create your own handler class and to configure the container, no JMS coding is required so you’re focusing on creating the business logic, not on the JMS boilerplate.
| factory | default: None Must be set manually A reference to a JMS connection factory. |
| destination | default: None Must be set manually Name of a JMS destination to read the messages off. |
| handler | default: None Must be set manually A reference to an object which will be receiving messages read from the JMS destination. A handler must implement handle(self, message) method, of which the message argument is a TextMessage instance. There is a convenience class, springpython.jms.listener.MessageHandler, which exposes such a method. The exact number of handlers available for message processing is controlled via the handlers_per_listener property. |
| factory | default: 1 Sets a number of background processes that connect to a JMS provider and read messages off the destination. |
| handlers_per_listener | default: 2 Sets a number of background processes that connect to a JMS provider and read messages off the destination. |
| wait_interval | default: 1000 (1 second) A value in milliseconds expressing how often each of the listeners will check for the arrival of a new message. |
Here’s an example showing SimpleMessageListenerContainer in action together with YamlConfig’s abstract objects definitions. customer_queue, credit_account_queue and deposit_account_queue subclass the listener_container object which holds the information common to all definitions of JMS destinations. 4 listeners will be assigned to each of the JMS destination, every listener will be assigned a pool of 5 threads for handling the messages read; a wait interval of 700 milliseconds has been set:
objects:
    - object: connection_factory
      class: springpython.jms.factory.WebSphereMQConnectionFactory
      properties:
          queue_manager: QM.1
          channel: SVRCONN.1
          host: 192.168.1.121
          listener_port: "1434"

    - object: message_handler
      class: app.MyMessageHandler

    - object: listener_container
      abstract: True
      class: springpython.jms.listener.SimpleMessageListenerContainer
      concurrent_listeners: "4"
      handlers_per_listener: "5"
      wait_interval: "700"
      properties:
          factory: {ref: connection_factory}
          handler: {ref: message_handler}

    - object: customer_queue
      parent: listener_container
      properties:
          destination: CUST.QUEUE.1

    - object: credit_account_queue
      parent: listener_container
      properties:
          destination: CREDACCT.QUEUE.1

    - object: deposit_account_queue
      parent: listener_container
      properties:
          destination: DEPACCT.QUEUE.1
Here’s a Python code using the above IoC configuration. Note that the fact of reading a configuration alone suffices for JMS listeners to be started and run in the background of the main application:
# app.py

from springpython.config import YamlConfig
from springpython.context import ApplicationContext

class MyMessageHandler(object):
    def handle(self, message):
        print "Got message!", message

if __name__ == "__main__":

    # Obtaining a context will automatically start the SimpleMessageListenerContainer
    # and its listeners in background.
    container = ApplicationContext(YamlConfig("./context.yml"))

    while True:
        # Here goes the main application's logic, which does nothing in this case.
        # However, the listeners have been already started and incoming messages
        # will be passed in to MyMessageHandler instance (as configured in YamlConfig).
        pass
9.7. TextMessage
springpython.jms.core.TextMessage objects encapsulate the data being sent to or received from a JMS provider. Even if you use the plain jms_template.send(“Foobar”) to send an ordinary text, there’s still a TextMessage instance created automatically underneath for you.
If all you need from JMS is simply to send and receive some text then you’re not likely to be required to use TextMessages. However, if you have to set or read JMS attributes or you’re interested in setting custom JMS properties then TextMessage is what you’re looking for.
In Spring Python there are no clumsy setters and getters as in Java JMS. If you need to set the property of a message, you just write it, like for instance message.jms_correlation_id = “1234567”. Here’s the list of all TextMessage’s attributes along with their explanation and usage notes.
| text | The message contents, the actual business payload carried by a message. May be both read and written to. For messages sent to a JMS provider it must be either a string or a unicode object encodable into UTF-8. The following two code snippets are equivalent: message = TextMessage("Hey")
message = TextMessage()
message.text = "Hey"
Here’s how to get the content of a message received by a JmsTemplate: # .. skip creating the connection factory and a JmsTemplate
message = jms_template.receive()
print message.text
|
| jms_correlation_id | Equivalent to Java’s JMSCorrelationID message header. It must be a string instance when set manually - a good way to produce correlation identifiers is to use the Python’s uuid4 type, e.g.: # stdlib
from uuid import uuid4
# Spring Python
from springpython.jms.core import TextMessage
# Prapare the JMS correlation ID
jms_correlation_id = uuid4().hex
message = TextMessage("Howdy")
message.jms_correlation_id = jms_correlation_id
# Now the message will be sent with a JMS correlation ID such as
# 6f5b070bb0ed472bbe63d511776bb1dc which is a 128 bits long ID.
|
| jms_delivery_mode | Equivalent to Java’s JMSDeliveryMode, can be both read and written to and must be equal to one of the following values springpython.jms.DELIVERY_MODE_NON_PERSISTENT, springpython.jms.DELIVERY_MODE_PERSISTENT or springpython.jms.DEFAULT_DELIVERY_MODE. The default value - DEFAULT_DELIVERY_MODE- equals to DELIVERY_MODE_PERSISTENT. |
| jms_destination | Equivalent to Java’s JMSDestination, automatically populated by JmsTemplate objects on send or receive time. May be read from but must not be set manually. |
| jms_expiration | Same as Java’s JMSExpiration - allow for a message to expire after a certain amount of time. The value is automatically set by JmsTemplate for received messages. For messages being sent the time expressed is in milliseconds, as in the following code: message = TextMessage("I will expire in half a second")
# Set the message's expiration time to 500 ms
message.jms_expiration = 500
|
| jms_message_id | Same as Java’s JMSMessageID. Automatically set by JmsTemplate for received messages, may be set manually but the value will be ignored by the JMS provider. |
| jms_redelivered | Same as Java’s JMSRedelivered header. Should not be set manually. Default value for incoming messages is False; for messages received from WebSphere MQ (which is currently the only supported JMS provider) it will be True if the underlying MQ message’s BackoutCount attribute is 1 or greater. |
| jms_reply_to | Equivalent to Java’s JMSReplyTo, the name of a JMS destination to which responses to the currently sent message should be delivered: message = TextMessage("Please, reply to me.")
# Set the reply to queue
message.jms_reply_to = "REPLY.TO.QUEUE.1"
See here for an example of how to use jms_reply_to in request/reply scenarios. |
| jms_timestamp | Same as Java’s JMSTimestamp, the timestamp of a message returned as a number of milliseconds with a centiseconds precision. Should not be set manually. |
| max_chars_printed | Specifies how many characters of the business payload (the .text attribute) will be returned by the TextMessage instance’s __str__ method, which is used, for instance, for logging purposes. Default value is 100 characters. Consider the code below, in both cases the message’s content is the same, the messages differ only by the value of the max_chars_printed attribute: # Spring Python
from springpython.jms.core import TextMessage
payload = "Business payload. " * 8
msg = TextMessage(payload)
msg.max_chars_printed = 50
print msg
JMS message class: jms_text
  jms_delivery_mode:  2
  jms_expiration:     None
  jms_priority:       None
  jms_message_id:     None
  jms_timestamp:      None
  jms_correlation_id: None
  jms_destination:    None
  jms_reply_to:       None
  jms_redelivered:    None
Business payload. Business payload. Business paylo
Another 94 character(s) omitted
# Spring Python
from springpython.jms.core import TextMessage

payload = "Business payload. " * 8

msg = TextMessage(payload)
msg.max_chars_printed = 20

print msg
JMS message class: jms_text
  jms_delivery_mode:  2
  jms_expiration:     None
  jms_priority:       None
  jms_message_id:     None
  jms_timestamp:      None
  jms_correlation_id: None
  jms_destination:    None
  jms_reply_to:       None
  jms_redelivered:    None
Business payload. Bu
Another 124 character(s) omitted
|
Attributes shown in the table above are standard JMS headers, available regardless of the JMS provider used. For WebSphereMQ - which is currently the only JMS provider supported by Spring Python - following attributes are also available: JMS_IBM_Report_Exception, JMS_IBM_Report_Expiration, JMS_IBM_Report_COA, JMS_IBM_Report_COD, JMS_IBM_Report_PAN, JMS_IBM_Report_NAN, JMS_IBM_Report_Pass_Msg_ID, JMS_IBM_Report_Pass_Correl_ID, JMS_IBM_Report_Discard_Msg, JMSXGroupID, JMSXGroupSeq, JMS_IBM_Feedback, JMS_IBM_Last_Msg_In_Group, JMSXUserID, JMS_IBM_PutTime, JMS_IBM_PutDate and JMSXAppID. Refer to the IBM’s Java JMS documentation for info on how to use them.
Creating custom JMS properties is simply a matter of assigning a value to an attribute, there are no special methods such as setStringProperty/getStringProperty which are used in Java JMS, thus the following code will create a custom MESSAGE_NAME property which can be read by getStringProperty on the Java side:
# Spring Python
from springpython.jms.core import TextMessage

msg = TextMessage("Hello!")
msg.MESSAGE_NAME = "HelloRequest"
Observe how custom properties will be printed to the console along with standard JMS headers:
# Spring Python
from springpython.jms.core import TextMessage

msg = TextMessage("Hello!")
msg.MESSAGE_NAME = "HelloRequest"
msg.CLIENT = "CRM"
msg.CUSTOMER_ID = "201888228"

print msg
JMS message class: jms_text
  jms_delivery_mode:  2
  jms_expiration:     None
  jms_priority:       None
  jms_message_id:     None
  jms_timestamp:      None
  jms_correlation_id: None
  jms_destination:    None
  jms_reply_to:       None
  jms_redelivered:    None
  CLIENT:CRM
  CUSTOMER_ID:201888228
  MESSAGE_NAME:HelloRequest
Hello!
Not all TextMessage’s attributes can be set to a custom value, the exact list of reserved attributes’ names is available as springpython.jms.core.reserved_attributes. There’s a very slim chance you’ll ever encounter the conflict with your application’s message attributes, nevertheless be sure to check the list before using custom JMS properties in your code.
9.8. Exceptions
springpython.jms.JMSException is the base exception class for all JMS-related issues that may be raised by Spring Python’s JMS and a pair of its specialized subclasses is also available: springpython.jms.NoMessageAvailableException and springpython.jms.WebSphereMQJMSException.
NoMessageAvailableException is raised when a call to receive or receive_and_convert timeouts, which indicates that there’s no message available for a given JMS destination.
WebSphereMQJMSException is raised when the underlying error is known to be caused by a call to WebSphere MQ API, such as a call to connect to a queue manager. Spring Python tries to populate these attributes of a WebSphereMQJMSException object when an error condition arises:
- message - a descriptive information of what has happened; taken either from an exception raised deeper in a call stack or an explanation from Spring Python itself,
- completion_code - an integer code returned by the call a queue manager, may be either 1 (a warning) or 2 (an error), it’s known as an MQCC in WebSphere MQ,
- reason_code - an integer code, as returned by the queue manager, giving a reason for the failure, known as MQRC in WebSphere MQ lingo. The meaning may be looked up in the IBM’s “WebSphere MQ Constants” manual.
Note that message, completion_code and reason_code are all optional and there’s no guarantee they will be actually returned. Should you caught a WebSphereMQJMSException, you should always check for their existence before making any use of them.
9.9. Logging and troubleshooting
Spring Python’s JMS uses standard Python’s logging module for emitting the messages. In general, you can expect JMS to behave sane, it won’t overflow your logs with meaningless entries, e.g. if you configure it to log the messages at the ERROR level then you’ll be notified of only truly erratic situtations.
In addition to logging’s builtin levels, JMS uses one custom level - springpython.util.TRACE1, enabling TRACE1 will degrade the performance considerably and will result in a huge number of messages written to the logs. Use it sparingly at troubleshooting times when you’d like to see the exact flow of messages, raw bytes and JMS headers passing by the Spring Python’s JMS classes involved. Do not ever enable it in production environments unless you have a very compelling reason and you’re sure you’re comfortable with paying the performance penalty. Consider using the logging.DEBUG level instead of TRACE1 if all you’re after is simply seeing the messages’ payload.
JMS loggers currently employed by Spring Python are springpython.jms.factory.WebSphereMQConnectionFactory, springpython.jms.listener.SimpleMessageListenerContainer and springpython.jms.listener.WebSphereMQListener(LISTENER_INSTANCE_ID).
Here’s how the WebSphere MQ connection factory’s logger can be configured to work at the INFO level:
# stdlib
import logging

log_format = "%(asctime)s - %(levelname)s - %(process)d - %(threadName)s - %(name)s - %(message)s"
formatter = logging.Formatter(log_format)

handler = logging.StreamHandler()
handler.setFormatter(formatter)

jms_logger = logging.getLogger("springpython.jms.factory.WebSphereMQConnectionFactory")

jms_logger.setLevel(level=logging.INFO)
jms_logger.addHandler(handler)
Here’s how to configure it to log messages at the TRACE1 level:
# stdlib
import logging

# Spring Python
from springpython.util import TRACE1

log_format = "%(asctime)s - %(levelname)s - %(process)d - %(threadName)s - %(name)s - %(message)s"
formatter = logging.Formatter(log_format)

handler = logging.StreamHandler()
handler.setFormatter(formatter)

jms_logger = logging.getLogger("springpython.jms.factory.WebSphereMQConnectionFactory")

jms_logger.setLevel(level=TRACE1)
jms_logger.addHandler(handler)
springpython.jms.listener.SimpleMessageListenerContainer is the logger used by the JMS listener container itself.
Each WebSphere MQ listener is assigned a springpython.jms.listener.WebSphereMQListener(LISTENER_INSTANCE_ID) logger, where LISTENER_INSTANCE_ID is an identifier uniquely associated with a listener to form a full name of a logger, such as springpython.jms.listener.WebSphereMQListener(0xc7f5e0). To be precise, its value is obtained by invoking hex(id(self)) on the listener’s instance. Note that the value is not guaranteed to be globally unique, it’s just an identifier of the Python object so its value may be very well reused across application’s restarts.
How much information is being logged depends on the logging level, the average message size, the messages’ max_chars_printed attribute value and the message rate.
Here’s an estimation of how fast log files will grow depending on the logging level. During the test, the message size was 5kB, there were a total of 10,000 messages sent, the max_chars_printed attribute had value of 100 and the log entries were written to an ordinary log file:
- ERROR - 0KB, no errors were encountered thus no entries were written to the log file,
- INFO - 0.9KB, only very basic info was logged, such as events of connecting to and disconnecting from a JMS provider,
- DEBUG - 7,3MB, up to the max_chars_printed characters of each message were written to the file plus all of JMS headers and some additional info as well,
- TRACE1 - 79MB, full trace was taken which resulted in the log file’s growing more than tenfold as compared to the DEBUG level.
Table Of Contents
- 9. JMS Messaging
Previous topic
Next topic
10. Spring Python’s plugin system