Spring Batch 2.0.4.RELEASE
- 1. Spring Batch Introduction
- 2. What's New in Spring Batch 2.0
- 3. The Domain Language of Batch
- 4. Configuring and Running a Job
- 5. Configuring a Step
- 5.1. Chunk-Oriented Processing
- 5.1.1. Configuring a Step
- 5.1.2. Referencing a Standalone Step
- 5.1.3. Inheriting from a Parent Step
- 5.1.4. The Commit Interval
- 5.1.5. Configuring a Step for Restart
- 5.1.6. Configuring Skip Logic
- 5.1.7. Configuring Fatal Exceptions
- 5.1.8. Configuring Retry Logic
- 5.1.9. Controlling Rollback
- 5.1.10. Transaction Attributes
- 5.1.11. Registering ItemStreams with the Step
- 5.1.12. Intercepting Step Execution
- 5.2. TaskletStep
- 5.3. Controlling Step Flow
- 5.4. Late Binding of Job and Step Attributes
- 6. ItemReaders and ItemWriters
- 6.1. ItemReader
- 6.2. ItemWriter
- 6.3. ItemProcessor
- 6.4. ItemStream
- 6.5. The Delegate Pattern and Registering with the Step
- 6.6. Flat Files
- 6.6.1. The FieldSet
- 6.6.2. FlatFileItemReader
- 6.6.2.1. LineMapper
- 6.6.2.2. LineTokenizer
- 6.6.2.3. FieldSetMapper
- 6.6.2.4. DefaultLineMapper
- 6.6.2.5. Simple Delimited File Reading Example
- 6.6.2.6. Mapping Fields by Name
- 6.6.2.7. Automapping FieldSets to Domain Objects
- 6.6.2.8. Fixed Length File Formats
- 6.6.2.9. Multiple Record Types within a Single File
- 6.6.2.10. Exception Handling in Flat Files
- 6.6.3. FlatFileItemWriter
- 6.7. XML Item Readers and Writers
- 6.8. Multi-File Input
- 6.9. Database
- 6.10. Reusing Existing Services
- 6.11. Validating Input
- 6.12. Preventing State Persistence
- 6.13. Creating Custom ItemReaders and ItemWriters
- 7. Scaling and Parallel Processing
- 8. Repeat
- 9. Retry
- 10. Unit Testing
- 11. Common Batch Patterns
- A. List of ItemReaders and ItemWriters
- B. Meta-Data Schema
- Glossary
Many applications within the enterprise domain require bulk processing to perform business operations in mission critical environments. These business operations include automated, complex processing of large volumes of information that is most efficiently processed without user interaction. These operations typically include time based events (e.g. month-end calculations, notices or correspondence), periodic application of complex business rules processed repetitively across very large data sets (e.g. Insurance benefit determination or rate adjustments), or the integration of information that is received from internal and external systems that typically requires formatting, validation and processing in a transactional manner into the system of record. Batch processing is used to process billions of transactions every day for enterprises.
Spring Batch is a lightweight, comprehensive batch framework designed to enable the development of robust batch applications vital for the daily operations of enterprise systems. Spring Batch builds upon the productivity, POJO-based development approach, and general ease of use capabilities people have come to know from the Spring Framework, while making it easy for developers to access and leverage more advance enterprise services when necessary. Spring Batch is not a scheduling framework. There are many good enterprise schedulers available in both the commercial and open source spaces such as Quartz, Tivoli, Control-M, etc. It is intended to work in conjunction with a scheduler, not replace a scheduler.
Spring Batch provides reusable functions that are essential in processing large volumes of records, including logging/tracing, transaction management, job processing statistics, job restart, skip, and resource management. It also provides more advance technical services and features that will enable extremely high-volume and high performance batch jobs though optimization and partitioning techniques. Simple as well as complex, high-volume batch jobs can leverage the framework in a highly scalable manner to process significant volumes of information.
While open source software projects and associated communities have focused greater attention on web-based and SOA messaging-based architecture frameworks, there has been a notable lack of focus on reusable architecture frameworks to accommodate Java-based batch processing needs, despite continued needs to handle such processing within enterprise IT environments. The lack of a standard, reusable batch architecture has resulted in the proliferation of many one-off, in-house solutions developed within client enterprise IT functions.
SpringSource and Accenture have collaborated to change this. Accenture's hands-on industry and technical experience in implementing batch architectures, SpringSource's depth of technical experience, and Spring's proven programming model together mark a natural and powerful partnership to create high-quality, market relevant software aimed at filling an important gap in enterprise Java. Both companies are also currently working with a number of clients solving similar problems developing Spring-based batch architecture solutions. This has provided some useful additional detail and real-life constraints helping to ensure the solution can be applied to the real-world problems posed by clients. For these reasons and many more, SpringSource and Accenture have teamed to collaborate on the development of Spring Batch.
Accenture has contributed previously proprietary batch processing architecture frameworks, based upon decades worth of experience in building batch architectures with the last several generations of platforms, (i.e., COBOL/Mainframe, C++/Unix, and now Java/anywhere) to the Spring Batch project along with committer resources to drive support, enhancements, and the future roadmap.
The collaborative effort between Accenture and SpringSource aims to promote the standardization of software processing approaches, frameworks, and tools that can be consistently leveraged by enterprise users when creating batch applications. Companies and government agencies desiring to deliver standard, proven solutions to their enterprise IT environments will benefit from Spring Batch.
A typical batch program generally reads a large number of records from a database, file, or queue, processes the data in some fashion, and then writes back data in a modified form. Spring Batch automates this basic batch iteration, providing the capability to process similar transactions as a set, typically in an offline environment without any user interaction. Batch jobs are part of most IT projects and Spring Batch is the only open source framework that provides a robust, enterprise-scale solution.
Business Scenarios
Commit batch process periodically
Concurrent batch processing: parallel processing of a job
Staged, enterprise message-driven processing
Massively parallel batch processing
Manual or scheduled restart after failure
Sequential processing of dependent steps (with extensions to workflow-driven batches)
Partial processing: skip records (e.g. on rollback)
Whole-batch transaction: for cases with a small batch size or existing stored procedures/scripts
Technical Objectives
Batch developers use the Spring programming model: concentrate on business logic; let the framework take care of infrastructure.
Clear separation of concerns between the infrastructure, the batch execution environment, and the batch application.
Provide common, core execution services as interfaces that all projects can implement.
Provide simple and default implementations of the core execution interfaces that can be used ‘out of the box’.
Easy to configure, customize, and extend services, by leveraging the spring framework in all layers.
All existing core services should be easy to replace or extend, without any impact to the infrastructure layer.
Provide a simple deployment model, with the architecture JARs completely separate from the application, built using Maven.
Spring Batch is designed with extensibility and a diverse group of end users in mind. The figure below shows a sketch of the layered architecture that supports the extensibility and ease of use for end-user developers.
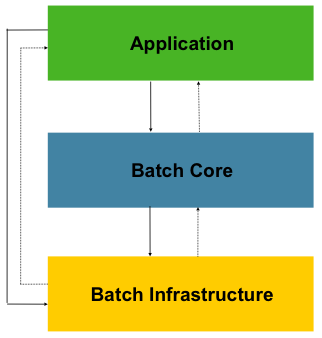
Figure 1.1: Spring Batch Layered Architecture
This layered architecture highlights three major high level
components: Application, Core, and Infrastructure. The application
contains all batch jobs and custom code written by developers using Spring
Batch. The Batch Core contains the core runtime classes necessary to
launch and control a batch job. It includes things such as a
JobLauncher, Job, and
Step implementations. Both Application and Core are
built on top of a common infrastructure. This infrastructure contains
common readers and writers, and services such as the
RetryTemplate, which are used both by application
developers(ItemReader and
ItemWriter) and the core framework itself.
(retry)
The Spring Batch 2.0 release has six major themes:
Java 5
Non Sequential Step Execution
Chunk oriented processing
Meta Data enhancements
Scalability
Configuration
The 1.x releases of Spring Batch were all based on Java 1.4. This
prevented the framework from using many enhancements provided in Java 5
such as generics, parameterized types, etc. The entire framework has been
updated to utilize these features. As a result, Java
1.4 is no longer supported. Most of the interfaces developers
work with have been updated to support generic types. As an example, the
ItemReader interface from 1.1 is below:
public interface ItemReader {

    Object read() throws Exception;

    void mark() throws MarkFailedException;

    void reset() throws ResetFailedException;
}
As you can see, the read method returns an
Object. The 2.0 version is below:
public interface ItemReader<T> {

    T read() throws Exception, UnexpectedInputException, ParseException;

}
As you can see, ItemReader now supports the
generic type, T, which is returned from read. You
may also notice that mark and
reset have been removed. This is due to step
processing strategy changes, which are discussed below. Many other
interfaces have been similarly updated.
Previously, the default processing strategy provided by Spring Batch was item-oriented processing:
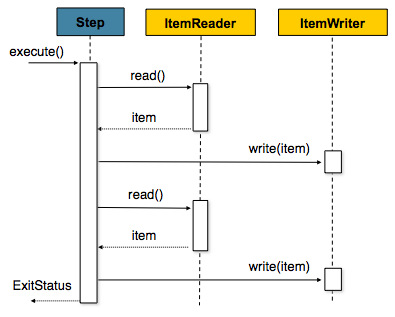 |
In item-oriented processing, the ItemReader
returns one Object (the 'item') which is then
handed to the ItemWriter, periodically committing
when the number of items hits the commit interval. For example, if the
commit interval is 5, ItemReader and
ItemWriter will each be called 5 times. This is
illustrated in a simplified code example below:
for(int i = 0; i < commitInterval; i++){
    Object item = itemReader.read();
    itemWriter.write(item);
}
Both the ItemReader and
ItemWriter interfaces were completely geared toward
this approach:
public interface ItemReader {

    Object read() throws Exception;

    void mark() throws MarkFailedException;

    void reset() throws ResetFailedException;
}
public interface ItemWriter {
void write(Object item) throws Exception;
void flush() throws FlushFailedException;
void clear() throws ClearFailedException;
}Because the 'scope' of the processing was one item, supporting
rollback scenarios required additional methods, which is what
mark, reset,
flush, and clear
provided. If, after successfully reading and writing 2 items, the third
has an error while writing, the transaction would need to be rolled back.
In this case, the clear method on the writer
would be called, indicating that it should clear
its buffer, and reset would be called on the
ItemReader, indicating that it should return back
to the last position it was at when mark was
called. (Both mark and
flush are called on commit)
In 2.0, this strategy has been changed to a chunk-oriented approach:
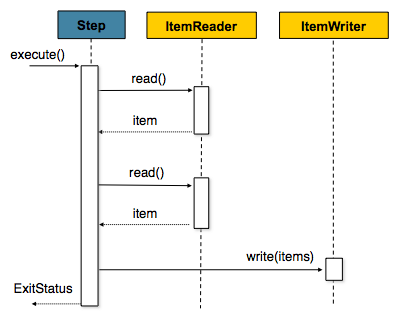 |
Using the same example from above, if the commit interval is five, read will be called 5 times, and write once. The items read will be aggregated into a list, that will ultimately be written out, as the simplified example below illustrates:
List items = new Arraylist();
for(int i = 0; i < commitInterval; i++){
    items.add(itemReader.read());
}
itemWriter.write(items);
This approach not only allows for much simpler processing and
scalability approaches, it also makes the
ItemReader and ItemWriter
interfaces much cleaner:
public interface ItemReader<T> {

    T read() throws Exception, UnexpectedInputException, ParseException;

}
public interface ItemWriter<T> {
void write(List<? extends T> items) throws Exception;
}As you can see, the interfaces no longer contain the
mark, reset,
flush, and clear
methods. This makes the creation of readers and writers much more
straightforward for developers. In the case of
ItemReader, the interface is now forward-only. The
framework will buffer read items for developers in the case of rollback
(though there are exceptions if the underlying resource is transactional
see: Section 5.1.9.1, “Transactional Readers”).
ItemWriter is also simplified, since it gets the
entire 'chunk' of items at once, rather than one at a time, it can decide
to flush any resources (such as a file or hibernate session) before
returning control to the Step. More detailed
information on chunk-oriented processing can be found in Section 5.1, “Chunk-Oriented Processing”. Reader and writer implementation
information can be found in Chapter 6, ItemReaders and ItemWriters.
Previously, Steps had only two
dependencies, ItemReader and
ItemWriter:
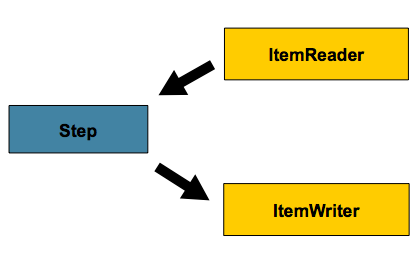
The basic configuration above is fairly robust. However, there are many cases where the item needs to be transformed before writing. In 1.x this can be achieved using the composite pattern:
This approach works. However, it requires an extra layer between
either the reader or the writer and the Step.
Furthermore, the ItemWriter would need to be
registered separately as an ItemStream with the
Step. For this reason, the
ItemTransfomer was renamed to
ItemProcessor and moved up to the same level as
ItemReader and
ItemWriter:
Until 2.0, the only option for configuring batch jobs has been normal spring bean configuration. However, in 2.0 there is a new namespace for configuration. For example, in 1.1, configuring a job looked like the following:
<bean id="footballJob"
class="org.springframework.batch.core.job.SimpleJob">
<property name="steps">
<list>
<!-- Step bean details ommitted for clarity -->
<bean id="playerload"/>
<bean id="gameLoad"/>
<bean id="playerSummarization"/>
</list>
</property>
<property name="jobRepository" ref="jobRepository" />
</bean>In 2.0, the equivalent would be:
<job id="footballJob">
<!-- Step bean details ommitted for clarity -->
<step id="playerload" next="gameLoad"/>
<step id="gameLoad" next="playerSummarization"/>
<step id="playerSummarization"/>
</job>More information on how to configure Jobs and Steps with the new namespace can be found in Chapter 4, Configuring and Running a Job, and Chapter 5, Configuring a Step.
The JobRepository interface represents basic
CRUD operations with Job meta-data. However, it may
also be useful to query the meta-data. For that reason, the
JobExplorer and JobOperator
interfaces have been created:
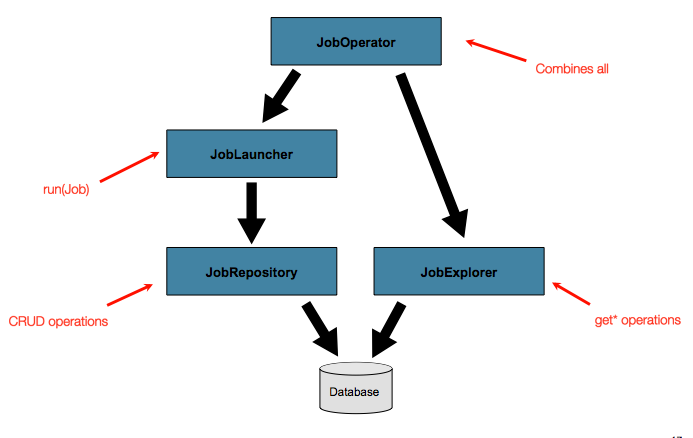
More information on the new meta data features can be found in Section 4.5, “Advanced Meta-Data Usage”. It is also worth noting that Jobs can now
be stopped via the database, removing the requirement to maintain a handle
to the JobExecution on the JVM the job was launched
in.
2.0 has also seen improvements in how steps can be configured. Rather than requiring that they solely be sequential:
They may now be conditional:
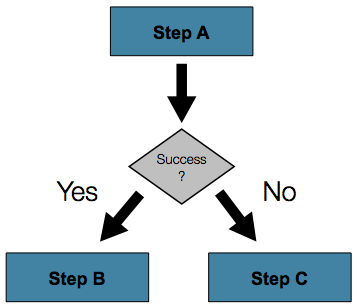
This new 'conditional flow' support is made easy to configure via the new namespace:
<job id="job">
<step id="stepA">
<next on="FAILED" to="stepB" />
<next on="*" to="stepC" />
</step>
<step id="stepB" next="stepC" />
<step id="stepC" />
</job>More details on how to configure non sequential steps can be found in Section 5.3, “Controlling Step Flow”.
Spring Batch 1.x was always intended as a single VM, possibly multi-threaded model, but many features were built into it that support parallel execution in multiple processes. Many projects have successfully implemented a scalable solution relying on the quality of service features of Spring Batch to ensure that processing only happens in the correct sequence. In 2.0 those features have been exposed more explicitly. There are two approaches to scalability: remote chunking, and partitioning.
Remote chunking is a technique for dividing up the work of a step without any explicit knowledge of the structure of the data. Any input source can be split up dynamically by reading it in a single process (as per normal in 1.x) and sending the items as a chunk to a remote worker process. The remote process implements a listener pattern, responding to the request, processing the data and sending an asynchronous reply. The transport for the request and reply has to be durable with guaranteed delivery and a single consumer, and those features are readily available with any JMS implementation. But Spring Batch is building the remote chunking feature on top of Spring Integration, therefore it is agnostic to the actual implementation of the message middleware. More details can be found in Section 7.3, “Remote Chunking”
Partitioning is an alternative approach which in contrast depends on having some knowledge of the structure of the input data, like a range of primary keys, or the name of a file to process. The advantage of this model is that the processors of each element in a partition can act as if they are a single step in a normal Spring Batch job. They don't have to implement any special or new patterns, which makes them easy to configure and test. Partitioning in principle is more scalable than remote chunking because there is no serialization bottleneck arising from reading all the input data in one place.
In Spring Batch 2.0 partitioning is supported by two interfaces:
PartitionHandler and
StepExecutionSplitter. The
PartitionHandler is the one that knows about the
execution fabric - it has to transmit requests to remote steps and
collect the results using whatever grid or remoting technology is
available. PartitionHandler is an SPI, and Spring
Batch provides one implementation out of the box for local execution
through a TaskExecutor. This will be useful
immediately when parallel processing of heavily IO bound tasks is
required, since in those cases remote execution only complicates the
deployment and doesn't necessarily help much with the performance. Other
implementations will be specific to the execution fabric. (e.g. one of
the grid providers such as IBM, Oracle, Terracotta, Appistry etc.),
Spring Batch makes no preference for any of grid provider over another.
More details can be found in Section 7.4, “Partitioning”
To any experienced batch architect, the overall concepts of batch processing used in Spring Batch should be familiar and comfortable. There are “Jobs” and “Steps” and developer supplied processing units called ItemReaders and ItemWriters. However, because of the Spring patterns, operations, templates, callbacks, and idioms, there are opportunities for the following:
significant improvement in adherence to a clear separation of concerns
clearly delineated architectural layers and services provided as interfaces
simple and default implementations that allow for quick adoption and ease of use out-of-the-box
significantly enhanced extensibility
The diagram below is simplified version of the batch reference architecture that has been used for decades. It provides an overview of the components that make up the domain language of batch processing. This architecture framework is a blueprint that has been proven through decades of implementations on the last several generations of platforms (COBOL/Mainframe, C++/Unix, and now Java/anywhere). JCL and COBOL developers are likely to be as comfortable with the concepts as C++, C# and Java developers. Spring Batch provides a physical implementation of the layers, components and technical services commonly found in robust, maintainable systems used to address the creation of simple to complex batch applications, with the infrastructure and extensions to address very complex processing needs.
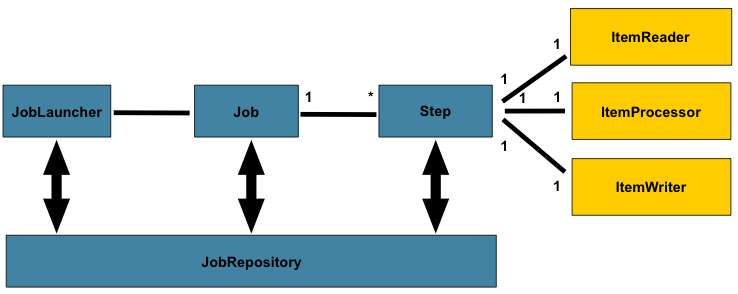
Figure 2.1: Batch Stereotypes
The diagram above highlights the key concepts that make up the domain language of batch. A Job has one to many steps, which has exactly one ItemReader, ItemProcessor, and ItemWriter. A job needs to be launched (JobLauncher), and meta data about the currently running process needs to be stored (JobRepository).
This section describes stereotypes relating to the concept of a
batch job. A Job is an entity that encapsulates an
entire batch process. As is common with other Spring projects, a
Job will be wired together via an XML configuration
file. This file may be referred to as the "job configuration". However,
Job is just the top of an overall hierarchy:

In Spring Batch, a Job is simply a container for Steps. It combines multiple steps that belong logically together in a flow and allows for configuration of properties global to all steps, such as restartability. The job configuration contains:
The simple name of the job
Definition and ordering of Steps
Whether or not the job is restartable
A default simple implementation of the Job
interface is provided by Spring Batch in the form of the
SimpleJob class which creates some standard
functionality on top of Job, however the batch
namespace abstracts away the need to instantiate it directly. Instead, the
<job> tag can be used:
<job id="footballJob">
<step id="playerload" next="gameLoad"/>
<step id="gameLoad" next="playerSummarization"/>
<step id="playerSummarization"/>
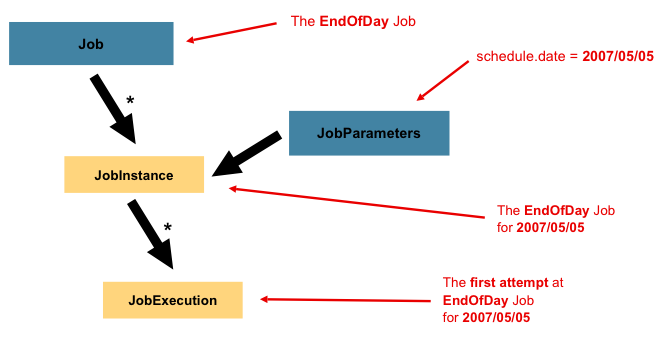
</job>A JobInstance refers to the concept of a
logical job run. Let's consider a batch job that should be run once at
the end of the day, such as the 'EndOfDay' job from the diagram above.
There is one 'EndOfDay' Job, but each individual
run of the Job must be tracked separately. In the
case of this job, there will be one logical
JobInstance per day. For example, there will be a
January 1st run, and a January 2nd run. If the January 1st run fails the
first time and is run again the next day, it is still the January 1st
run. (Usually this corresponds with the data it is processing as well,
meaning the January 1st run processes data for January 1st, etc).
Therefore, each JobInstance can have multiple
executions (JobExecution is discussed in more
detail below) and only one JobInstance
corresponding to a particular Job and
JobParameters can be running at a given
time.
The definition of a JobInstance has
absolutely no bearing on the data the will be loaded. It is entirely up
to the ItemReader implementation used to
determine how data will be loaded. For example, in the EndOfDay
scenario, there may be a column on the data that indicates the
'effective date' or 'schedule date' to which the data belongs. So, the
January 1st run would only load data from the 1st, and the January 2nd
run would only use data from the 2nd. Because this determination will
likely be a business decision, it is left up to the
ItemReader to decide. What using the same
JobInstance will determine, however, is whether
or not the 'state' (i.e. the ExecutionContext,
which is discussed below) from previous executions will be used. Using a
new JobInstance will mean 'start from the
beginning' and using an existing instance will generally mean 'start
from where you left off'.
Having discussed JobInstance and how it
differs from Job, the natural question to ask is:
"how is one JobInstance distinguished from
another?" The answer is: JobParameters.
JobParameters is a set of parameters used to
start a batch job. They can be used for identification or even as
reference data during the run:
In the example above, where there are two instances, one for
January 1st, and another for January 2nd, there is really only one Job,
one that was started with a job parameter of 01-01-2008 and another that
was started with a parameter of 01-02-2008. Thus, the contract can be
defined as: JobInstance =
Job + JobParameters. This
allows a developer to effectively control how a
JobInstance is defined, since they control what
parameters are passed in.
A JobExecution refers to the technical
concept of a single attempt to run a Job. An
execution may end in failure or success, but the
JobInstance corresponding to a given execution
will not be considered complete unless the execution completes
successfully. Using the EndOfDay Job described
above as an example, consider a JobInstance for
01-01-2008 that failed the first time it was run. If it is run again
with the same job parameters as the first run (01-01-2008), a new
JobExecution will be created. However, there will
still be only one JobInstance.
A Job defines what a job is and how it is
to be executed, and JobInstance is a purely
organizational object to group executions together, primarily to enable
correct restart semantics. A JobExecution,
however, is the primary storage mechanism for what actually happened
during a run, and as such contains many more properties that must be
controlled and persisted:
Table 3.1. JobExecution Properties
| status | A BatchStatus object that
indicates the status of the execution. While running, it's
BatchStatus.STARTED, if it fails, it's BatchStatus.FAILED, and
if it finishes successfully, it's BatchStatus.COMPLETED |
| startTime | A java.util.Date representing the
current system time when the execution was started. |
| endTime | A java.util.Date representing the
current system time when the execution finished, regardless of
whether or not it was successful. |
| exitStatus | The ExitStatus indicating the
result of the run. It is most important because it contains an
exit code that will be returned to the caller. See chapter 5 for
more details. |
| createTime | A java.util.Date representing the
current system time when the JobExecution
was first persisted. The job may not have been started yet (and
thus has no start time), but it will always have a createTime,
which is required by the framework for managing job level
ExecutionContexts. |
| lastUpdated | A java.util.Date representing the
last time a JobExecution was
persisted. |
| executionContext | The 'property bag' containing any user data that needs to be persisted between executions. |
| failureExceptions | The list of exceptions encountered during the execution
of a Job. These can be useful if more
than one exception is encountered during the failure of a
Job. |
These properties are important because they will be persisted and can be used to completely determine the status of an execution. For example, if the EndOfDay job for 01-01 is executed at 9:00 PM, and fails at 9:30, the following entries will be made in the batch meta data tables:
Table 3.4. BATCH_JOB_EXECUTION
| JOB_EXEC_ID | JOB_INST_ID | START_TIME | END_TIME | STATUS |
| 1 | 1 | 2008-01-01 21:00 | 2008-01-01 21:30 | FAILED |
Note
column names may have been abbreviated or removed for clarity and formatting
Now that the job has failed, let's assume that it took the entire
course of the night for the problem to be determined, so that the 'batch
window' is now closed. Assuming the window starts at 9:00 PM, the job
will be kicked off again for 01-01, starting where it left off and
completing successfully at 9:30. Because it's now the next day, the
01-02 job must be run as well, which is kicked off just afterwards at
9:31, and completes in its normal one hour time at 10:30. There is no
requirement that one JobInstance be kicked off
after another, unless there is potential for the two jobs to attempt to
access the same data, causing issues with locking at the database level.
It is entirely up to the scheduler to determine when a
Job should be run. Since they're separate
JobInstances, Spring Batch will make no attempt
to stop them from being run concurrently. (Attempting to run the same
JobInstance while another is already running will
result in a JobExecutionAlreadyRunningException
being thrown). There should now be an extra entry in both the
JobInstance and
JobParameters tables, and two extra entries in
the JobExecution table:
Table 3.6. BATCH_JOB_PARAMS
| JOB_INST_ID | TYPE_CD | KEY_NAME | DATE_VAL |
| 1 | DATE | schedule.Date | 2008-01-01 00:00:00 |
| 2 | DATE | schedule.Date | 2008-01-02 00:00:00 |
Table 3.7. BATCH_JOB_EXECUTION
| JOB_EXEC_ID | JOB_INST_ID | START_TIME | END_TIME | STATUS |
| 1 | 1 | 2008-01-01 21:00 | 2008-01-01 21:30 | FAILED |
| 2 | 1 | 2008-01-02 21:00 | 2008-01-02 21:30 | COMPLETED |
| 3 | 2 | 2008-01-02 21:31 | 2008-01-02 22:29 | COMPLETED |
Note
column names may have been abbreviated or removed for clarity and formatting
A Step is a domain object that encapsulates
an independent, sequential phase of a batch job. Therefore, every
Job is composed entirely of one or more steps. A
Step contains all of the information necessary to
define and control the actual batch processing. This is a necessarily
vague description because the contents of any given
Step are at the discretion of the developer writing
a Job. A Step can be as simple or complex as the
developer desires. A simple Step might load data
from a file into the database, requiring little or no code. (depending
upon the implementations used) A more complex Step
may have complicated business rules that are applied as part of the
processing. As with Job, a
Step has an individual
StepExecution that corresponds with a unique
JobExecution:
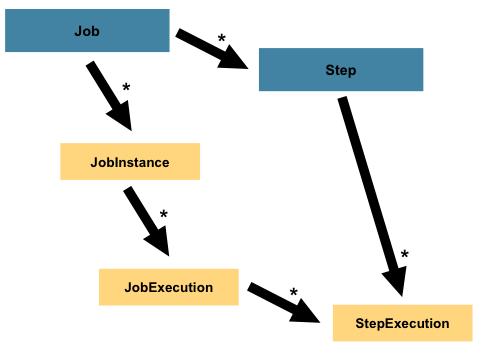
A StepExecution represents a single attempt
to execute a Step. A new
StepExecution will be created each time a
Step is run, similar to
JobExecution. However, if a step fails to execute
because the step before it fails, there will be no execution persisted
for it. A StepExecution will only be created when
its Step is actually started.
Step executions are represented by objects of the
StepExecution class. Each execution contains a
reference to its corresponding step and
JobExecution, and transaction related data such
as commit and rollback count and start and end times. Additionally, each
step execution will contain an ExecutionContext,
which contains any data a developer needs persisted across batch runs,
such as statistics or state information needed to restart. The following
is a listing of the properties for
StepExecution:
Table 3.8. StepExecution Properties
| status | A BatchStatus object that
indicates the status of the execution. While it's running, the
status is BatchStatus.STARTED, if it fails, the status is
BatchStatus.FAILED, and if it finishes successfully, the status
is BatchStatus.COMPLETED |
| startTime | A java.util.Date representing the
current system time when the execution was started. |
| endTime | A java.util.Date representing the
current system time when the execution finished, regardless of
whether or not it was successful. |
| exitStatus | The ExitStatus indicating the
result of the execution. It is most important because it
contains an exit code that will be returned to the caller. See
chapter 5 for more details. |
| executionContext | The 'property bag' containing any user data that needs to be persisted between executions. |
| readCount | The number of items that have been successfully read |
| writeCount | The number of items that have been successfully written |
| commitCount | The number transactions that have been committed for this execution |
| rollbackCount | The number of times the business transaction controlled
by the Step has been rolled back. |
| readSkipCount | The number of times read has
failed, resulting in a skipped item. |
| processSkipCount | The number of times process has
failed, resulting in a skipped item. |
| filterCount | The number of items that have been 'filtered' by the
ItemProcessor. |
| writeSkipCount | The number of times write has
failed, resulting in a skipped item. |
An ExecutionContext represents a collection
of key/value pairs that are persisted and controlled by the framework in
order to allow developers a place to store persistent state that is scoped
to a StepExecution or
JobExecution. For those familiar with Quartz, it is
very similar to JobDataMap. The best usage example
is to facilitate restart. Using flat file input as an example, while
processing individual lines, the framework periodically persists the
ExecutionContext at commit points. This allows the
ItemReader to store its state in case a fatal error
occurs during the run, or even if the power goes out. All that is needed
is to put the current number of lines read into the context, and the
framework will do the rest:
executionContext.putLong(getKey(LINES_READ_COUNT), reader.getPosition());
Using the EndOfDay example from the Job Stereotypes section as an example, assume there's one step: 'loadData', that loads a file into the database. After the first failed run, the meta data tables would look like the following:
Table 3.11. BATCH_JOB_EXECUTION
| JOB_EXEC_ID | JOB_INST_ID | START_TIME | END_TIME | STATUS |
| 1 | 1 | 2008-01-01 21:00 | 2008-01-01 21:30 | FAILED |
Table 3.12. BATCH_STEP_EXECUTION
| STEP_EXEC_ID | JOB_EXEC_ID | STEP_NAME | START_TIME | END_TIME | STATUS |
| 1 | 1 | loadDate | 2008-01-01 21:00 | 2008-01-01 21:30 | FAILED |
In this case, the Step ran for 30 minutes
and processed 40,321 'pieces', which would represent lines in a file in
this scenario. This value will be updated just before each commit by the
framework, and can contain multiple rows corresponding to entries within
the ExecutionContext. Being notified before a
commit requires one of the various StepListeners,
or an ItemStream, which are discussed in more
detail later in this guide. As with the previous example, it is assumed
that the Job is restarted the next day. When it is
restarted, the values from the ExecutionContext of
the last run are reconstituted from the database, and when the
ItemReader is opened, it can check to see if it has
any stored state in the context, and initialize itself from there:
if (executionContext.containsKey(getKey(LINES_READ_COUNT))) {
log.debug("Initializing for restart. Restart data is: " + executionContext);
long lineCount = executionContext.getLong(getKey(LINES_READ_COUNT));
LineReader reader = getReader();
Object record = "";
while (reader.getPosition() < lineCount && record != null) {
record = readLine();
}
}In this case, after the above code is executed, the current line
will be 40,322, allowing the Step to start again
from where it left off. The ExecutionContext can
also be used for statistics that need to be persisted about the run
itself. For example, if a flat file contains orders for processing that
exist across multiple lines, it may be necessary to store how many orders
have been processed (which is much different from than the number of lines
read) so that an email can be sent at the end of the
Step with the total orders processed in the body.
The framework handles storing this for the developer, in order to
correctly scope it with an individual JobInstance.
It can be very difficult to know whether an existing
ExecutionContext should be used or not. For
example, using the 'EndOfDay' example from above, when the 01-01 run
starts again for the second time, the framework recognizes that it is the
same JobInstance and on an individual
Step basis, pulls the
ExecutionContext out of the database and hands it
as part of the StepExecution to the
Step itself. Conversely, for the 01-02 run the
framework recognizes that it is a different instance, so an empty context
must be handed to the Step. There are many of these
types of determinations that the framework makes for the developer to
ensure the state is given to them at the correct time. It is also
important to note that exactly one ExecutionContext
exists per StepExecution at any given time. Clients
of the ExecutionContext should be careful because
this creates a shared keyspace, so care should be taken when putting
values in to ensure no data is overwritten. However, the
Step stores absolutely no data in the context, so
there is no way to adversely affect the framework.
It is also important to note that there is at least one
ExecutionContext per
JobExecution, and one for every
StepExecution. For example, consider the following
code snippet:
ExecutionContext ecStep = stepExecution.getExecutionContext(); ExecutionContext ecJob = jobExecution.getExecutionContext(); //ecStep does not equal ecJob
As noted in the comment, ecStep will not equal ecJob; they are two
different ExecutionContexts. The one scoped to the
Step will be saved at every commit point in the
Step, whereas the one scoped to the
Job will be saved in between every
Step execution.
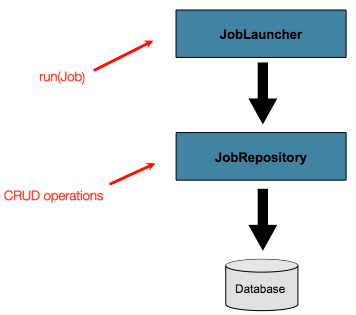
JobRepository is the persistence mechanism
for all of the Stereotypes mentioned above. It provides CRUD operations
for JobLauncher, Job, and
Step implementations. When a
Job is first launched, a
JobExecution is obtained from the repository, and
during the course of execution StepExecution and
JobExecution implementations are persisted by
passing them to the repository:
<job-repository id="jobRepository"/>
JobLauncher represents a simple interface for
launching a Job with a given set of
JobParameters:
public interface JobLauncher {
public JobExecution run(Job job, JobParameters jobParameters)
throws JobExecutionAlreadyRunningException, JobRestartException;
}It is expected that implementations will obtain a valid
JobExecution from the
JobRepository and execute the
Job.
ItemReader is an abstraction that represents
the retrieval of input for a Step, one item at a
time. When the ItemReader has exhausted the items
it can provide, it will indicate this by returning null. More details
about the ItemReader interface and its various
implementations can be found in Chapter 6, ItemReaders and ItemWriters.
ItemWriter is an abstraction that represents
the output of a Step, one item at a time.
Generally, an item writer has no knowledge of the input it will receive
next, only the item that was passed in its current invocation. More
details about the ItemWriter interface and its
various implementations can be found in Chapter 6, ItemReaders and ItemWriters.
ItemProcessor is an abstraction that
represents the business processing of an item. While the
ItemReader reads one item, and the
ItemWriter writes them, the
ItemProcessor provides access to transform or apply
other business processing. If, while processing the item, it is determined
that the item is not valid, returning null indicates that the item should
not be written out. More details about the ItemProcessor interface can be
found in Chapter 6, ItemReaders and ItemWriters.
Many of the domain concepts listed above need to be configured in a
Spring ApplicationContext. While there are
implementations of the interfaces above that can be used in a standard
bean definition, a namespace has been provided for ease of
configuration:
<beans:beans xmlns="http://www.springframework.org/schema/batch" xmlns:beans="http://www.springframework.org/schema/beans" xmlns:xsi="http://www.w3.org/2001/XMLSchema-instance" xsi:schemaLocation=" http://www.springframework.org/schema/beans http://www.springframework.org/schema/beans/spring-beans-2.0.xsd http://www.springframework.org/schema/batch http://www.springframework.org/schema/batch/spring-batch-2.0.xsd"> <job id="ioSampleJob"> <step id="step1"> <tasklet> <chunk reader="itemReader" writer="itemWriter" commit-interval="2"/> </tasklet> </step> </job> </beans:beans>
As long as the batch namespace has been declared, any of its
elements can be used. More information on configuring a
Job can be found in Chapter 4, Configuring and Running a Job. More information on configuring a Step can be
found in Chapter 5, Configuring a Step.
In Batch Domain Language , the overall architecture design was discussed, using the following diagram as a guide:
While the
Job
object may seem like a simple
container for steps, there are many configuration options of which a
developers must be aware . Furthermore, there are many considerations for
how a
Job
will be run and how its meta-data will be
stored during that run. This chapter will explain the various configuration
options and runtime concerns of a
Job
.
There are multiple implementations of the
Job
interface, however, the
namespace abstracts away the differences in configuration. It has only
three required dependencies: a name,
JobRepository
,
and a list of
Step
s.
<job id="footballJob">
<step id="playerload" parent="s1" next="gameLoad"/>
<step id="gameLoad" parent="s2" next="playerSummarization"/>
<step id="playerSummarization" parent="s3"/>
</job>The namespace defaults to referencing a repository with an id of 'jobRepository', which is a sensible default. However, this can be overridden explicitly:
<job id="footballJob" job-repository="specialRepository">
<step id="playerload" parent="s1" next="gameLoad"/>
<step id="gameLoad" parent="s3" next="playerSummarization"/>
<step id="playerSummarization" parent="s3"/>
</job>One key issue when executing a batch job concerns the behavior of
a Job when it is restarted? The launching of a
Job is considered to be a 'restart' if a
JobExecution already exists for the particular
JobInstance. Ideally, all jobs should be able to
start up where they left off, but there are scenarios where this is not
possible. It is entirely up to the developer to
ensure that a new JobInstance is created in this
scenario. However, Spring Batch does provide some help. If a
Job should never be restarted, but should always
be run as part of a new JobInstance, then the
restartable property may be set to 'false':
<job id="footballJob" restartable="false">
...
</job>To phrase it another way, setting restartable to false means "this
Job does not support being started again". Restarting a Job that is not
restartable will cause a JobRestartException to
be thrown:
Job job = new SimpleJob();
job.setRestartable(false);
JobParameters jobParameters = new JobParameters();
JobExecution firstExecution = jobRepository.createJobExecution(job, jobParameters);
jobRepository.saveOrUpdate(firstExecution);
try {
jobRepository.createJobExecution(job, jobParameters);
fail();
}
catch (JobRestartException e) {
// expected
}This snippet of JUnit code shows how attempting to create a
JobExecution the first time for a non restartable
job will cause no issues. However, the second
attempt will throw a JobRestartException.
During the course of the execution of a
Job, it may be useful to be notified of various
events in its lifecycle so that custom code may be executed. The
SimpleJob allows for this by calling a
JobListener at the appropriate time:
public interface JobExecutionListener {
void beforeJob(JobExecution jobExecution);
void afterJob(JobExecution jobExecution);
}JobListeners can be added to a
SimpleJob via the listeners element on the
job:
<job id="footballJob">
<step id="playerload" parent="s1" next="gameLoad"/>
<step id="gameLoad" parent="s2" next="playerSummarization"/>
<step id="playerSummarization" parent="s3"/>
<listeners>
<listener class="org.springframework.batch.sample.SampleListener"/>
</listeners>
</job>It should be noted that afterJob will be
called regardless of the success or failure of the
Job. If success or failure needs to be determined
it can be obtained from the JobExecution:
public void afterJob(JobExecution jobExecution){
if( jobExecution.getStatus() == BatchStatus.COMPLETED ){
//job success
}
else if(jobExecution.getStatus() == BatchStatus.FAILED){
//job failure
}
}The annotations corresponding to this interface are:
@BeforeJob@AfterJob
If a group of Jobs share similar, but not
identical, configurations, then it may be helpful to define a "parent"
Job from which the concrete
Jobs may inherit properties. Similar to class
inheritance in Java, the "child" Job will combine
its elements and attributes with the parent's.
In the following example, "baseJob" is an abstract
Job definition that defines only a list of
listeners. The Job "job1" is a concrete
definition that inherits the list of listeners from "baseJob" and merges
it with its own list of listeners to produce a
Job with two listeners and one
Step, "step1".
<job id="baseJob" abstract="true">
<listeners>
<listener class="com.ListenerOne"/>
<listeners>
</job>
<job id="job1" parent="baseJob3">
<step id="step1" parent="standaloneStep"/>
<listeners merge="true">
<listener class="com.ListenerTwo"/>
<listeners>
</job>Please see the section on Inheriting from a Parent Step for more detailed information.
Unlike many traditional Spring applications, many of the
components of a batch application are stateful; the file readers and
writers are obvious examples. The recommended way to deal with this is
to create a fresh ApplicationContext for each job
execution. If the Job is launched from the
command line with CommandLineJobRunner, this is
trivial. For more complex launching scenarios where jobs are executed in
parallel or serially from the same process, some extra steps have to be
taken to ensure that the ApplicationContext is
refreshed. This is preferable to using prototype scope for the stateful
beans because then they would not receive lifecycle callbacks from the
container at the end of use. (e.g. through destroy-method in XML)
The strategy provided by Spring Batch to deal with this scenario
is the JobFactory, and the samples provide an
example of a specialized implementation that can load an
ApplicationContext and close it properly when the
job is finished. A relevant examples is
ClassPathXmlApplicationContextJobFactory and its
use in the adhoc-job-launcher-context.xml and the
quartz-job-launcher-context.xml, which can be found in the
Samples project.
As described in earlier, the JobRepository is
used for basic CRUD operations of the various persisted domain objects
within Spring Batch, such as JobExecution and
StepExecution. It is required by many of the major
framework features, such as the JobLauncher,
Job, and Step. The batch
namespace abstracts away many of the implementation details of the
JobRepository implementations and their
collaborators. However, there are still a few configuration options
available:
<job-repository id="jobRepository"
dataSource="dataSource"
transactionManager="transactionManager"
isolation-level-for-create="SERIALIZABLE"
table-prefix="BATCH_"
/>None of the configuration options listed above are required except the id. If they are not set, the defaults shown above will be used. They are shown above for awareness purposes.
If the namespace is used, transactional advice will be
automatically created around the repository. This is to ensure that the
batch meta data, including state that is necessary for restarts after a
failure, is persisted correctly. The behavior of the framework is not
well defined if the repository methods are not transactional. The
isolation level in the create* method attributes is
specified separately to ensure that when jobs are launched, if two
processes are trying to launch the same job at the same time, only one
will succeed. The default isolation level for that method is
SERIALIZABLE, which is quite aggressive: READ_COMMITTED would work just
as well; READ_UNCOMMITTED would be fine if two processes are not likely
to collide in this way. However, since a call to the
create* method is quite short, it is unlikely
that the SERIALIZED will cause problems, as long as the database
platform supports it. However, this can be overridden:
<job-repository id="jobRepository"
isolation-level-for-create="REPEATABLE_READ" />If the namespace or factory beans aren't used then it is also essential to configure the transactional behavior of the repository using AOP:
<aop:config>
<aop:advisor
pointcut="execution(* org.springframework.batch.core..*Repository+.*(..))"/>
<advice-ref="txAdvice" />
</aop:config>
<tx:advice id="txAdvice" transaction-manager="transactionManager">
<tx:attributes>
<tx:method name="*" />
</tx:attributes>
</tx:advice>This fragment can be used as is, with almost no changes. Remember also to include the appropriate namespace declarations and to make sure spring-tx and spring-aop (or the whole of spring) are on the classpath.
Another modifiable property of the
JobRepository is the table prefix of the
meta-data tables. By default they are all prefaced with BATCH_.
BATCH_JOB_EXECUTION and BATCH_STEP_EXECUTION are two examples. However,
there are potential reasons to modify this prefix. If the schema names
needs to be prepended to the table names, or if more than one set of
meta data tables is needed within the same schema, then the table prefix
will need to be changed:
<job-repository id="jobRepository"
table-prefix="SYSTEM.TEST_" />Given the above changes, every query to the meta data tables will be prefixed with "SYSTEM.TEST_". BATCH_JOB_EXECUTION will be referred to as SYSTEM.TEST_JOB_EXECUTION.
Note
Only the table prefix is configurable. The table and column names are not.
There are scenarios in which you may not want to persist your domain objects to the database. One reason may be speed; storing domain objects at each commit point takes extra time. Another reason may be that you just don't need to persist status for a particular job. For this reason, Spring batch provides an in-memory Map version of the job repository:
<bean id="jobRepository"
class="org.springframework.batch.core.repository.support.MapJobRepositoryFactoryBean">
<property name="transactionManager" ref="transactionManager"/>
</bean>Note that the in-memory repository is volatile and so does not allow restart between JVM instances. It also cannot guarantee that two job instances with the same parameters are launched simultaneously, and is not suitable for use in a multi-threaded Job, or a locally partitioned Step. So use the database version of the repository wherever you need those features.
However it does require a transaction manager to be defined
because there are rollback semantics within the repository, and because
the business logic might still be transactional (e.g. RDBMS access). For
testing purposes many people find the
ResourcelessTransactionManager useful.
If you are using a database platform that is not in the list of
supported platforms, you may be able to use one of the supported types,
if the SQL variant is close enough. To do this you can use the raw
JobRepositoryFactoryBean instead of the namespace
shortcut and use it to set the database type to the closest
match:
<bean id="jobRepository" class="org...JobRepositoryFactoryBean">
<property name="databaseType" value="db2"/>
<property name="dataSource" ref="dataSource"/>
</bean>(The JobRepositoryFactoryBean tries to
auto-detect the database type from the DataSource
if it is not specified.) The major differences between platforms are
mainly accounted for by the strategy for incrementing primary keys, so
often it might be necessary to override the
incrementerFactory as well (using one of the standard
implementations from the Spring Framework).
If even that doesn't work, or you are not using an RDBMS, then the
only option may be to implement the various Dao
interfaces that the SimpleJobRepository depends
on and wire one up manually in the normal Spring way.
The most basic implementation of the
JobLauncher interface is the
SimpleJobLauncher. Its only required dependency is
a JobRepository, in order to obtain an
execution:
<bean id="jobLauncher"
class="org.springframework.batch.core.launch.support.SimpleJobLauncher">
<property name="jobRepository" ref="jobRepository" />
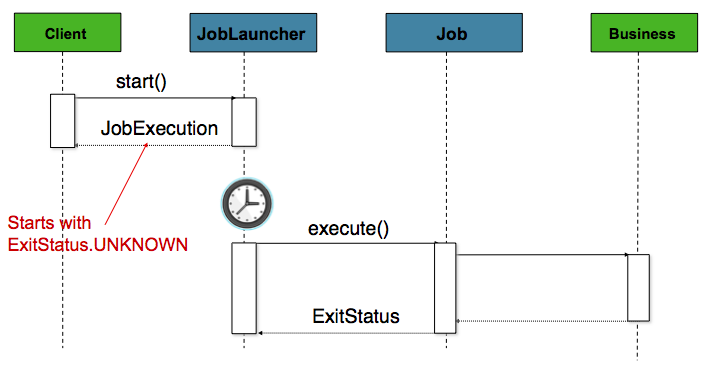
</bean>Once a JobExecution is
obtained, it is passed to the execute method of
Job, ultimately returning the
JobExecution to the caller:
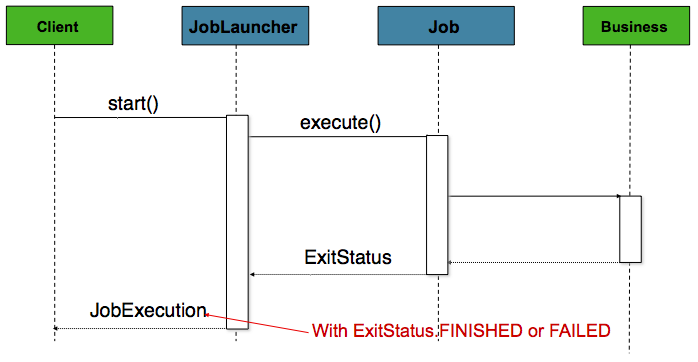
The sequence is straightforward and works well when launched from a
scheduler. However, issues arise when trying to launch from an HTTP
request. In this scenario, the launching needs to be done asynchronously
so that the SimpleJobLauncher returns immediately
to its caller. This is because it is not good practice to keep an HTTP
request open for the amount of time needed by long running processes such
as batch. An example sequence is below:
The SimpleJobLauncher can easily be
configured to allow for this scenario by configuring a
TaskExecutor:
<bean id="jobLauncher"
class="org.springframework.batch.core.launch.support.SimpleJobLauncher">
<property name="jobRepository" ref="jobRepository" />
<property name="taskExecutor">
<bean class="org.springframework.core.task.SimpleAsyncTaskExecutor" />
</property>
</bean>Any implementation of the spring TaskExecutor
interface can be used to control how jobs are asynchronously
executed.
At a minimum, launching a batch job requires two things: the
Job to be launched and a
JobLauncher. Both can be contained within the same
context or different contexts. For example, if launching a job from the
command line, a new JVM will be instantiated for each Job, and thus every
job will have its own JobLauncher. However, if
running from within a web container within the scope of an
HttpRequest, there will usually be one
JobLauncher, configured for asynchronous job
launching, that multiple requests will invoke to launch their jobs.
For users that want to run their jobs from an enterprise
scheduler, the command line is the primary interface. This is because
most schedulers (with the exception of Quartz unless using the
NativeJob) work directly with operating system
processes, primarily kicked off with shell scripts. There are many ways
to launch a Java process besides a shell script, such as Perl, Ruby, or
even 'build tools' such as ant or maven. However, because most people
are familiar with shell scripts, this example will focus on them.
Because the script launching the job must kick off a Java
Virtual Machine, there needs to be a class with a main method to act
as the primary entry point. Spring Batch provides an implementation
that serves just this purpose:
CommandLineJobRunner. It's important to note
that this is just one way to bootstrap your application, but there are
many ways to launch a Java process, and this class should in no way be
viewed as definitive. The CommandLineJobRunner
performs four tasks:
Load the appropriate
ApplicationContextParse command line arguments into
JobParametersLocate the appropriate job based on arguments
Use the
JobLauncherprovided in the application context to launch the job.
All of these tasks are accomplished using only the arguments passed in. The following are required arguments:
Table 4.1. CommandLineJobRunner arguments
| jobPath | The location of the XML file that will be used to
create an ApplicationContext. This file
should contain everything needed to run the complete
Job |
| jobName | The name of the job to be run. |
These arguments must be passed in with the path first and the name second. All arguments after these are considered to be JobParameters and must be in the format of 'name=value':
bash$ java CommandLineJobRunner endOfDayJob.xml endOfDay schedule.date(date)=2008/01/01In most cases you would want to use a manifest to declare your
main class in a jar, but for simplicity, the class was used directly.
This example is using the same 'EndOfDay' example from Batch Domain Language. The first argument is 'endOfDayJob.xml', which is
the Spring ApplicationContext containing the
Job. The second argument, 'endOfDay' represents
the job name. The final argument, 'schedule.date(date)=2008/01/01'
will be converted into JobParameters. An
example of the XML configuration is below:
<job id="endOfDay">
<step id="step1" parent="simpleStep" />
</job>
<!-- Launcher details removed for clarity -->
<beans:bean id="jobLauncher"
class="org.springframework.batch.core.launch.support.SimpleJobLauncher" />This example is overly simplistic, since there are many more
requirements to a run a batch job in Spring Batch in general, but it
serves to show the two main requirements of the
CommandLineJobRunner:
Job and
JobLauncher
When launching a batch job from the command-line, an enterprise
scheduler is often used. Most schedulers are fairly dumb and work only
at the process level. This means that they only know about some
operating system process such as a shell script that they're invoking.
In this scenario, the only way to communicate back to the scheduler
about the success or failure of a job is through return codes. A
return code is a number that is returned to a scheduler by the process
that indicates the result of the run. In the simplest case: 0 is
success and 1 is failure. However, there may be more complex
scenarios: If job A returns 4 kick off job B, and if it returns 5 kick
off job C. This type of behavior is configured at the scheduler level,
but it is important that a processing framework such as Spring Batch
provide a way to return a numeric representation of the 'Exit Code'
for a particular batch job. In Spring Batch this is encapsulated
within an ExitStatus, which is covered in more
detail in Chapter 5. For the purposes of discussing exit codes, the
only important thing to know is that an
ExitStatus has an exit code property that is
set by the framework (or the developer) and is returned as part of the
JobExecution returned from the
JobLauncher. The
CommandLineJobRunner converts this string value
to a number using the ExitCodeMapper
interface:
public interface ExitCodeMapper {
public int intValue(String exitCode);
}The essential contract of an
ExitCodeMapper is that, given a string exit
code, a number representation will be returned. The default
implementation used by the job runner is the SimpleJvmExitCodeMapper
that returns 0 for completion, 1 for generic errors, and 2 for any job
runner errors such as not being able to find a
Job in the provided context. If anything more
complex than the 3 values above is needed, then a custom
implementation of the ExitCodeMapper interface
must be supplied. Because the
CommandLineJobRunner is the class that creates
an ApplicationContext, and thus cannot be
'wired together', any values that need to be overwritten must be
autowired. This means that if an implementation of
ExitCodeMapper is found within the BeanFactory,
it will be injected into the runner after the context is created. All
that needs to be done to provide your own
ExitCodeMapper is to declare the implementation
as a root level bean and ensure that it is part of the
ApplicationContext that is loaded by the
runner.
Historically, offline processing such as batch jobs have been
launched from the command-line, as described above. However, there are
many cases where launching from an HttpRequest is
a better option. Many such use cases include reporting, ad-hoc job
running, and web application support. Because a batch job by definition
is long running, the most important concern is ensuring to launch the
job asynchronously:
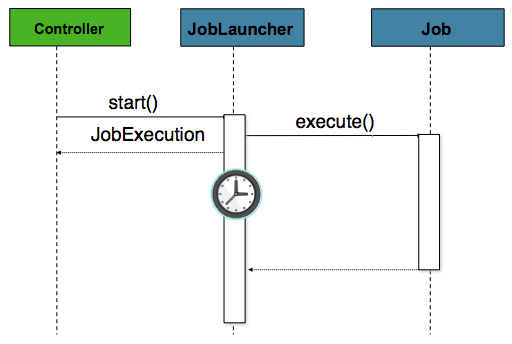
The controller in this case is a Spring MVC controller. More
information on Spring MVC can be found here: http://static.springframework.org/spring/docs/2.5.x/reference/mvc.html.
The controller launches a Job using a
JobLauncher that has been configured to launch
asynchronously, which
immediately returns a JobExecution. The
Job will likely still be running, however, this
nonblocking behaviour allows the controller to return immediately, which
is required when handling an HttpRequest. An
example is below:
@Controller
public class JobLauncherController {
@Autowired
JobLauncher jobLauncher;
@Autowired
Job job;
@RequestMapping("/jobLauncher.html")
public void handle() throws Exception{
jobLauncher.run(job, new JobParameters());
}
}So far, both the JobLauncher and JobRepository interfaces have been discussed. Together, they represent simple launching of a job, and basic CRUD operations of batch domain objects:
A JobLauncher uses the
JobRepository to create new
JobExecution objects and run them.
Job and Step implementations
later use the same JobRepository for basic updates
of the same executions during the running of a Job.
The basic operations suffice for simple scenarios, but in a large batch
environment with hundreds of batch jobs and complex scheduling
requirements, more advanced access of the meta data is required:
The JobExplorer and
JobOperator interfaces, which will be discussed
below, add additional functionality for querying and controlling the meta
data.
The most basic need before any advanced features is the ability to
query the repository for existing executions. This functionality is
provided by the JobExplorer interface:
public interface JobExplorer {
List<JobInstance> getJobInstances(String jobName, int start, int count);
JobExecution getJobExecution(Long executionId);
StepExecution getStepExecution(Long jobExecutionId, Long stepExecutionId);
JobInstance getJobInstance(Long instanceId);
List<JobExecution> getJobExecutions(JobInstance jobInstance);
Set<JobExecution> findRunningJobExecutions(String jobName);
}As is evident from the method signatures above,
JobExplorer is a read-only version of the
JobRepository, and like the
JobRepository, it can be easily configured via a
factory bean:
<bean id="jobExplorer" class="org.spr...JobExplorerFactoryBean"
p:dataSource-ref="dataSource" />Earlier in this
chapter, it was mentioned that the table prefix of the
JobRepository can be modified to allow for
different versions or schemas. Because the
JobExplorer is working with the same tables, it
too needs the ability to set a prefix:
<bean id="jobExplorer" class="org.spr...JobExplorerFactoryBean"
p:dataSource-ref="dataSource" p:tablePrefix="BATCH_" />As previously discussed, the JobRepository
provides CRUD operations on the meta-data, and the
JobExplorer provides read-only operations on the
meta-data. However, those operations are most useful when used together
to perform common monitoring tasks such as stopping, restarting, or
summarizing a Job, as is commonly done by batch operators. Spring Batch
provides for these types of operations via the
JobOperator interface:
public interface JobOperator {
List<Long> getExecutions(long instanceId) throws NoSuchJobInstanceException;
List<Long> getJobInstances(String jobName, int start, int count)
throws NoSuchJobException;
Set<Long> getRunningExecutions(String jobName) throws NoSuchJobException;
String getParameters(long executionId) throws NoSuchJobExecutionException;
Long start(String jobName, String parameters)
throws NoSuchJobException, JobInstanceAlreadyExistsException;
Long restart(long executionId)
throws JobInstanceAlreadyCompleteException, NoSuchJobExecutionException,
NoSuchJobException, JobRestartException;
Long startNextInstance(String jobName)
throws NoSuchJobException, JobParametersNotFoundException, JobRestartException,
JobExecutionAlreadyRunningException, JobInstanceAlreadyCompleteException;
boolean stop(long executionId)
throws NoSuchJobExecutionException, JobExecutionNotRunningException;
String getSummary(long executionId) throws NoSuchJobExecutionException;
Map<Long, String> getStepExecutionSummaries(long executionId)
throws NoSuchJobExecutionException;
Set<String> getJobNames();
}The above operations represent methods from many different
interfaces, such as JobLauncher,
JobRepository,
JobExplorer, and
JobRegistry. For this reason, the provided
implementation of JobOperator,
SimpleJobOperator, has many dependencies:
<bean id="jobOperator" class="org.spr...SimpleJobOperator">
<property name="jobExplorer">
<bean class="org.spr...JobExplorerFactoryBean">
<property name="dataSource" ref="dataSource" />
</bean>
</property>
<property name="jobRepository" ref="jobRepository" />
<property name="jobRegistry" ref="jobRegistry" />
<property name="jobLauncher" ref="jobLauncher" />
</bean>Most of the methods on JobOperator are
self-explanatory, and more detailed explanations can be found on the
javadoc
of the interface. However, the
startNextInstance method is worth noting. This
method will always start a new instance of a Job.
This can be extremely useful if there are serious issues in a
JobExecution and the Job
needs to be started over again from the beginning. Unlike
JobLauncher though, which requires a new
JobParameters object that will trigger a new
JobInstance if the parameters are different from
any previous set of parameters, the
startNextInstance method will use the
JobParametersIncrementer tied to the
Job to force the Job to a
new instance:
public interface JobParametersIncrementer {
JobParameters getNext(JobParameters parameters);
}The contract of JobParametersIncrementer is
that, given a JobParameters
object, it will return the 'next' JobParameters
object by incrementing any necessary values it may contain. This
strategy is useful because the framework has no way of knowing what
changes to the JobParameters make it the 'next'
instance. For example, if the only value in
JobParameters is a date, and the next instance
should be created, should that value be incremented by one day? Or one
week (if the job is weekly for instance)? The same can be said for any
numerical values that help to identify the Job,
as shown below:
public class SampleIncrementer implements JobParametersIncrementer {
public JobParameters getNext(JobParameters parameters) {
if (parameters==null || parameters.isEmpty()) {
return new JobParametersBuilder().addLong("run.id", 1L).toJobParameters();
}
long id = parameters.getLong("run.id",1L) + 1;
return new JobParametersBuilder().addLong("run.id", id).toJobParameters();
}
}In this example, the value with a key of 'run.id' is used to
discriminate between JobInstances. If the
JobParameters passed in is null, it can be
assumed that the Job has never been run before
and thus its initial state can be returned. However, if not, the old
value is obtained, incremented by one, and returned. An incrementer can
be associated with Job via the 'incrementer'
attribute in the namespace:
<job id="footballJob" incrementer="sampleIncrementer">
...
</job>One of the most common use cases of
JobOperator is gracefully stopping a
Job:
Set<Long> executions = jobOperator.getRunningExecutions("sampleJob");
jobOperator.stop(executions.iterator().next()); The shutdown is not immediate, since there is no way to force
immediate shutdown, especially if the execution is currently in
developer code that the framework has no control over, such as a
business service. However, as soon as control is returned back to the
framework, it will set the status of the current
StepExecution to
BatchStatus.STOPPED, save it, then do the same
for the JobExecution before finishing.
As discussed in Batch Domain Language, a
Step is a domain object that encapsulates an
independent, sequential phase of a batch job and contains all of the
information necessary to define and control the actual batch processing.
This is a necessarily vague description because the contents of any given
Step are at the discretion of the developer writing a
Job. A Step can be as simple or complex as the
developer desires. A simple Step might load data from
a file into the database, requiring little or no code. (depending upon the
implementations used) A more complex Step may have
complicated business rules that are applied as part of the
processing.
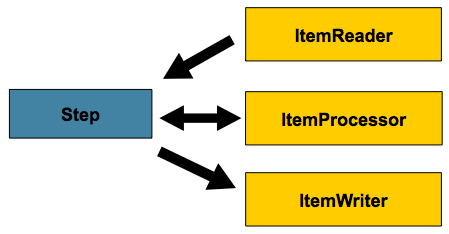
Spring Batch uses a 'Chunk Oriented' processing style within its
most common implementation. Chunk oriented processing refers to reading
the data one at a time, and creating 'chunks' that will be written out,
within a transaction boundary. One item is read in from an
ItemReader, handed to an
ItemWriter, and aggregated. Once the number of
items read equals the commit interval, the entire chunk is written out via
the ItemWriter, and then the transaction is committed.
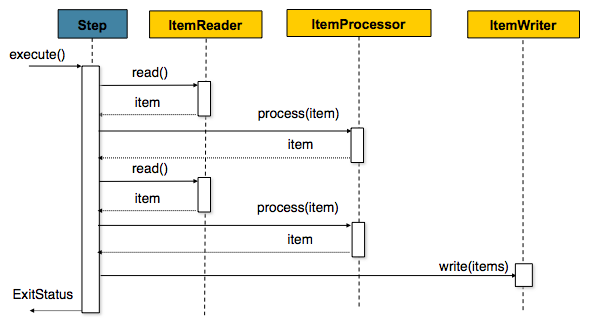
Below is a code representation of the same concepts shown above:
List items = new Arraylist();
for(int i = 0; i < commitInterval; i++){
Object item = itemReader.read()
Object processedItem = itemProcessor.process(item);
items.add(processedItem);
}
itemWriter.write(items);Despite the relatively short list of required dependencies for a
Step, it is an extremely complex class that can
potentially contain many collaborators. In order to ease configuration,
the Spring Batch namespace can be used:
<job id="sampleJob" job-repository="jobRepository">
<step id="step1">
<tasklet transaction-manager="transactionManager">
<chunk reader="itemReader" writer="itemWriter" commit-interval="10"/>
<tasklet>
</step>
</job>The configuration above represents the only required dependencies to create a item-oriented step:
reader - The
ItemReaderthat provides items for processing.writer - The
ItemWriterthat processes the items provided by theItemReader.transaction-manager - Spring's
PlatformTransactionManagerthat will be used to begin and commit transactions during processing.job-repository - The
JobRepositorythat will be used to periodically store theStepExecutionandExecutionContextduring processing (just before committing). For an in-line <step/> (one defined within a <job/>) it is an attribute on the <job/> element; for a standalone step, it is defined as an attribute of the on the <tasklet/>.commit-interval - The number of items that will be processed before the transaction is committed.
It should be noted that, job-repository defaults to
"jobRepository" and transaction-manager defaults to "transactionManger".
Furthermore, the ItemProcessor is optional, not
required, since the item could be directly passed from the reader to the
writer.
While steps must exist within a Job to define the flow, it can sometimes be useful to reference a 'standalone' Step. For example, if a Step is used by multiple jobs it can be useful to declare it once and reference it from multiple jobs. This can be achieved with the 'parent' attribute:
<job id="sampleJob" job-repository="jobRepository">
<step id="step1" parent="standaloneStep" />
</job>
<step id="standaloneStep">
<tasklet job-repository="jobRepository" transaction-manager="transactionManager">
<chunk reader="itemReader" writer="itemWriter" commit-interval="10"/>
</tasklet>
</step>It should be noted that the id attribute is still required on the step within the job element. This is for two reasons:
The id will be used as the step name when persisting the StepExecution. If the same standalone step is referenced in more than one step in the job, an error will occur.
When creating job flows, as described later in this chapter, the next attribute should be referring to the step in the flow, not the standalone step.
If a group of Steps share similar
configurations, then it may be helpful to define a "parent"
Step from which the concrete
Steps may inherit properties. Similar to class
inheritance in Java, the "child" Step will
combine its elements and attributes with the parent's. The child will
also override any of the parent's Steps.
In the following example, the Step
"concreteStep1" will inherit from "parentStep". It will be instantiated
with 'itemReader', 'itemProcessor', 'itemWriter', startLimit=5, and
allowStartIfComplete=true. Additionally, the commitInterval will be '5'
since it is overridden by the "concreteStep1":
<step id="parentStep">
<tasklet allow-start-if-complete="true">
<chunk reader="itemReader" writer="itemWriter" commit-interval="10"/>
</tasklet>
</step>
<step id="concreteStep1" parent="parentStep">
<tasklet start-limit="5">
<chunk processor="itemProcessor" commit-interval="5"/>
</tasklet>
</step>Sometimes it may be necessary to define a parent
Step that is not a complete
Step configuration. If, for instance, the
reader, writer, and tasklet attributes are left off of a
Step configuration, then initialization will
fail. If a parent must be defined without these properties, then the
"abstract" attribute should be used. An "abstract"
Step will not be instantiated; it is used only
for extending.
In the following example, the Step
"abstractParentStep" would not instantiate if it were not declared to
be abstract. The Step "concreteStep2" will have
'itemReader', 'itemWriter', and commitInterval=10.
<step id="abstractParentStep" abstract="true">
<tasklet>
<chunk commit-interval="10"/>
</tasklet>
</step>
<step id="concreteStep2" parent="abstractParentStep">
<tasklet>
<chunk reader="itemReader" writer="itemWriter"/>
</tasklet>
</step>Some of the configurable elements on
Steps are lists; the <listeners/>
element, for instance. If both the parent and child
Steps declare a <listeners/> element,
then the child's list will override the parent's. In order to allow a
child to add additional listeners to the list defined by the parent,
every list element has a "merge" attribute. If the element specifies
that merge="true", then the child's list will be combined with the
parent's instead of overriding it.
In the following example, the Step
"concreteStep3" will be created will two listeners:
com.ListenerOne and
com.ListenerTwo:
<step id="listenersParentStep" abstract="true">
<listeners>
<listener class="com.ListenerOne"/>
<listeners>
</step>
<step id="concreteStep3" parent="listenersParentStep">
<tasklet>
<chunk reader="itemReader" writer="itemWriter" commit-interval="5"/>
<listeners merge="true">
<listener class="com.ListenerTwo"/>
<listeners>
</tasklet>
</step>As mentioned above, a step reads in and writes out items,
periodically committing using the supplied
PlatformTransactionManager. With a
commit-interval of 1, it will commit after writing each individual item.
This is less than ideal in many situations, since beginning and
committing a transaction is expensive. Ideally, it is preferable to
process as many items as possible in each transaction, which is
completely dependent upon the type of data being processed and the
resources with which the step is interacting. For this reason, the
number of items that are processed within a commit can be
configured.
<job id="sampleJob">
<step id="step1">
<tasklet>
<chunk reader="itemReader" writer="itemWriter" commit-interval="10"/>
</tasklet>
</step>
</job>In the example above, 10 items will be processed within each
transaction. At the beginning of processing a transaction is begun, and
each time read is called on the
ItemReader, a counter is incremented. When it
reaches 10, the list of aggregated items is passed to the
ItemWriter, and the transaction will be
committed.
In Chapter 4, Configuring and Running a Job, restarting a
Job was discussed. Restart has numerous impacts
on steps, and as such may require some specific configuration.
There are many scenarios where you may want to control the
number of times a Step may be started. For
example, a particular Step might need to be
configured so that it only runs once because it invalidates some
resource that must be fixed manually before it can be run again. This
is configurable on the step level, since different steps may have
different requirements. A Step that may only be
executed once can exist as part of the same Job
as a Step that can be run infinitely. Below is
an example start limit configuration:
<step id="step1">
<tasklet start-limit="1">
<chunk reader="itemReader" writer="itemWriter" commit-interval="10"/>
</tasklet>
</step>The simple step above can be run only once. Attempting to run it
again will cause an exception to be thrown. It should be noted that
the default value for the start-limit is
Integer.MAX_VALUE.
In the case of a restartable job, there may be one or more steps
that should always be run, regardless of whether or not they were
successful the first time. An example might be a validation step, or a
Step that cleans up resources before
processing. During normal processing of a restarted job, any step with
a status of 'COMPLETED', meaning it has already been completed
successfully, will be skipped. Setting allow-start-if-complete to
"true" overrides this so that the step will always run:
<step id="step1">
<tasklet allow-start-if-complete="true">
<chunk reader="itemReader" writer="itemWriter" commit-interval="10"/>
</tasklet>
</step><job id="footballJob" restartable="true">
<step id="playerload" next="gameLoad">
<tasklet>
<chunk reader="playerFileItemReader" writer="playerWriter"
commit-interval="10" />
</tasklet>
</step>
<step id="gameLoad" next="playerSummarization">
<tasklet allow-start-if-complete="true">
<chunk reader="gameFileItemReader" writer="gameWriter"
commit-interval="10"/>
</tasklet>
</step>
<step id="playerSummarization">
<tasklet start-limit="3">
<chunk reader="playerSummarizationSource" writer="summaryWriter"
commit-interval="10"/>
</tasklet>
</step>
</job>The above example configuration is for a job that loads in
information about football games and summarizes them. It contains
three steps: playerLoad, gameLoad, and playerSummarization. The
playerLoad Step loads player information from a
flat file, while the gameLoad Step does the
same for games. The final Step,
playerSummarization, then summarizes the statistics for each player
based upon the provided games. It is assumed that the file loaded by
'playerLoad' must be loaded only once, but that 'gameLoad' will load
any games found within a particular directory, deleting them after
they have been successfully loaded into the database. As a result, the
playerLoad Step contains no additional
configuration. It can be started almost limitlessly, and if complete
will be skipped. The 'gameLoad' Step, however,
needs to be run every time in case extra files have been dropped since
it last executed. It has 'allow-start-if-complete' set to 'true' in
order to always be started. (It is assumed that the database tables
games are loaded into has a process indicator on it, to ensure new
games can be properly found by the summarization step). The
summarization Step, which is the most important
in the Job, is configured to have a start limit
of 3. This is useful because if the step continually fails, a new exit
code will be returned to the operators that control job execution, and
it won't be allowed to start again until manual intervention has taken
place.
Note
This job is purely for example purposes and is not the same as the footballJob found in the samples project.
Run 1:
playerLoad is executed and completes successfully, adding 400 players to the 'PLAYERS' table.
gameLoad is executed and processes 11 files worth of game data, loading their contents into the 'GAMES' table.
playerSummarization begins processing and fails after 5 minutes.
Run 2:
playerLoad is not run, since it has already completed successfully, and allow-start-if-complete is 'false' (the default).
gameLoad is executed again and processes another 2 files, loading their contents into the 'GAMES' table as well (with a process indicator indicating they have yet to be processed)
playerSummarization begins processing of all remaining game data (filtering using the process indicator) and fails again after 30 minutes.
Run 3:
playerLoad is not run, since it has already completed successfully, and allow-start-if-complete is 'false' (the default).
gameLoad is executed again and processes another 2 files, loading their contents into the 'GAMES' table as well (with a process indicator indicating they have yet to be processed)
playerSummarization is not start, and the job is immediately killed, since this is the third execution of playerSummarization, and its limit is only 2. The limit must either be raised, or the
Jobmust be executed as a newJobInstance.
There are many scenarios where errors encountered while processing
should not result in Step failure, but should be
skipped instead. This is usually a decision that must be made by someone
who understands the data itself and what meaning it has. Financial data,
for example, may not be skippable because it results in money being
transferred, which needs to be completely accurate. Loading a list of
vendors, on the other hand, might allow for skips. If a vendor is not
loaded because it was formatted incorrectly or was missing necessary
information, then there probably won't be issues. Usually these bad
records are logged as well, which will be covered later when discussing
listeners.
<step id="step1">
<tasklet>
<chunk reader="flatFileItemReader" writer="itemWriter"
commit-interval="10" skip-limit="10">
<skippable-exception-classes>
org.springframework.batch.item.file.FlatFileParseException
</skippable-exception-classes>
</chunk>
</tasklet>
</step>In this example, a FlatFileItemReader is
used, and if at any point a
FlatFileParseException is thrown, it will be
skipped and counted against the total skip limit of 10. Separate counts
are made of skips on read, process and write inside the step execution,
and the limit applies across all.
One problem with the example above is that any other exception
besides a FlatFileParseException will cause the
Job to fail. In certain scenarios this may be the
correct behavior. However, in other scenarios it may be easier to
identify which exceptions should cause failure and skip everything
else:
<step id="step1">
<tasklet>
<chunk reader="flatFileItemReader" writer="itemWriter"
commit-interval="10" skip-limit="10">
<skippable-exception-classes>
java.lang.Exception
</skippable-exception-classes>
<fatal-exception-classes>
java.io.FileNotFoundException
</fatal-exception-classes>
</chunk>
</tasklet>
</step>By setting the skippable exceptions to
java.lang.Exception, any exception that is thrown
will be skipped. However, the second list, 'fatal-exception-classes',
contains specific exceptions that should be fatal if encountered (i.e.
not skipped).
In most cases you want an exception to cause either a skip or
Step failure. However, not all exceptions are
deterministic. If a FlatFileParseException is
encountered while reading, it will always be thrown for that record;
resetting the ItemReader will not help. However,
for other exceptions, such as a
DeadlockLoserDataAccessException, which indicates
that the current process has attempted to update a record that another
process holds a lock on, waiting and trying again might result in
success. In this case, retry should be configured:
<step id="step1">
<tasklet>
<chunk reader="itemReader" writer="itemWriter"
commit-interval="2" retry-limit="3">
<retryable-exception-classes>
org.springframework.dao.DeadlockLoserDataAccessException
</retryable-exception-classes>
</chunk>
</tasklet>
</step>The Step allows a limit for the number of
times an individual item can be retried, and a list of exceptions that
are 'retryable'. More details on how retry works can be found in Chapter 9, Retry
By default, regardless of retry or skip, any exceptions thrown
from the ItemWriter will cause the transaction
controlled by the Step to rollback. If skip is
configured as described above, exceptions thrown from the
ItemReader will not cause a rollback. However,
there are many scenarios in which exceptions thrown from the
ItemWriter should not cause a rollback because no
action has taken place to invalidate the transaction. For this reason,
the Step can be configured with a list of
exceptions that should not cause rollback. The
no-rollback-exception-classes element is a list of transaction
attributes, separated by commas or newlines.
<step id="step1">
<tasklet>
<chunk reader="itemReader" writer="itemWriter" commit-interval="2"/>
<no-rollback-exception-classes>
org.springframework.batch.item.validator.ValidationException
</no-rollback-exception-classes>
</tasklet>
</step>The basic contract of the ItemReader is
that it is forward only. The step buffers reader input, so that in the
case of a rollback the items don't need to be re-read from the reader.
However, there are certain scenarios in which the reader is built on
top of a transactional resource, such as a JMS queue. In this case,
since the queue is tied to the transaction that is rolled back, the
messages that have been pulled from the queue will be put back on. For
this reason, the step can be configured to not buffer the
items:
<step id="step1">
<tasklet>
<chunk reader="itemReader" writer="itemWriter" commit-interval="2"
is-reader-transactional-queue="true"/>
</tasklet>
</step>Transaction attributes can be used to control the isolation, propagation, and timeout settings. More information on setting transaction attributes can be found in the spring core documentation.
<step id="step1">
<tasklet>
<chunk reader="itemReader" writer="itemWriter" commit-interval="2"/>
<transaction-attributes isolation="DEFAULT"
propagation="REQUIRED"
timeout="30"/>
</tasklet>
</step>The step has to take care of ItemStream
callbacks at the necessary points in its lifecycle. (for more
information on the ItemStream interface, please
refer to Section 6.4, “ItemStream”) This is vital if a step fails,
and might need to be restarted, because the
ItemStream interface is where the step gets the
information it needs about persistent state between executions.
If the ItemReader,
ItemProcessor, or
ItemWriter itself implements the
ItemStream interface, then these will be
registered automatically. Any other streams need to be registered
separately. This is often the case where there are indirect dependencies
such as delegates being injected into the reader and writer. A stream
can be registered on the Step through the
'streams' element, as illustrated below:
<step id="step1">
<tasklet>
<chunk reader="itemReader" writer="compositeWriter" commit-interval="2">
<streams>
<stream ref="fileItemWriter1"/>
<stream ref="fileItemWriter2"/>
</streams>
</chunk>
</tasklet>
</step>
<beans:bean id="compositeWriter"
class="org.springframework.batch.item.support.CompositeItemWriter">
<beans:property name="delegates">
<beans:list>
<beans:ref bean="fileItemWriter1" />
<beans:ref bean="fileItemWriter2" />
</beans:list>
</beans:property>
</beans:bean>In the example above, the
CompositeItemWriter is not an
ItemStream, but both of its delegates are.
Therefore, both delegate writers must be explicitly registered as
streams in order for the framework to handle them correctly. The
ItemReader does not need to be explicitly
registered as a stream because it is a direct property of the
Step. The step will now be restartable and the
state of the reader and writer will be correctly persisted in the event
of a failure.
Just as with the Job, there are many events
during the execution of a Step where a user may
need to perform some functionality. For example, in order to write out
to a flat file that requires a footer, the
ItemWriter needs to be notified when the
Step has been completed, so that the footer can
written. This can be accomplished with one of many
Step scoped listeners.
Any class that implements the StepListener
interface (or an extension thereof) can be applied to a step via the
listeners element:
<step id="step1">
<tasklet>
<chunk reader="reader" writer="writer" commit-interval="10"/>
<listeners>
<listener ref="stepListener"/>
</listeners>
</tasklet>
</step>An ItemReader, ItemWriter
or ItemProcessor that itself implements
one of the StepListener interfaces will
be registered automatically with the Step
if using the namespace <step> element,
or one of the the *StepFactoryBean
factories. This only applies to components directly injected
into the Step: if the listener is nested
inside another component, it needs to be explicitly registered
(as described above).
In addition to the StepListener interfaces,
annotations are provided to address the same concerns.
StepExecutionListener represents the most
generic listener for Step execution. It allows
for notification before a Step is started and
after it has ends, whether it ended normally or failed:
public interface StepExecutionListener extends StepListener {
void beforeStep(StepExecution stepExecution);
ExitStatus afterStep(StepExecution stepExecution);
}ExitStatus is the return type of
afterStep in order to allow listeners the
chance to modify the exit code that is returned upon completion of a
Step.
The annotations corresponding to this interface are:
@BeforeStep@AfterStep
A chunk is defined as the items processed within the scope of a
transaction. Committing a transaction, at each commit interval,
commits a 'chunk'. A ChunkListener may be
useful to perform logic before a chunk begins processing or after a
chunk has completed:
public interface ChunkListener extends StepListener {
void beforeChunk();
void afterChunk();
}The beforeChunk method is called after
the transaction is started, but before read
is called on the ItemReader. Conversely,
afterChunk is called after the last call to
write on the
ItemWriter, but before the chunk has been
committed.
The annotations corresponding to this interface are:
@BeforeChunk@AfterChunk
When discussing skip logic above, it was mentioned that it may
be beneficial to log out skipped records, so that they can be deal
with later. In the case of read errors, this can be done with an
ItemReaderListener:
public interface ItemReadListener<T> extends StepListener {
void beforeRead();
void afterRead(T item);
void onReadError(Exception ex);
}The beforeRead method will be called
before each call to read on the
ItemReader. The
afterRead method will be called after each
successful call to read, and will be passed
the item that was read. If there was an error while reading, the
onReadError method will be called. The
exception encountered will be provided so that it can be
logged.
The annotations corresponding to this interface are:
@BeforeRead@AfterRead@OnReadError
Just as with the ItemReadListener, the
processing of an item can be 'listened' to:
public interface ItemProcessListener<T, S> extends StepListener {
void beforeProcess(T item);
void afterProcess(T item, S result);
void onProcessError(T item, Exception e);
}The beforeProcess method will be called
before process on the
ItemProcessor, and is handed the item that will
be processed. The afterProcess method will be
called after the item has been successfully processed. If there was an
error while processing, the onProcessError
method will be called. The exception encountered and the item that was
attempted to be processed will be provided, so that they can be
logged.
The annotations corresponding to this interface are:
@BeforeProcess@AfterProcess@OnProcessError
The writing of an item can be 'listened' to with the
ItemWriteListener:
public interface ItemWriteListener<S> extends StepListener {
void beforeWrite(List<? extends S> items);
void afterWrite(List<? extends S> items);
void onWriteError(Exception exception, List<? extends S> items);
}The beforeWrite method will be called
before write on the
ItemWriter, and is handed the item that will be
written. The afterWrite method will be called
after the item has been successfully written. If there was an error
while writing, the onWriteError method will
be called. The exception encountered and the item that was attempted
to be written will be provided, so that they can be logged.
The annotations corresponding to this interface are:
@BeforeWrite@AfterWrite@OnWriteError
ItemReadListener,
ItemProcessListener, and
ItemWriteListner all provide mechanisms for
being notified of errors, but none will inform you that a record has
actually been skipped. onWriteError, for
example, will be called even if an item is retried and successful. For
this reason, there is a separate interface for tracking skipped
items:
public interface SkipListener<T,S> extends StepListener {
void onSkipInRead(Throwable t);
void onSkipInProcess(T item, Throwable t);
void onSkipInWrite(S item, Throwable t);
}onSkipInRead will be called whenever an
item is skipped while reading. It should be noted that rollbacks may
cause the same item to be registered as skipped more than once.
onSkipInWrite will be called when an item is
skipped while writing. Because the item has been read successfully
(and not skipped), it is also provided the item itself as an
argument.
The annotations corresponding to this interface are:
@OnSkipInRead@OnSkipInWrite@OnSkipInProcess
One of the most common use cases for a
SkipListener is to log out a skipped item, so
that another batch process or even human process can be used to
evaluate and fix the issue leading to the skip. Because there are
many cases in which the original transaction may be rolled back,
Spring Batch makes two guarantees:
The appropriate skip method (depending on when the error happened) will only be called once per item.
The
SkipListenerwill always be called just before the transaction is committed. This is to ensure that any transactional resources call by the listener are not rolled back by a failure within theItemWriter.
Chunk-oriented processing is not the only way to process in a
Step. What if a Step must
consist as a simple stored procedure call? You could implement the call as
an ItemReader and return null after the procedure
finishes, but it is a bit unnatural since there would need to be a no-op
ItemWriter. Spring Batch provides the
TaskletStep for this scenario.
The Tasklet is a simple interface that has
one method, execute, which will be a called
repeatedly by the TaskletStep until it either
returns RepeatStatus.FINISHED or throws an exception to
signal a failure. Each call to the Tasklet is
wrapped in a transaction. Tasklet implementors
might call a stored procedure, a script, or a simple SQL update statement.
To create a TaskletStep, the 'ref' attribute of the
<tasket/> element should reference a bean defining a
Tasklet object; no <chunk/> element should be
used within the <tasket/>:
<step id="step1">
<tasklet ref="myTasklet"/>
</step>Note
TaskletStep will automatically register the
tasklet as StepListener if it implements this
interface
As with other adapters for the ItemReader
and ItemWriter interfaces, the
Tasklet interface contains an implementation that
allows for adapting itself to any pre-existing class:
TaskletAdapter. An example where this may be
useful is an existing DAO that is used to update a flag on a set of
records. The TaskletAdapter can be used to call
this class without having to write an adapter for the
Tasklet interface:
<bean id="myTasklet" class="org.springframework.batch.core.step.tasklet.TaskletAdapter">
<property name="targetObject">
<bean class="org.mycompany.FooDao">
</property>
<property name="targetMethod" value="updateFoo" />
</bean>Many batch jobs contain steps that must be done before the main
processing begins in order to set up various resources or after
processing has completed to cleanup those resources. In the case of a
job that works heavily with files, it is often necessary to delete
certain files locally after they have been uploaded successfully to
another location. The example below taken from the Spring Batch samples
project, is a Tasklet implementation with just
such a responsibility:
public class FileDeletingTasklet implements Tasklet, InitializingBean {
private Resource directory;
public RepeatStatus execute(StepContribution contribution,
ChunkContext chunkContext) throws Exception {
File dir = directory.getFile();
Assert.state(dir.isDirectory());
File[] files = dir.listFiles();
for (int i = 0; i < files.length; i++) {
boolean deleted = files[i].delete();
if (!deleted) {
throw new UnexpectedJobExecutionException("Could not delete file " +
files[i].getPath());
}
}
return RepeatStatus.COMPLETED;
}
public void setDirectoryResource(Resource directory) {
this.directory = directory;
}
public void afterPropertiesSet() throws Exception {
Assert.notNull(directory, "directory must be set");
}
}The above Tasklet implementation will
delete all files within a given directory. It should be noted that the
execute method will only be called once. All
that is left is to reference the Tasklet from the
Step:
<job id="taskletJob">
<step id="deleteFilesInDir">
<tasklet ref="fileDeletingTasklet"/>
</step>
</job>
<beans:bean id="fileDeletingTasklet"
class="org.springframework.batch.sample.tasklet.FileDeletingTasklet">
<beans:property name="directoryResource">
<beans:bean id="directory"
class="org.springframework.core.io.FileSystemResource">
<beans:constructor-arg value="target/test-outputs/test-dir" />
</beans:bean>
</beans:property>
</beans:bean>With the ability to group steps together within an owning job comes
the need to be able to control how the job 'flows' from one step to
another. The failure of a Step doesn't necessarily
mean that the Job should fail. Furthermore, there
may be more than one type of 'success' which determines which
Step should be executed next. Depending upon how a
group of Steps is configured, certain steps may not even be processed at
all.
The simplest flow scenario is a job where all of the steps execute sequentially:
This can be achieved using the 'next' attribute of the step element:
<job id="job">
<step id="stepA" parent="s1" next="stepB" />
<step id="stepB" parent="s2" next="stepC"/>
<step id="stepC" parent="s3" />
</job>In the scenario above, 'step A' will execute
first because it is the first Step listed. If
'step A' completes normally, then 'step B' will execute, and so on.
However, if 'step A' fails, then the entire Job
will fail and 'step B' will not execute.
Note
With the Spring Batch namespace, the first step listed in the
configuration will always be the first step
executed by the Job. The order of the other
step elements does not matter, but the first step must always appear
first in the xml.
In the example above, there are only two possibilities:
The
Stepis successful and the nextStepshould be executed.The
Stepfailed and thus theJobshould fail.
In many cases, this may be sufficient. However, what about a
scenario in which the failure of a Step should
trigger a different Step, rather than causing
failure?
In order to handle more complex scenarios, the
Spring Batch namespace allows transition elements to be defined within
the step element. One such transition is the "next" element. Like the
"next" attribute, the "next" element will tell the
Job which Step to execute
next. However, unlike the attribute, any number of "next" elements are
allowed on a given Step, and there is no default
behavior the case of failure. This means that if transition elements are
used, then all of the behavior for the Step's
transitions must be defined explicitly. Note also that a single step
cannot have both a "next" attribute and a transition element.
The next element specifies a pattern to match and the step to execute next:
<job id="job">
<step id="stepA" parent="s1">
<next on="*" to="stepB" />
<next on="FAILED" to="stepC" />
</step>
<step id="stepB" parent="s2" next="stepC" />
<step id="stepC" parent="s3" />
</job>The "on" attribute of a transition element uses a simple
pattern-matching scheme to match the ExitStatus
that results from the execution of the Step. Only
two special characters are allowed in the pattern:
"*" will zero or more characters
"?" will match exactly one character
For example, "c*t" will match "cat" and "count", while "c?t" will match "cat" but not "count".
While there is no limit to the number of transition elements on a
Step, if the Step's
execution results in an ExitStatus that is not
covered by an element, then the framework will throw an exception and
the Job will fail. It is important to note that
the framework will automatically order transitions from most specific to
least specific. This means that even if the elements were swapped for
"stepA" in the example above, an ExitStatus of
"FAILED" would still go to "stepB".
When configuring a Job for conditional
flow, it is important to understand the difference between
BatchStatus and
ExitStatus. BatchStatus
is an enumeration that is a property of both
JobExecution and
StepExecution and is used by the framework to
record the status of a Job or
Step. It can be one of the following values:
COMPLETED, STARTING, STARTED, STOPPING, STOPPED, FAILED, ABANDONED or
UNKNOWN. Most of them are self explanatory: COMPLETED is the status
set when a step or job has completed successfully, FAILED is set when
it fails, and so on. The example above contains the following 'next'
element:
<next on="FAILED" to="stepB" />
At first glance, it would appear that the 'on' attribute
references the BatchStatus of the
Step to which it belongs. However, it actually
references the ExitStatus of the
Step. As the name implies,
ExitStatus represents the status of a
Step after it finishes execution. More
specifically, the 'next' element above references the exit code of the
ExitStatus. To write it in English, it says:
"go to stepB if the exit code is FAILED". By default, the exit code is
always the same as the BatchStatus for the
Step, which is why the entry above works. However, what if the exit
code needs to be different? A good example comes from the skip sample
job within the samples project:
<step id="step1" parent="s1">
<end on="FAILED" />
<next on="COMPLETED WITH SKIPS" to="errorPrint1" />
<next on="*" to="step2" />
</step>The above step has three possibilities:
The
Stepfailed, in which case the job should fail.The
Stepcompleted successfully.The
Stepcompleted successfully, but with an exit code of 'COMPLETED WITH SKIPS'. In this case, a different step should be run to handle the errors.
The above configuration will work. However, something needs to change the exit code based on the condition of the execution having skipped records:
public class SkipCheckingListener extends StepExecutionListenerSupport {
public ExitStatus afterStep(StepExecution stepExecution) {
String exitCode = stepExecution.getExitStatus().getExitCode();
if (!exitCode.equals(ExitStatus.FAILED.getExitCode()) &&
stepExecution.getSkipCount() > 0) {
return new ExitStatus("COMPLETED WITH SKIPS");
}
else {
return null;
}
}
}The above code is a StepExecutionListener
that first checks to make sure the Step was
successful, and next if the skip count on the
StepExecution is higher than 0. If both
conditions are met, a new ExitStatus with an
exit code of "COMPLETED WITH SKIPS" is returned.
After the discussion of BatchStatus and
ExitStatus, one might wonder how the
BatchStatus and ExitStatus
are determined for the Job. While these statuses
are determined for the Step by the code that is
executed, the statuses for the Job will be
determined based on the configuration.
So far, all of the job configurations discussed have had at least
one final Step with no transitions. For example,
after the following step executes, the Job will
end:
<step id="stepC" parent="s3"/>
If no transitions are defined for a Step,
then the Job's statuses will be defined as
follows:
If the
Stepends withExitStatusFAILED, then theJob'sBatchStatusandExitStatuswill both be FAILED.Otherwise, the
Job'sBatchStatusandExitStatuswill both be COMPLETED.
While this method of terminating a batch job is sufficient for
some batch jobs, such as a simple sequential step job, custom defined
job-stopping scenarios may be required. For this purpose, Spring Batch
provides three transition elements to stop a Job
(in addition to the "next" element
that we discussed previously). Each of these stopping elements will stop
a Job with a particular
BatchStatus. It is important to note that the
stop transition elements will have no effect on either the
BatchStatus or ExitStatus
of any Steps in the Job:
these elements will only affect the final statuses of the
Job. For example, it is possible for every step
in a job to have a status of FAILED but the job to have a status of
COMPLETED, or vise versa.
The 'end' element instructs a Job to stop
with a BatchStatus of COMPLETED. A
Job that has finished with status COMPLETED
cannot be restarted (the framework will throw a
JobInstanceAlreadyCompleteException). The 'end'
element also allows for an optional 'exit-code' attribute that can be
used to customize the ExitStatus of the
Job. If no 'exit-code' attribute is given, then
the ExitStatus will be "COMPLETED" by default,
to match the BatchStatus.
In the following scenario, if step2 fails, then the
Job will stop with a
BatchStatus of COMPLETED and an
ExitStatus of "COMPLETED" and step3 will not
execute; otherwise, execution will move to step3. Note that if step2
fails, the Job will not be restartable (because
the status is COMPLETED).
<step id="step1" parent="s1" next="step2">
<step id="step2" parent="s2">
<end on="FAILED"/>
<next on="*" to="step3"/>
</step>
<step id="step3" parent="s3">The 'fail' element instructs a Job to
stop with a BatchStatus of FAILED. Unlike the
'end' element, the 'fail' element will not prevent the
Job from being restarted. The 'fail' element
also allows for an optional 'exit-code' attribute that can be used to
customize the ExitStatus of the
Job. If no 'exit-code' attribute is given, then
the ExitStatus will be "FAILED" by default, to
match the BatchStatus.
In the following scenario, if step2 fails, then the
Job will stop with a
BatchStatus of FAILED and an
ExitStatus of "EARLY TERMINATION" and step3
will not execute; otherwise, execution will move to step3.
Additionally, if step2 fails, and the Job is
restarted, then execution will begin again on step2.
<step id="step1" parent="s1" next="step2">
<step id="step2" parent="s2">
<fail on="FAILED" exit-code="EARLY TERMINATION"/>
<next on="*" to="step3"/>
</step>
<step id="step3" parent="s3">The 'stop' element instructs a Job to
stop with a BatchStatus of STOPPED. Stopping a
Job can provide a temporary break in processing
so that the operator can take some action before restarting the
Job. The 'stop' element requires a 'restart'
attribute that specifies the step where execution should pick up when
the Job is restarted.
In the following scenario, if step1 finishes with COMPLETE, then the job will then stop. Once it is restarted, execution will begin on step2.
<step id="step1" parent="s1">
<stop on="COMPLETED" restart="step2"/>
</step>
<step id="step2" parent="s2"/>In some situations, more information than the
ExitStatus may be required to decide which step
to execute next. In this case, a
JobExecutionDecider can be used to assist in the
decision.
public class MyDecider implements JobExecutionDecider {
public String decide(JobExecution jobExecution, StepExecution stepExecution) {
if (someCondition) {
return "FAILED";
}
else {
return "COMPLETED";
}
}
}In the job configuration, a "decision" tag will specify the decider to use as well as all of the transitions.
<job id="job">
<step id="step1" parent="s1" next="decision" />
<decision id="decision" decider="decider">
<next on="FAILED" to="step2" />
<next on="COMPLETED" to="step3" />
</decision>
<step id="step2" parent="s2" next="step3"/>
<step id="step3" parent="s3" />
</job>
<beans:bean id="decider" class="com.MyDecider"/>Every scenario described so far has involved a
Job that executes its
Steps one at a time in a linear fashion. In
addition to this typical style, the Spring Batch namespace also allows
for a job to be configured with parallel flows using the 'split'
element. As is seen below, the 'split' element contains one or more
'flow' elements, where entire separate flows can be defined. A 'split'
element may also contain any of the previously discussed transition
elements such as the 'next' attribute or the 'next', 'end', 'fail', or
'pause' elements.
<split id="split1" next="step4">
<flow>
<step id="step1" parent="s1" next="step2"/>
<step id="step2" parent="s2"/>
</flow>
<flow>
<step id="step3" parent="s3"/>
</flow>
</split>
<step id="step4" parent="s4"/>Both the XML and Flat File examples above use the Spring
Resource abstraction to obtain a file. This works
because Resource has a getFile
method, which returns a java.io.File. Both XML and
Flat File resources can be configured using standard Spring
constructs:
<bean id="flatFileItemReader"
class="org.springframework.batch.item.file.FlatFileItemReader">
<property name="resource"
value="file://outputs/20070122.testStream.CustomerReportStep.TEMP.txt" />
</bean>The above Resource will load the file from
the file system location specified. Note that absolute locations have to
start with a double slash ("//"). In most spring applications, this
solution is good enough because the names of these are known at compile
time. However, in batch scenarios, the file name may need to be determined
at runtime as a parameter to the job. This could be solved using '-D'
parameters, i.e. a system property:
<bean id="flatFileItemReader"
class="org.springframework.batch.item.file.FlatFileItemReader">
<property name="resource" value="${input.file.name}" />
</bean>All that would be required for this solution to work would be a
system argument (-Dinput.file.name="file://file.txt"). (Note that although
a PropertyPlaceholderConfigurer can be used here,
it is not necessary if the system property is always set because the
ResourceEditor in Spring already filters and does
placeholder replacement on system properties.)
Often in a batch setting it is preferable to parameterize the file
name in the JobParameters of the
job, instead of through system properties, and access them that way. To
accomplish this, Spring Batch allows for the late binding of various Job
and Step attributes:
<bean id="flatFileItemReader" scope="step"
class="org.springframework.batch.item.file.FlatFileItemReader">
<property name="resource" value="#{jobParameters[input.file.name]}" />
</bean>Both the JobExecution and
StepExecution level
ExecutionContext can be accessed in the same
way:
<bean id="flatFileItemReader" scope="step"
class="org.springframework.batch.item.file.FlatFileItemReader">
<property name="resource" value="#{jobExecutionContext[input.file.name]}" />
</bean><bean id="flatFileItemReader" scope="step"
class="org.springframework.batch.item.file.FlatFileItemReader">
<property name="resource" value="#{stepExecutionContext[input.file.name]}" />
</bean>Note
Any bean that uses late-binding must be declared with scope="step". See for Section 5.4.1, “Step Scope” more information.
All of the late binding examples from above have a scope of "step" declared on the bean definition:
<bean id="flatFileItemReader" scope="step"
class="org.springframework.batch.item.file.FlatFileItemReader">
<property name="resource" value="#{jobParameters[input.file.name]}" />
</bean>Using a scope of Step is required in order
to use late binding since the bean cannot actually be instantiated until
the Step starts, which allows the attributes to
be found. Because it is not part of the Spring container by default, it
must be added explicitly, either by using the batch
namespace:
<beans:beans xmlns="http://www.springframework.org/schema/beans"
xmlns:batch="http://www.springframework.org/schema/batch"
xmlns:xsi="http://www.w3.org/2001/XMLSchema-instance"
xsi:schemaLocation="...">
...
</beans:beans>or by including a bean definition explicitly for
theStep (but not both):
<bean class="org.springframework.batch.core.scope.StepScope" />
All batch processing can be described in its most simple form as
reading in large amounts of data, performing some type of calculation or
transformation, and writing the result out. Spring Batch provides three key
interfaces to help perform bulk reading and writing:
ItemReader, ItemProcessor and
ItemWriter.
Although a simple concept, an ItemReader is
the means for providing data from many different types of input. The most
general examples include:
Flat File- Flat File Item Readers read lines of data from a flat file that typically describe records with fields of data defined by fixed positions in the file or delimited by some special character (e.g. Comma).
XML - XML ItemReaders process XML independently of technologies used for parsing, mapping and validating objects. Input data allows for the validation of an XML file against an XSD schema.
Database - A database resource is accessed to return resultsets which can be mapped to objects for processing. The default SQL ItemReaders invoke a
RowMapperto return objects, keep track of the current row if restart is required, store basic statistics, and provide some transaction enhancements that will be explained later.
There are many more possibilities, but we'll focus on the basic ones for this chapter. A complete list of all available ItemReaders can be found in Appendix A.
ItemReader is a basic interface for generic
input operations:
public interface ItemReader<T> {
T read() throws Exception, UnexpectedInputException, ParseException;
}The read method defines the most essential
contract of the ItemReader; calling it returns one
Item or null if no more items are left. An item might represent a line in
a file, a row in a database, or an element in an XML file. It is generally
expected that these will be mapped to a usable domain object (i.e. Trade,
Foo, etc) but there is no requirement in the contract to do so.
It is expected that implementations of the
ItemReader interface will be forward only. However,
if the underlying resource is transactional (such as a JMS queue) then
calling read may return the same logical item on subsequent calls in a
rollback scenario. It is also worth noting that a lack of items to process
by an ItemReader will not cause an exception to be
thrown. For example, a database ItemReader that is
configured with a query that returns 0 results will simply return null on
the first invocation of read.
ItemWriter is similar in functionality to an
ItemReader, but with inverse operations. Resources
still need to be located, opened and closed but they differ in that an
ItemWriter writes out, rather than reading in. In
the case of databases or queues these may be inserts, updates, or sends.
The format of the serialization of the output is specific to each batch
job.
As with ItemReader,
ItemWriter is a fairly generic interface:
public interface ItemWriter<T> {

    void write(List<? extends T> items) throws Exception;

}
As with read on
ItemReader, write provides
the basic contract of ItemWriter; it will attempt
to write out the list of items passed in as long as it is open. Because it
is generally expected that items will be 'batched' together into a chunk
and then output, the interface accepts a list of items, rather than an
item by itself. After writing out the list, any flushing that may be
necessary can be performed before returning from the write method. For
example, if writing to a Hibernate DAO, multiple calls to write can be
made, one for each item. The writer can then call close on the hibernate
Session before returning.
The ItemReader and
ItemWriter interfaces are both very useful for
their specific tasks, but what if you want to insert business logic before
writing? One option for both reading and writing is to use the composite
pattern: create an ItemWriter that contains another
ItemWriter, or an ItemReader
that contains another ItemReader. For
example:
public class CompositeItemWriter<T> implements ItemWriter<T> {

    ItemWriter<T> itemWriter;

    public CompositeItemWriter(ItemWriter<T> itemWriter) {
        this.itemWriter = itemWriter;
    }

    public void write(List<? extends T> items) throws Exception {
        //Add business logic here
       itemWriter.write(item);
    }

    public void setDelegate(ItemWriter<T> itemWriter){
        this.itemWriter = itemWriter;
    }
}
The class above contains another ItemWriter
to which it delgates after having provided some business logic. This
pattern could easily be used for an ItemReader as
well, perhaps to obtain more reference data based upon the input that was
provided by the main ItemReader. It is also useful
if you need to control the call to write yourself.
However, if you only want to 'transform' the item passed in for writing
before it is actually written, there isn't much need to call
write yourself: you just want to modify the item.
For this scenario, Spring Batch provides the
ItemProcessor interface:
public interface ItemProcessor<I, O> {

    O process(I item) throws Exception;
}
An ItemProcessor is very simple; given one
object, transform it and return another. The provided object may or may
not be of the same type. The point is that business logic may be applied
within process, and is completely up to the developer to create. An
ItemProcessor can be wired directly into a step,
For example, assuming an ItemReader provides a
class of type Foo, and it needs to be converted to type Bar before being
written out. An ItemProcessor can be written that
performs the conversion:
public class Foo {}

public class Bar {
    public Bar(Foo foo) {}
}

public class FooProcessor implements ItemProcessor<Foo,Bar>{
    public Bar process(Foo foo) throws Exception {
        //Perform simple transformation, convert a Foo to a Bar
        return new Bar(foo);
    }
}

public class BarWriter implements ItemWriter<Bar>{
    public void write(List<? extends Bar> bars) throws Exception {
        //write bars
    }
}
In the very simple example above, there is a class
Foo, a class Bar, and a
class FooProcessor that adheres to the
ItemProcessor interface. The transformation is
simple, but any type of transformation could be done here. The
BarWriter will be used to write out
Bar objects, throwing an exception if any other
type is provided. Similarly, the FooProcessor will
throw an exception if anything but a Foo is
provided. The FooProcessor can then be injected
into a Step:
<job id="ioSampleJob">
    <step name="step1">
        <tasklet>
            <chunk reader="fooReader" processor="fooProcessor" writer="barWriter"
                   commit-interval="2"/>
        </tasklet>
    </step>
</job>Performing a single transformation is useful in many scenarios,
but what if you want to 'chain' together multiple
ItemProcessors? This can be accomplished using
the composite pattern mentioned previously. To update the previous,
single transformation, example, Foo will be
transformed to Bar, which will be transformed to
Foobar and written out:
public class Foo {}

public class Bar {
    public Bar(Foo foo) {}
}

public class Foobar{
    public Foobar(Bar bar) {}
}

public class FooProcessor implements ItemProcessor<Foo,Bar>{
    public Bar process(Foo foo) throws Exception {
        //Perform simple transformation, convert a Foo to a Bar
        return new Bar(foo);
    }
}

public class BarProcessor implements ItemProcessor<Bar,FooBar>{
    public FooBar process(Bar bar) throws Exception {
        return new Foobar(bar);
    }
}

public class FoobarWriter implements ItemWriter<FooBar>{
    public void write(List<? extends FooBar> items) throws Exception {
        //write items
    }
}
A FooProcessor and
BarProcessor can be 'chained' together to give
the resultant Foobar:
CompositeItemProcessor<Foo,Foobar> compositeProcessor =
                                      new CompositeItemProcessor<Foo,Foobar>();
List itemProcessors = new ArrayList();
itemProcessors.add(new FooTransformer());
itemProcessors.add(new BarTransformer());
compositeProcessor.setItemProcessors(itemProcessors);
Just as with the previous example, the composite processor can be
configured into the Step:
<job id="ioSampleJob">
    <step name="step1">
        <tasklet>
            <chunk reader="fooReader" processor="compositeProcessor" writer="foobarWriter"
                   commit-interval="2"/>
        </tasklet>
    </step>
</job>

<bean id="compositeItemProcessor"
      class="org.springframework.batch.item.support.CompositeItemProcessor">
    <property name="itemProcessors">
        <list>
            <bean class="..FooProcessor" />
            <bean class="..BarProcessor" />
        </list>
    </property>
</bean>One typical use for an item processor is to filter out records before they are passed to the ItemWriter. Filtering is an action distinct from skipping; skipping indicates that a record is invalid whereas filtering simply indicates that a record should not be written.
For example, consider a batch job that reads a file containing
three different types of records: records to insert, records to update,
and records to delete. If record deletion is not supported by the
system, then we would not want to send any "delete" records to the
ItemWriter. But, since these records are not
actually bad records, we would want to filter them out, rather than
skip. As a result, the ItemWriter would receive only "insert" and
"update" records.
To filter a record, one simply returns "null" from the
ItemProcessor. The framework will detect that the
result is "null" and avoid adding that item to the list of records
delivered to the ItemWriter. As usual, an
exception thrown from the ItemProcessor will
result in a skip.
Both ItemReaders and
ItemWriters serve their individual purposes well,
but there is a common concern among both of them that necessitates another
interface. In general, as part of the scope of a batch job, readers and
writers need to be opened, closed, and require a mechanism for persisting
state:
public interface ItemStream {

    void open(ExecutionContext executionContext) throws ItemStreamException;

    void update(ExecutionContext executionContext) throws ItemStreamException;

    void close() throws ItemStreamException;
}
Before describing each method, we should mention the
ExecutionContext. Clients of an
ItemReader that also implement
ItemStream should call
open before any calls to
read in order to open any resources such as files
or to obtain connections. A similar restriction applies to an
ItemWriter that implements
ItemStream. As mentioned in Chapter 2, if expected
data is found in the ExecutionContext, it may be
used to start the ItemReader or
ItemWriter at a location other than its initial
state. Conversely, close will be called to ensure
that any resources allocated during open will be
released safely. update is called primarily to
ensure that any state currently being held is loaded into the provided
ExecutionContext. This method will be called before
committing, to ensure that the current state is persisted in the database
before commit.
In the special case where the client of an
ItemStream is a Step (from
the Spring Batch Core), an ExecutionContext is
created for each StepExecution to allow users to
store the state of a particular execution, with the expectation that it
will be returned if the same JobInstance is started
again. For those familiar with Quartz, the semantics are very similar to a
Quartz JobDataMap.
Note that the CompositeItemWriter is an
example of the delegation pattern, which is common in Spring Batch. The
delegates themselves might implement callback interfaces like
ItemStream or StepListener.
If they do, and they are being used in conjunction with Spring Batch Core
as part of a Step in a Job,
then they almost certainly need to be registered manually with the
Step. A reader, writer, or processor that is
directly wired into the Step will be registered automatically if it
implements ItemStream or a
StepListener interface. But because the delegates
are not known to the Step, they need to be injected
as listeners or streams (or both if appropriate):
<job id="ioSampleJob">
    <step name="step1">
        <tasklet>
            <chunk reader="fooReader" processor="fooProcessor" writer="compositeItemWriter"
                   commit-interval="2">
                    <streams>
                    <stream ref="barWriter" />
                </streams>
            </chunk>
        </tasklet>
    </step>
</job>

<bean id="compositeItemWriter" class="...CompositeItemWriter">
    <property name="delegate" ref="barWriter" />
</bean>

<bean id="barWriter" class="...BarWriter" />One of the most common mechanisms for interchanging bulk data has always been the flat file. Unlike XML, which has an agreed upon standard for defining how it is structured (XSD), anyone reading a flat file must understand ahead of time exactly how the file is structured. In general, all flat files fall into two types: Delimited and Fixed Length. Delimited files are those in which fields are separated by a delimiter, such as a comma. Fixed Length files have fields that are a set length.
When working with flat files in Spring Batch, regardless of
whether it is for input or output, one of the most important classes is
the FieldSet. Many architectures and libraries
contain abstractions for helping you read in from a file, but they
usually return a String or an array of Strings. This really only gets
you halfway there. A FieldSet is Spring Batch’s
abstraction for enabling the binding of fields from a file resource. It
allows developers to work with file input in much the same way as they
would work with database input. A FieldSet is
conceptually very similar to a Jdbc ResultSet.
FieldSets only require one argument, a String
array of tokens. Optionally, you can also configure in the names of the
fields so that the fields may be accessed either by index or name as
patterned after ResultSet:
String[] tokens = new String[]{"foo", "1", "true"};
FieldSet fs = new DefaultFieldSet(tokens);
String name = fs.readString(0);
int value = fs.readInt(1);
boolean booleanValue = fs.readBoolean(2);
There are many more options on the FieldSet
interface, such as Date, long,
BigDecimal, etc. The biggest advantage of the
FieldSet is that it provides consistent parsing
of flat file input. Rather than each batch job parsing differently in
potentially unexpected ways, it can be consistent, both when handling
errors caused by a format exception, or when doing simple data
conversions.
A flat file is any type of file that contains at most
two-dimensional (tabular) data. Reading flat files in the Spring Batch
framework is facilitated by the class
FlatFileItemReader, which provides basic
functionality for reading and parsing flat files. The two most important
required dependencies of FlatFileItemReader are
Resource and LineMapper.
The LineMapper interface will be
explored more in the next sections. The resource property represents a
Spring Core Resource. Documentation explaining
how to create beans of this type can be found in Spring
Framework, Chapter 4.Resources. Therefore, this
guide will not go into the details of creating
Resource objects. However, a simple example of a
file system resource can be found below:
Resource resource = new FileSystemResource("resources/trades.csv");In complex batch environments the directory structures are often managed by the EAI infrastructure where drop zones for external interfaces are established for moving files from ftp locations to batch processing locations and vice versa. File moving utilities are beyond the scope of the spring batch architecture but it is not unusual for batch job streams to include file moving utilities as steps in the job stream. It is sufficient that the batch architecture only needs to know how to locate the files to be processed. Spring Batch begins the process of feeding the data into the pipe from this starting point. However, Spring Integration provides many of these types of services.
The other properties in FlatFileItemReader
allow you to further specify how your data will be interpreted:
Table 6.1. FlatFileItemReader Properties
| Property | Type | Description |
|---|---|---|
| comments | String[] | Specifies line prefixes that indicate comment rows |
| encoding | String | Specifies what text encoding to use - default is "ISO-8859-1" |
| lineMapper | LineMapper | Converts a String
to an Object representing the
item. |
| linesToSkip | int | Number of lines to ignore at the top of the file |
| recordSeparatorPolicy | RecordSeparatorPolicy | Used to determine where the line endings are and do things like continue over a line ending if inside a quoted string. |
| resource | Resource | The resource from which to read. |
| skippedLinesCallback | LineCallbackHandler | Interface which passes the raw line content of the lines in the file to be skipped. If linesToSkip is set to 2, then this interface will be called twice. |
| strict | boolean | In strict mode, the reader will throw an exception on ExecutionContext if the input resource does not exist. |
As with RowMapper, which takes a low
level construct such as ResultSet and returns
an Object, flat file processing requires the
same construct to convert a String line into an
Object:
public interface LineMapper<T> {

    T mapLine(String line, int lineNumber) throws Exception;

}
The basic contract is that, given the current line and the line
number with which it is associated, the mapper should return a
resulting domain object. This is similar to
RowMapper in that each line is associated with
its line number, just as each row in a
ResultSet is tied to its row number. This
allows the line number to be tied to the resulting domain object for
identity comparison or for more informative logging. However, unlike
RowMapper, the
LineMapper is given a raw line which, as
discussed above, only gets you halfway there. The line must be
tokenized into a FieldSet, which can then be
mapped to an object, as described below.
An abstraction for turning a line of input into a line into a
FieldSet is necessary because there can be many
formats of flat file data that need to be converted to a
FieldSet. In Spring Batch, this interface is
the LineTokenizer:
public interface LineTokenizer {

    FieldSet tokenize(String line);

}
The contract of a LineTokenizer is such
that, given a line of input (in theory the
String could encompass more than one line), a
FieldSet representing the line will be
returned. This FieldSet can then be passed to a
FieldSetMapper. Spring Batch contains the
following LineTokenizer implementations:
DelmitedLineTokenizer- Used for files where fields in a record are separated by a delimiter. The most common delimiter is a comma, but pipes or semicolons are often used as well.FixedLengthTokenizer- Used for files where fields in a record are each a 'fixed width'. The width of each field must be defined for each record type.PatternMatchingCompositeLineTokenizer- Determines which among a list ofLineTokenizers should be used on a particular line by checking against a pattern.
The FieldSetMapper interface defines a
single method, mapFieldSet, which takes a
FieldSet object and maps its contents to an
object. This object may be a custom DTO, a domain object, or a simple
array, depending on the needs of the job. The
FieldSetMapper is used in conjunction with the
LineTokenizer to translate a line of data from
a resource into an object of the desired type:
public interface FieldSetMapper<T> {

    T mapFieldSet(FieldSet fieldSet);

}
The pattern used is the same as the
RowMapper used by
JdbcTemplate.
Now that the basic interfaces for reading in flat files have been defined, it becomes clear that three basic steps are required:
Read one line from the file.
Pass the string line into the
LineTokenizer#tokenize() method, in order to retrieve aFieldSet.Pass the
FieldSetreturned from tokenizing to aFieldSetMapper, returning the result from theItemReader#read() method.
The two interfaces described above represent two separate tasks:
converting a line into a FieldSet, and mapping
a FieldSet to a domain object. Because the
input of a LineTokenizer matches the input of
the LineMapper (a line), and the output of a
FieldSetMapper matches the output of the
LineMapper, a default implementation that uses
both a LineTokenizer and
FieldSetMapper is provided. The
DefaultLineMapper represents the behavior most
users will need:
public class DefaultLineMapper<T> implements LineMapper<T>, InitializingBean {

    private LineTokenizer tokenizer;

    private FieldSetMapper<T> fieldSetMapper;

    public T mapLine(String line, int lineNumber) throws Exception {
        return fieldSetMapper.mapFieldSet(tokenizer.tokenize(line));
    }

    public void setLineTokenizer(LineTokenizer tokenizer) {
        this.tokenizer = tokenizer;
    }

    public void setFieldSetMapper(FieldSetMapper<T> fieldSetMapper) {
        this.fieldSetMapper = fieldSetMapper;
    }
}
The above functionality is provided in a default implementation, rather than being built into the reader itself (as was done in previous versions of the framework) in order to allow users greater flexibility in controlling the parsing process, especially if access to the raw line is needed.
The following example will be used to illustrate this using an actual domain scenario. This particular batch job reads in football players from the following file:
ID,lastName,firstName,position,birthYear,debutYear
"AbduKa00,Abdul-Jabbar,Karim,rb,1974,1996",
"AbduRa00,Abdullah,Rabih,rb,1975,1999",
"AberWa00,Abercrombie,Walter,rb,1959,1982",
"AbraDa00,Abramowicz,Danny,wr,1945,1967",
"AdamBo00,Adams,Bob,te,1946,1969",
"AdamCh00,Adams,Charlie,wr,1979,2003"
The contents of this file will be mapped to the following
Player domain object:
public class Player implements Serializable {

    private String ID;
    private String lastName;
    private String firstName;
    private String position;
    private int birthYear;
    private int debutYear;

    public String toString() {
        return "PLAYER:ID=" + ID + ",Last Name=" + lastName +
            ",First Name=" + firstName + ",Position=" + position +
            ",Birth Year=" + birthYear + ",DebutYear=" +
            debutYear;
    }

    // setters and getters...
}
In order to map a FieldSet into a
Player object, a
FieldSetMapper that returns players needs to be
defined:
protected static class PlayerFieldSetMapper implements FieldSetMapper<Player> {
    public Player mapFieldSet(FieldSet fieldSet) {
        Player player = new Player();

        player.setID(fieldSet.readString(0));
        player.setLastName(fieldSet.readString(1));
        player.setFirstName(fieldSet.readString(2));
        player.setPosition(fieldSet.readString(3));
        player.setBirthYear(fieldSet.readInt(4));
        player.setDebutYear(fieldSet.readInt(5));

        return player;
    }
}
The file can then be read by correctly constructing a
FlatFileItemReader and calling
read:
FlatFileItemReader<Player> itemReader = new FlatFileItemReader<Player>();
itemReader.setResource(new FileSystemResource("resources/players.csv"));
//DelimitedLineTokenizer defaults to comma as its delimiter
LineMapper<Player> lineMapper = new DefaultLineMapper<Player>();
lineMapper.setLineTokenizer(new DelimitedLineTokenizer());
lineMapper.setFieldSetMapper(new PlayerFieldSetMapper());
itemReader.setLineMapper(lineMapper);
itemReader.open(new ExecutionContext());
Player player = itemReader.read();
Each call to read will return a new
Player object from each line in the file. When the end of the file is
reached, null will be returned.
There is one additional piece of functionality that is allowed
by both DelimitedLineTokenizer and
FixedLengthTokenizer that is similar in
function to a Jdbc ResultSet. The names of the
fields can be injected into either of these
LineTokenizer implementations to increase the
readability of the mapping function. First, the column names of all
fields in the flat file are injected into the tokenizer:
tokenizer.setNames(new String[] {"ID", "lastName","firstName","position","birthYear","debutYear"}); A FieldSetMapper can use this information
as follows:
public class PlayerMapper implements FieldSetMapper<Player> {
    public Player mapFieldSet(FieldSet fs) {

       if(fs == null){
           return null;
       }

       Player player = new Player();
       player.setID(fs.readString("ID"));
       player.setLastName(fs.readString("lastName"));
       player.setFirstName(fs.readString("firstName"));
       player.setPosition(fs.readString("position"));
       player.setDebutYear(fs.readInt("debutYear"));
       player.setBirthYear(fs.readInt("birthYear"));

       return player;
   }
}For many, having to write a specific
FieldSetMapper is equally as cumbersome as
writing a specific RowMapper for a
JdbcTemplate. Spring Batch makes this easier by
providing a FieldSetMapper that automatically
maps fields by matching a field name with a setter on the object using
the JavaBean specification. Again using the football example, the
BeanWrapperFieldSetMapper configuration looks
like the following:
<bean id="fieldSetMapper"
      class="org.springframework.batch.item.file.mapping.BeanWrapperFieldSetMapper">
    <property name="prototypeBeanName" value="player" />
</bean>

<bean id="player"
      class="org.springframework.batch.sample.domain.Player"
      scope="prototype" />
For each entry in the FieldSet, the
mapper will look for a corresponding setter on a new instance of the
Player object (for this reason, prototype scope
is required) in the same way the Spring container will look for
setters matching a property name. Each available field in the
FieldSet will be mapped, and the resultant
Player object will be returned, with no code
required.
So far only delimited files have been discussed in much detail, however, they represent only half of the file reading picture. Many organizations that use flat files use fixed length formats. An example fixed length file is below:
UK21341EAH4121131.11customer1
UK21341EAH4221232.11customer2
UK21341EAH4321333.11customer3
UK21341EAH4421434.11customer4
UK21341EAH4521535.11customer5
While this looks like one large field, it actually represent 4 distinct fields:
ISIN: Unique identifier for the item being order - 12 characters long.
Quantity: Number of this item being ordered - 3 characters long.
Price: Price of the item - 5 characters long.
Customer: Id of the customer ordering the item - 9 characters long.
When configuring the
FixedLengthLineTokenizer, each of these lengths
must be provided in the form of ranges:
<bean id="fixedLengthLineTokenizer"
      class="org.springframework.batch.io.file.transform.FixedLengthTokenizer">
    <property name="names" value="ISIN,Quantity,Price,Customer" />
    <property name="columns" value="1-12, 13-15, 16-20, 21-29" />
</bean>
Because the FixedLengthLineTokenizer uses
the same LineTokenizer interface as discussed
above, it will return the same FieldSet as if a
delimiter had been used. This allows the same approaches to be used in
handling its output, such as using the
BeanWrapperFieldSetMapper.
Note
Supporting the above syntax for ranges requires that a
specialized property editor,
RangeArrayPropertyEditor, be configured in
the ApplicationContext. However, this bean
is automatically declared in an
ApplicationContext where the batch
namespace is used.
All of the file reading examples up to this point have all made a key assumption for simplicity's sake: all of the records in a file have the same format. However, this may not always be the case. It is very common that a file might have records with different formats that need to be tokenized differently and mapped to different objects. The following excerpt from a file illustrates this:
USER;Smith;Peter;;T;20014539;F
LINEA;1044391041ABC037.49G201XX1383.12H
LINEB;2134776319DEF422.99M005LI
In this file we have three types of records, "USER", "LINEA", and "LINEB". A "USER" line corresponds to a User object. "LINEA" and "LINEB" both correspond to Line objects, though a "LINEA" has more information than a "LINEB".
The ItemReader will read each line
individually, but we must specify different
LineTokenizer and
FieldSetMapper objects so that the
ItemWriter will receive the correct items. The
PatternMatchingCompositeLineMapper makes this
easy by allowing maps of patterns to
LineTokenizers and patterns to
FieldSetMappers to be configured:
<bean id="orderFileLineMapper"
      class="org.spr...PatternMatchingCompositeLineMapper">
    <property name="tokenizers">
        <map>
            <entry key="USER*" value-ref="userTokenizer" />
            <entry key="LINEA*" value-ref="lineATokenizer" />
            <entry key="LINEB*" value-ref="lineBTokenizer" />
        </map>
    </property>
    <property name="fieldSetMappers">
        <map>
            <entry key="USER*" value-ref="userFieldSetMapper" />
            <entry key="LINE*" value-ref="lineFieldSetMapper" />
        </map>
    </property>
</bean>
In this example, "LINEA" and "LINEB" have separate
LineTokenizers but they both use the same
FieldSetMapper.
The PatternMatchingCompositeLineMapper
makes use of the PatternMatcher's
match method in order to select the correct
delegate for each line. The PatternMatcher
allows for two wildcard characters with special meaning: the question
mark ("?") will match exactly one character, while the asterisk ("*")
will match zero or more characters. Note that in the configuration
above, all patterns end with an asterisk, making them effectively
prefixes to lines. The PatternMatcher will
always match the most specific pattern possible, regardless of the
order in the configuration. So if "LINE*" and "LINEA*" were both
listed as patterns, "LINEA" would match pattern "LINEA*", while
"LINEB" would match pattern "LINE*". Additionally, a single asterisk
("*") can serve as a default by matching any line not matched by any
other pattern.
<entry key="*" value-ref="defaultLineTokenizer" />
There is also a
PatternMatchingCompositeLineTokenizer that can
be used for tokenization alone.
It is also common for a flat file to contain records that each span multiple lines. To handle this situation, a more complex strategy is required. A demonstration of this common pattern can be found in Section 11.5, “Multi-Line Records”.
There are many scenarios when tokenizing a line may cause
exceptions to be thrown. Many flat files are imperfect and contain
records that aren't formatted correctly. Many users choose to skip
these erroneous lines, logging out the issue, original line, and line
number. These logs can later be inspected manually or by another batch
job. For this reason, Spring Batch provides a hierarchy of exceptions
for handling parse exceptions:
FlatFileParseException and
FlatFileFormatException.
FlatFileParseException is thrown by the
FlatFileItemReader when any errors are
encountered while trying to read a file.
FlatFileFormatException is thrown by
implementations of the LineTokenizer interface,
and indicates a more specific error encountered while
tokenizing.
Both DelimitedLineTokenizer and
FixedLengthLineTokenizer have the ability to
specify column names that can be used for creating a
FieldSet. However, if the number of column
names doesn't match the number of columns found while tokenizing a
line the FieldSet can't be created, and a
IncorrectTokenCountException is thrown, which
contains the number of tokens encountered, and the number
expected:
tokenizer.setNames(new String[] {"A", "B", "C", "D"});

try{
    tokenizer.tokenize("a,b,c");
}
catch(IncorrectTokenCountException e){
    assertEquals(4, e.getExpectedCount());
    assertEquals(3, e.getActualCount());
}
Because the tokenizer was configured with 4 column names, but
only 3 tokens were found in the file, an
IncorrectTokenCountException was
thrown.
Files formatted in a fixed length format have additional requirements when parsing because, unlike a delimited format, each column must strictly adhere to its predefined width. If the total line length doesn't add up to the widest value of this column, an exception is thrown:
tokenizer.setColumns(new Range[] { new Range(1, 5),
                                   new Range(6, 10),
                                   new Range(11, 15) });
try {
    tokenizer.tokenize("12345");
    fail("Expected IncorrectLineLengthException");
}
catch (IncorrectLineLengthException ex) {
    assertEquals(15, ex.getExpectedLength());
    assertEquals(5, ex.getActualLength());
}
The configured ranges for the tokenizer above are: 1-5, 6-10,
and 11-15, thus the total length of the line expected is 15.
However, in this case a line of length 5 was passed in, causing an
IncorrectLineLengthException to be thrown.
Throwing an exception here rather than only mapping the first column
allows the processing of the line to fail earlier, and with more
information than it would if it failed while trying to read in
column 2 in a FieldSetMapper. However, there
are scenarios where the length of the line isn't always constant.
For this reason, validation of line length can be turned off via the
'strict' property:
tokenizer.setColumns(new Range[] { new Range(1, 5), new Range(6, 10) });
tokenizer.setStrict(false);
FieldSet tokens = tokenizer.tokenize("12345");
assertEquals("12345", tokens.readString(0));
assertEquals("", tokens.readString(1));
The above example is almost identical to the one before it,
except that tokenizer.setStrict(false) was called. This setting
tells the tokenizer to not enforce line lengths when tokenizing the
line. A FieldSet is now correctly created and
returned. However, it will only contain empty tokens for the
remaining values.
Writing out to flat files has the same problems and issues that reading in from a file must overcome. A step must be able to write out in either delimited or fixed length formats in a transactional manner.
Just as the LineTokenizer interface is
necessary to take an item and turn it into a
String, file writing must have a way to
aggregate multiple fields into a single string for writing to a file.
In Spring Batch this is the
LineAggregator:
public interface LineAggregator<T> {

    public String aggregate(T item);

}
The LineAggregator is the opposite of a
LineTokenizer.
LineTokenizer takes a
String and returns a
FieldSet, whereas
LineAggregator takes an
item and returns a
String.
The most basic implementation of the LineAggregator interface
is the PassThroughLineAggregator, which
simply assumes that the object is already a string, or that its
string representation is acceptable for writing:
public class PassThroughLineAggregator<T> implements LineAggregator<T> {

    public String aggregate(T item) {
        return item.toString();
    }
}
The above implementation is useful if direct control of
creating the string is required, but the advantages of a
FlatFileItemWriter, such as transaction and
restart support, are necessary.
Now that the LineAggregator interface and
its most basic implementation,
PassThroughLineAggregator, have been defined,
the basic flow of writing can be explained:
The object to be written is passed to the
LineAggregatorin order to obtain aString.The returned
Stringis written to the configured file.
The following excerpt from the
FlatFileItemWriter expresses this in
code:
public void write(T item) throws Exception {
    write(lineAggregator.aggregate(item) + LINE_SEPARATOR);
}
A simple configuration would look like the following:
<bean id="itemWriter" class="org.spr...FlatFileItemWriter">
    <property name="resource" value="file:target/test-outputs/output.txt" />
    <property name="lineAggregator">
        <bean class="org.spr...PassThroughLineAggregator"/>
    </property>
</bean>The above example may be useful for the most basic uses of a
writing to a file. However, most users of the
FlatFileItemWriter will have a domain object
that needs to be written out, and thus must be converted into a line.
In file reading, the following was required:
Read one line from the file.
Pass the string line into the
LineTokenizer#tokenize() method, in order to retrieve aFieldSetPass the
FieldSetreturned from tokenizing to aFieldSetMapper, returning the result from theItemReader#read() method
File writing has similar, but inverse steps:
Pass the item to be written to the writer
convert the fields on the item into an array
aggregate the resulting array into a line
Because there is no way for the framework to know which fields
from the object need to be written out, a
FieldExtractor must be written to accomplish
the task of turning the item into an array:
public interface FieldExtractor<T> {

    Object[] extract(T item);

}
Implementations of the FieldExtractor
interface should create an array from the fields of the provided
object, which can then be written out with a delimiter between the
elements, or as part of a field-width line.
There are many cases where a collection, such as an array,
Collection, or
FieldSet, needs to be written out.
"Extracting" an array from a one of these collection types is very
straightforward: simply convert the collection to an array.
Therefore, the PassThroughFieldExtractor
should be used in this scenario. It should be noted, that if the
object passed in is not a type of collection, then the
PassThroughFieldExtractor will return an
array containing solely the item to be extracted.
As with the BeanWrapperFieldSetMapper
described in the file reading section, it is often preferable to
configure how to convert a domain object to an object array, rather
than writing the conversion yourself. The
BeanWrapperFieldExtractor provides just this
type of functionality:
BeanWrapperFieldExtractor<Name> extractor = new BeanWrapperFieldExtractor<Name>();
extractor.setNames(new String[] { "first", "last", "born" });

String first = "Alan";
String last = "Turing";
int born = 1912;

Name n = new Name(first, last, born);
Object[] values = extractor.extract(n);

assertEquals(first, values[0]);
assertEquals(last, values[1]);
assertEquals(born, values[2]);
This extractor implementation has only one required property,
the names of the fields to map. Just as the
BeanWrapperFieldSetMapper needs field names
to map fields on the FieldSet to setters on
the provided object, the
BeanWrapperFieldExtractor needs names to map
to getters for creating an object array. It is worth noting that the
order of the names determines the order of the fields within the
array.
The most basic flat file format is one in which all fields are
separated by a delimiter. This can be accomplished using a
DelimitedLineAggregator. The example below
writes out a simple domain object that represents a credit to a
customer account:
public class CustomerCredit {

    private int id;
    private String name;
    private BigDecimal credit;

    //getters and setters removed for clarity
}
Because a domain object is being used, an implementation of the FieldExtractor interface must be provided, along with the delimiter to use:
<bean id="itemWriter" class="org.springframework.batch.item.file.FlatFileItemWriter">
    <property name="resource" ref="outputResource" />
    <property name="lineAggregator">
        <bean class="org.spr...DelimitedLineAggregator">
            <property name="delimiter" value=","/>
            <property name="fieldExtractor">
                <bean class="org.spr...BeanWrapperFieldExtractor">
                    <property name="names" value="name,credit"/>
                </bean>
            </property>
        </bean>
    </property>
</bean>
In this case, the
BeanWrapperFieldExtractor described earlier in
this chapter is used to turn the name and credit fields within
CustomerCredit into an object array, which is
then written out with commas between each field.
Delimited is not the only type of flat file format. Many prefer
to use a set width for each column to delineate between fields, which
is usually referred to as 'fixed width'. Spring Batch supports this in
file writing via the FormatterLineAggregator.
Using the same CustomerCredit domain object
described above, it can be configured as follows:
<bean id="itemWriter" class="org.springframework.batch.item.file.FlatFileItemWriter">
    <property name="resource" ref="outputResource" />
    <property name="lineAggregator">
        <bean class="org.spr...FormatterLineAggregator">
            <property name="fieldExtractor">
                <bean class="org.spr...BeanWrapperFieldExtractor">
                    <property name="names" value="name,credit" />
                </bean>
            </property>
            <property name="format" value="%-9s%-2.0f" />
        </bean>
    </property>
</bean>
Most of the above example should look familiar. However, the value of the format property is new:
<property name="format" value="%-9s%-2.0f" />
The underlying implementation is built using the same
Formatter added as part of Java 5. The Java
Formatter is based on the
printf functionality of the C programming
language. Most details on how to configure a formatter can be found in
the javadoc of Formatter.
FlatFileItemReader has a very simple
relationship with file resources. When the reader is initialized, it
opens the file if it exists, and throws an exception if it does not.
File writing isn't quite so simple. At first glance it seems like a
similar straight forward contract should exist for
FlatFileItemWriter: if the file already exists,
throw an exception, and if it does not, create it and start writing.
However, potentially restarting a Job can cause
issues. In normal restart scenarios, the contract is reversed: if the
file exists, start writing to it from the last known good position,
and if it does not, throw an exception. However, what happens if the
file name for this job is always the same? In this case, you would
want to delete the file if it exists, unless it's a restart. Because
of this possibility, the FlatFileItemWriter
contains the property, shouldDeleteIfExists.
Setting this property to true will cause an existing file with the
same name to be deleted when the writer is opened.
Spring Batch provides transactional infrastructure for both reading XML records and mapping them to Java objects as well as writing Java objects as XML records.
Constraints on streaming XML
The StAX API is used for I/O as other standard XML parsing APIs do not fit batch processing requirements (DOM loads the whole input into memory at once and SAX controls the parsing process allowing the user only to provide callbacks).
Lets take a closer look how XML input and output works in Spring Batch. First, there are a few concepts that vary from file reading and writing but are common across Spring Batch XML processing. With XML processing, instead of lines of records (FieldSets) that need to be tokenized, it is assumed an XML resource is a collection of 'fragments' corresponding to individual records:
Figure 3.1: XML Input
The 'trade' tag is defined as the 'root element' in the scenario above. Everything between '<trade>' and '</trade>' is considered one 'fragment'. Spring Batch uses Object/XML Mapping (OXM) to bind fragments to objects. However, Spring Batch is not tied to any particular XML binding technology. Typical use is to delegate to Spring OXM, which provides uniform abstraction for the most popular OXM technologies. The dependency on Spring OXM is optional and you can choose to implement Spring Batch specific interfaces if desired. The relationship to the technologies that OXM supports can be shown as the following:
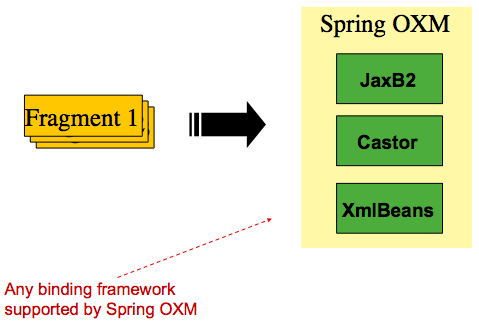
Figure 3.2: OXM Binding
Now with an introduction to OXM and how one can use XML fragments to represent records, let's take a closer look at readers and writers.
The StaxEventItemReader configuration
provides a typical setup for the processing of records from an XML input
stream. First, lets examine a set of XML records that the
StaxEventItemReader can process.
<?xml version="1.0" encoding="UTF-8"?>
<records>
    <trade xmlns="http://springframework.org/batch/sample/io/oxm/domain">
        <isin>XYZ0001</isin>
        <quantity>5</quantity>
        <price>11.39</price>
        <customer>Customer1</customer>
    </trade>
    <trade xmlns="http://springframework.org/batch/sample/io/oxm/domain">
        <isin>XYZ0002</isin>
        <quantity>2</quantity>
        <price>72.99</price>
        <customer>Customer2c</customer>
    </trade>
    <trade xmlns="http://springframework.org/batch/sample/io/oxm/domain">
        <isin>XYZ0003</isin>
        <quantity>9</quantity>
        <price>99.99</price>
        <customer>Customer3</customer>
    </trade>
</records>
To be able to process the XML records the following is needed:
Root Element Name - Name of the root element of the fragment that constitutes the object to be mapped. The example configuration demonstrates this with the value of trade.
Resource - Spring Resource that represents the file to be read.
FragmentDeserializer- Unmarshalling facility provided by Spring OXM for mapping the XML fragment to an object.
<bean id="itemReader" class="org.springframework.batch.item.xml.StaxEventItemReader">
    <property name="fragmentRootElementName" value="customer" />
    <property name="resource" value="data/iosample/input/input.xml" />
    <property name="unmarshaller" ref="customerCreditMarshaller" />
</bean>

<bean id="customerCreditMarshaller"
      class="org.springframework.oxm.xstream.XStreamMarshaller">
    <property name="aliases">
        <util:map id="aliases">
            <entry key="customer"
                   value="org.springframework.batch.sample.domain.CustomerCredit" />
            <entry key="price" value="java.math.BigDecimal" />
            <entry key="name" value="java.lang.String" />
        </util:map>
    </property>
</bean>
Notice that in this example we have chosen to use an
XStreamMarshaller that requires an alias passed
in as a map with the first key and value being the name of the fragment
(i.e. root element) and the object type to bind. Then, similar to a
FieldSet, the names of the other elements that
map to fields within the object type are described as key/value pairs in
the map. In the configuration file we can use a Spring configuration
utility to describe the required alias as follows:
<bean id="itemReader" class="org.springframework.batch.item.xml.StaxEventItemReader">
    <property name="fragmentRootElementName" value="customer" />
    <property name="resource" value="data/iosample/input/input.xml" />
    <property name="unmarshaller" ref="customerCreditMarshaller" />
</bean>

<bean id="customerCreditMarshaller"
      class="org.springframework.oxm.xstream.XStreamMarshaller">
    <property name="aliases">
        <util:map id="aliases">
            <entry key="customer"
                   value="org.springframework.batch.sample.domain.CustomerCredit" />
            <entry key="price" value="java.math.BigDecimal" />
            <entry key="name" value="java.lang.String" />
        </util:map>
    </property>
</bean>
On input the reader reads the XML resource until it recognizes
that a new fragment is about to start (by matching the tag name by
default). The reader creates a standalone XML document from the fragment
(or at least makes it appear so) and passes the document to a
deserializer (typically a wrapper around a Spring OXM
Unmarshaller) to map the XML to a Java
object.
In summary, this procedure is analogous to the following scripted Java code which uses the injection provided by the Spring configuration:
StaxEventItemReader xmlStaxEventItemReader = new StaxEventItemReader()
Resource resource = new ByteArrayResource(xmlResource.getBytes())

Map aliases = new HashMap();
aliases.put("customer","org.springframework.batch.sample.domain.CustomerCredit");
aliases.put("price","java.math.BigDecimal");
aliases.put("name","java.lang.String");
Marshaller marshaller = new XStreamMarshaller();
marshaller.setAliases(aliases);
xmlStaxEventItemReader.setUnmarshaller(marshaller);
xmlStaxEventItemReader.setResource(resource);
xmlStaxEventItemReader.setFragmentRootElementName("customer");
xmlStaxEventItemReader.open(new ExecutionContext());

boolean hasNext = true

CustomerCredit credit = null;

while (hasNext) {
    credit = xmlStaxEventItemReader.read();
    if (credit == null) {
        hasNext = false;
    }
    else {
        System.out.println(credit);
    }
}Output works symmetrically to input. The
StaxEventItemWriter needs a
Resource, a serializer, and a rootTagName. A Java
object is passed to a serializer (typically a wrapper around Spring OXM
Marshaller) which writes to a
Resource using a custom event writer that filters
the StartDocument and
EndDocument events produced for each fragment by
the OXM tools. We'll show this in an example using the
MarshallingEventWriterSerializer. The Spring
configuration for this setup looks as follows:
<bean id="itemWriter" class="org.springframework.batch.item.xml.StaxEventItemWriter">
    <property name="resource" ref="outputResource" />
    <property name="marshaller" ref="customerCreditMarshaller" />
    <property name="rootTagName" value="customers" />
    <property name="overwriteOutput" value="true" />
</bean>
The configuration sets up the three required properties and optionally sets the overwriteOutput=true, mentioned earlier in the chapter for specifying whether an existing file can be overwritten. It should be noted the marshaller used for the writer is the exact same as the one used in the reading example from earlier in the chapter:
<bean id="customerCreditMarshaller"
      class="org.springframework.oxm.xstream.XStreamMarshaller">
    <property name="aliases">
        <util:map id="aliases">
            <entry key="customer"
                   value="org.springframework.batch.sample.domain.CustomerCredit" />
            <entry key="price" value="java.math.BigDecimal" />
            <entry key="name" value="java.lang.String" />
        </util:map>
    </property>
</bean>
To summarize with a Java example, the following code illustrates all of the points discussed, demonstrating the programmatic setup of the required properties:
StaxEventItemWriter staxItemWriter = new StaxEventItemWriter()
FileSystemResource resource = new FileSystemResource("data/outputFile.xml")

Map aliases = new HashMap();
aliases.put("customer","org.springframework.batch.sample.domain.CustomerCredit");
aliases.put("price","java.math.BigDecimal");
aliases.put("name","java.lang.String");
Marshaller marshaller = new XStreamMarshaller();
marshaller.setAliases(aliases);

staxItemWriter.setResource(resource);
staxItemWriter.setMarshaller(marshaller);
staxItemWriter.setRootTagName("trades");
staxItemWriter.setOverwriteOutput(true);

ExecutionContext executionContext = new ExecutionContext();
staxItemWriter.open(executionContext);
CustomerCredit Credit = new CustomerCredit();
trade.setPrice(11.39);
credit.setName("Customer1");
staxItemWriter.write(trade);It is a common requirement to process multiple files within a single
Step. Assuming the files all have the same
formatting, the MultiResourceItemReader supports
this type of input for both XML and flat file processing. Consider the
following files in a directory:
file-1.txt file-2.txt ignored.txt
file-1.txt and file-2.txt are formatted the same and for business
reasons should be processed together. The
MuliResourceItemReader can be used to read in both
files by using wildcards:
<bean id="multiResourceReader" class="org.spr...MultiResourceItemReader">
    <property name="resources" value="classpath:data/input/file-*.txt" />
    <property name="delegate" ref="flatFileItemReader" />
</bean>
The referenced delegate is a simple
FlatFileItemReader. The above configuration will
read input from both files, handling rollback and restart scenarios. It
should be noted that, as with any ItemReader,
adding extra input (in this case a file) could cause potential issues when
restarting. It is recommended that batch jobs work with their own
individual directories until completed successfully.
Like most enterprise application styles, a database is the central storage mechanism for batch. However, batch differs from other application styles due to the sheer size of the datasets with which the system must work. If a SQL statement returns 1 million rows, the result set probably holds all returned results in memory until all rows have been read. Spring Batch provides two types of solutions for this problem: Cursor and Paging database ItemReaders.
Using a database cursor is generally the default approach of most
batch developers, because it is the database's solution to the problem
of 'streaming' relational data. The Java
ResultSet class is essentially an object
orientated mechanism for manipulating a cursor. A
ResultSet maintains a cursor to the current row
of data. Calling next on a
ResultSet moves this cursor to the next row.
Spring Batch cursor based ItemReaders open the a cursor on
initialization, and move the cursor forward one row for every call to
read, returning a mapped object that can be
used for processing. The close method will then
be called to ensure all resources are freed up. The Spring core
JdbcTemplate gets around this problem by using
the callback pattern to completely map all rows in a
ResultSet and close before returning control back
to the method caller. However, in batch this must wait until the step is
complete. Below is a generic diagram of how a cursor based
ItemReader works, and while a SQL statement is
used as an example since it is so widely known, any technology could
implement the basic approach:
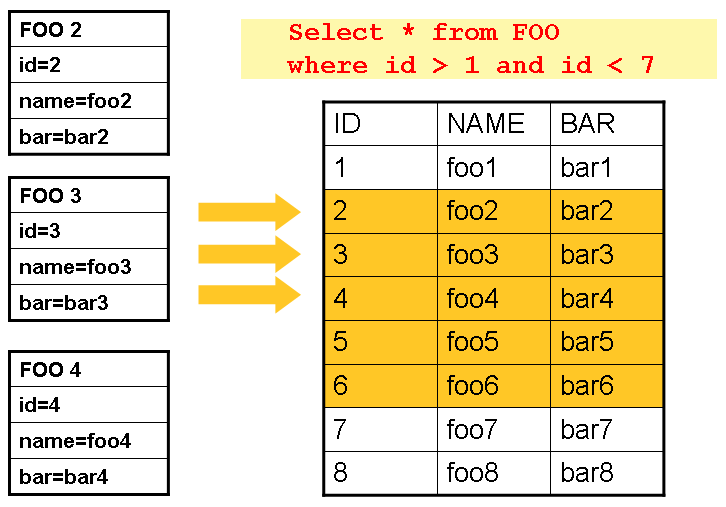
This example illustrates the basic pattern. Given a 'FOO' table,
which has three columns: ID, NAME, and BAR, select all rows with an ID
greater than 1 but less than 7. This puts the beginning of the cursor
(row 1) on ID 2. The result of this row should be a completely mapped
Foo object. Calling read() again moves the
cursor to the next row, which is the Foo with an ID of 3. The results of
these reads will be written out after each
read, thus allowing the objects to be garbage
collected (assuming no instance variables are maintaining references to
them).
JdbcCursorItemReader is the Jdbc
implementation of the cursor based technique. It works directly with a
ResultSet and requires a SQL statement to run
against a connection obtained from a
DataSource. The following database schema will
be used as an example:
CREATE TABLE CUSTOMER (
   ID BIGINT IDENTITY PRIMARY KEY,
   NAME VARCHAR(45),
   CREDIT FLOAT
);
Many people prefer to use a domain object for each row, so we'll
use an implementation of the RowMapper
interface to map a CustomerCredit
object:
public class CustomerCreditRowMapper implements RowMapper {

    public static final String ID_COLUMN = "id";
    public static final String NAME_COLUMN = "name";
    public static final String CREDIT_COLUMN = "credit";

    public Object mapRow(ResultSet rs, int rowNum) throws SQLException {
        CustomerCredit customerCredit = new CustomerCredit();

        customerCredit.setId(rs.getInt(ID_COLUMN));
        customerCredit.setName(rs.getString(NAME_COLUMN));
        customerCredit.setCredit(rs.getBigDecimal(CREDIT_COLUMN));

        return customerCredit;
    }
}
Because JdbcTemplate is so familiar to
users of Spring, and the JdbcCursorItemReader
shares key interfaces with it, it is useful to see an example of how
to read in this data with JdbcTemplate, in
order to contrast it with the ItemReader. For
the purposes of this example, let's assume there are 1,000 rows in the
CUSTOMER database. The first example will be using
JdbcTemplate:
//For simplicity sake, assume a dataSource has already been obtained
JdbcTemplate jdbcTemplate = new JdbcTemplate(dataSource);
List customerCredits = jdbcTemplate.query("SELECT ID, NAME, CREDIT from CUSTOMER",
                                          new CustomerCreditRowMapper());
After running this code snippet the customerCredits list will
contain 1,000 CustomerCredit objects. In the
query method, a connection will be obtained from the
DataSource, the provided SQL will be run
against it, and the mapRow method will be
called for each row in the ResultSet. Let's
contrast this with the approach of the
JdbcCursorItemReader:
JdbcCursorItemReader itemReader = new JdbcCursorItemReader();
itemReader.setDataSource(dataSource);
itemReader.setSql("SELECT ID, NAME, CREDIT from CUSTOMER");
itemReader.setRowMapper(new CustomerCreditRowMapper());
int counter = 0;
ExecutionContext executionContext = new ExecutionContext();
itemReader.open(executionContext);
Object customerCredit = new Object();
while(customerCredit != null){
    customerCredit = itemReader.read();
    counter++;
}
itemReader.close(executionContext);
After running this code snippet the counter will equal 1,000. If
the code above had put the returned customerCredit into a list, the
result would have been exactly the same as with the
JdbcTemplate example. However, the big
advantage of the ItemReader is that it allows
items to be 'streamed'. The read method can
be called once, and the item written out via an
ItemWriter, and then the next item obtained via
read. This allows item reading and writing to
be done in 'chunks' and committed periodically, which is the essence
of high performance batch processing. Furthermore, it is very easily
configured for injection into a Spring Batch
Step:
<bean id="itemReader" class="org.spr...JdbcCursorItemReader">
    <property name="dataSource" ref="dataSource"/>
    <property name="sql" value="select ID, NAME, CREDIT from CUSTOMER"/>
    <property name="rowMapper">
        <bean class="org.springframework.batch.sample.domain.CustomerCreditRowMapper"/>
    </property>
</bean>Because there are so many varying options for opening a cursor
in Java, there are many properties on the
JdbcCustorItemReader that can be set:
Table 6.2. JdbcCursorItemReader Properties
| ignoreWarnings | Determines whether or not SQLWarnings are logged or cause an exception - default is true |
| fetchSize | Gives the Jdbc driver a hint as to the number of rows
that should be fetched from the database when more rows are
needed by the ResultSet object used
by the ItemReader. By default, no
hint is given. |
| maxRows | Sets the limit for the maximum number of rows the
underlying ResultSet can hold at any
one time. |
| queryTimeout | Sets the number of seconds the driver will wait for a
Statement object to execute to the
given number of seconds. If the limit is exceeded, a
DataAccessEception is thrown.
(Consult your driver vendor documentation for
details). |
| verifyCursorPosition | Because the same ResultSet
held by the ItemReader is passed to
the RowMapper, it is possible for
users to call ResultSet.next()
themselves, which could cause issues with the reader's
internal count. Setting this value to true will cause an
exception to be thrown if the cursor position is not the
same after the RowMapper call as it
was before. |
| saveState | Indicates whether or not the reader's state should be
saved in the ExecutionContext
provided by
ItemStream#update(ExecutionContext)
The default value is false. |
| driverSupportsAbsolute | Defaults to false. Indicates whether the Jdbc driver
supports setting the absolute row on a
ResultSet. It is recommended that
this is set to true for Jdbc drivers that supports
ResultSet.absolute() as it may
improve performance, especially if a step fails while
working with a large data set. |
| setUseSharedExtendedConnection | Defaults to false. Indicates whether the connection
used for the cursor should be used by all other processing
thus sharing the same transaction. If this is set to false,
which is the default, then the cursor will be opened using
its own connection and will not participate in any
transactions started for the rest of the step processing. If
you set this flag to true then you must wrap the
DataSource in an
ExtendedConnectionDataSourceProxy to
prevent the connection from being closed and released after
each commit. When you set this option to true then the
statement used to open the cursor will be created with both
'READ_ONLY' and 'HOLD_CUSORS_OVER_COMMIT' options. This
allows holding the cursor open over transaction start and
commits performed in the step processing. To use this
feature you need a database that supports this and a Jdbc
driver supporting Jdbc 3.0 or later. |
Just as normal Spring users make important decisions about
whether or not to use ORM solutions, which affect whether or not they
use a JdbcTemplate or a
HibernateTemplate, Spring Batch users have the
same options. HibernateCursorItemReader is the
Hibernate implementation of the cursor technique. Hibernate's usage in
batch has been fairly controversial. This has largely been because
Hibernate was originally developed to support online application
styles. However, that doesn't mean it can't be used for batch
processing. The easiest approach for solving this problem is to use a
StatelessSession rather than a standard
session. This removes all of the caching and dirty checking hibernate
employs that can cause issues in a batch scenario. For more
information on the differences between stateless and normal hibernate
sessions, refer to the documentation of your specific hibernate
release. The HibernateCursorItemReader allows
you to declare an HQL statement and pass in a
SessionFactory, which will pass back one item
per call to read in the same basic fashion as
the JdbcCursorItemReader. Below is an example
configuration using the same 'customer credit' example as the JDBC
reader:
HibernateCursorItemReader itemReader = new HibernateCursorItemReader();
itemReader.setQueryString("from CustomerCredit");
//For simplicity sake, assume sessionFactory already obtained.
itemReader.setSessionFactory(sessionFactory);
itemReader.setUseStatelessSession(true);
int counter = 0;
ExecutionContext executionContext = new ExecutionContext();
itemReader.open(executionContext);
Object customerCredit = new Object();
while(customerCredit != null){
    customerCredit = itemReader.read();
    counter++;
}
itemReader.close(executionContext);
This configured ItemReader will return
CustomerCredit objects in the exact same manner
as described by the JdbcCursorItemReader,
assuming hibernate mapping files have been created correctly for the
Customer table. The 'useStatelessSession' property defaults to true,
but has been added here to draw attention to the ability to switch it
on or off. It is also worth noting that the fetchSize of the
underlying cursor can be set via the setFetchSize property. As with
JdbcCursorItemReader, configuration is
straightforward:
<bean id="itemReader"
      class="org.springframework.batch.item.database.HibernateCursorItemReader">
    <property name="sessionFactory" ref="sessionFactory" />
    <property name="queryString" value="from CustomerCredit" />
</bean>An alternative to using a database cursor is executing multiple queries where each query is bringing back a portion of the results. We refer to this portion as a page. Each query that is executed must specify the starting row number and the number of rows that we want returned for the page.
One implementation of a paging ItemReader
is the JdbcPagingItemReader. The
JdbcPagingItemReader needs a
PagingQueryProvider responsible for providing
the SQL queries used to retrieve the rows making up a page. Since each
database has its own strategy for providing paging support, we need to
use a different PagingQueryProvider for each
supported database type. There is also the
SqlPagingQueryProviderFactoryBean that will
auto-detect the database that is being used and determine the
appropriate PagingQueryProvider implementation.
This simplifies the configuration and is the recommended best
practice.
The SqlPagingQueryProviderFactoryBean
requires that you specify a select clause and a from clause. You can
also provide an optional where clause. These clauses will be used to
build an SQL statement combined with the required sortKey.
After the reader has been opened, it will pass back one item per
call to read in the same basic fashion as any
other ItemReader. The paging happens behind the
scenes when additional rows are needed.
Below is an example configuration using a similar 'customer credit' example as the cursor based ItemReaders above:
<bean id="itemReader" class="org.spr...JdbcPagingItemReader">
    <property name="dataSource" ref="dataSource"/>
    <property name="queryProvider">
        <bean class="org.spr...SqlPagingQueryProviderFactoryBean">
            <property name="selectClause" value="select id, name, credit"/>
            <property name="fromClause" value="from customer"/>
            <property name="whereClause" value="where status=:status"/>
            <property name="sortKey" value="id"/>
        </bean>
    </property>
    <property name="parameterValues">
        <map>
            <entry key="status" value="NEW"/>
        </map>
    </property>
    <property name="pageSize" value="1000"/>
    <property name="rowMapper" ref="customerMapper"/>
</bean>
This configured ItemReader will return
CustomerCredit objects using the
RowMapper that must be specified. The
'pageSize' property determines the number of entities read from the
database for each query execution.
The 'parameterValues' property can be used to specify a Map of parameter values for the query. If you use named parameters in the where clause the key for each entry should match the name of the named parameter. If you use a traditional '?' placeholder then the key for each entry should be the number of the placeholder, starting with 1.
Another implementation of a paging
ItemReader is the
JpaPagingItemReader. JPA doesn't have a concept
similar to the Hibernate StatelessSession so we
have to use other features provided by the JPA specification. Since
JPA supports paging, this is a natural choice when it comes to using
JPA for batch processing. After each page is read, the entities will
become detached and the persistence context will be cleared in order
to allow the entities to be garbage collected once the page is
processed.
The JpaPagingItemReader allows you to
declare a JPQL statement and pass in a
EntityManagerFactory. It will then pass back
one item per call to read in the same basic
fashion as any other ItemReader. The paging
happens behind the scenes when additional entities are needed. Below
is an example configuration using the same 'customer credit' example
as the JDBC reader above:
<bean id="itemReader" class="org.spr...JpaPagingItemReader">
    <property name="entityManagerFactory" ref="entityManagerFactory"/>
    <property name="queryString" value="select c from CustomerCredit c"/>
    <property name="pageSize" value="1000"/>
</bean>
This configured ItemReader will return
CustomerCredit objects in the exact same manner
as described by the JdbcPagingItemReader above,
assuming the Customer object has the correct JPA annotations or ORM
mapping file. The 'pageSize' property determines the number of
entities read from the database for each query execution.
If you use IBATIS for your data access then you can use the
IbatisPagingItemReader which, as the name
indicates, is an implementation of a paging
ItemReader. IBATIS doesn't have direct support
for reading rows in pages but by providing a couple of standard
variables you can add paging support to your IBATIS queries.
Here is an example of a configuration for a
IbatisPagingItemReader reading CustomerCredits
as in the examples above:
<bean id="itemReader" class="org.spr...IbatisPagingItemReader">
    <property name="sqlMapClient" ref="sqlMapClient"/>
    <property name="queryId" value="getPagedCustomerCredits"/>
    <property name="pageSize" value="1000"/>
</bean>
The IbatisPagingItemReader configuration
above references an IBATIS query called "getPagedCustomerCredits".
Here is an example of what that query should look like for
MySQL.
<select id="getPagedCustomerCredits" resultMap="customerCreditResult">
    select id, name, credit from customer order by id asc LIMIT #_skiprows#, #_pagesize#
</select>
The _skiprows and
_pagesize variables are provided by the
IbatisPagingItemReader and there is also a
_page variable that can be used if necessary.
The syntax for the paging queries varies with the database used. Here
is an example for Oracle (unfortunately we need to use CDATA for some
operators since this belongs in an XML document):
<select id="getPagedCustomerCredits" resultMap="customerCreditResult">
    select * from (
      select * from (
        select t.id, t.name, t.credit, ROWNUM ROWNUM_ from customer t order by id
       ) where ROWNUM_ <![CDATA[ > ]]> ( #_page# * #_pagesize# )
    ) where ROWNUM <![CDATA[ <= ]]> #_pagesize#
  </select>
While both Flat Files and XML have specific ItemWriters, there is
no exact equivalent in the database world. This is because transactions
provide all the functionality that is needed. ItemWriters are necessary
for files because they must act as if they're transactional, keeping
track of written items and flushing or clearing at the appropriate
times. Databases have no need for this functionality, since the write is
already contained in a transaction. Users can create their own DAOs that
implement the ItemWriter interface or use one
from a custom ItemWriter that's written for
generic processing concerns, either way, they should work without any
issues. One thing to look out for is the performance and error handling
capabilities that are provided by batching the outputs. This is most
common when using hibernate as an ItemWriter, but
could have the same issues when using Jdbc batch mode. Batching database
output doesn't have any inherent flaws, assuming we are careful to flush
and there are no errors in the data. However, any errors while writing
out can cause confusion because there is no way to know which individual
item caused an exception, or even if any individual item was
responsible, as illustrated below:

If items are buffered before being written out, any
errors encountered will not be thrown until the buffer is flushed just
before a commit. For example, let's assume that 20 items will be written
per chunk, and the 15th item throws a DataIntegrityViolationException.
As far as the Step is concerned, all 20 item will be written out
successfully, since there's no way to know that an error will occur
until they are actually written out. Once
Session#flush() is
called, the buffer will be emptied and the exception will be hit. At
this point, there's nothing the Step can do, the
transaction must be rolled back. Normally, this exception might cause
the Item to be skipped (depending upon the skip/retry policies), and
then it won't be written out again. However, in the batched scenario,
there's no way for it to know which item caused the issue, the whole
buffer was being written out when the failure happened. The only way to
solve this issue is to flush after each item:
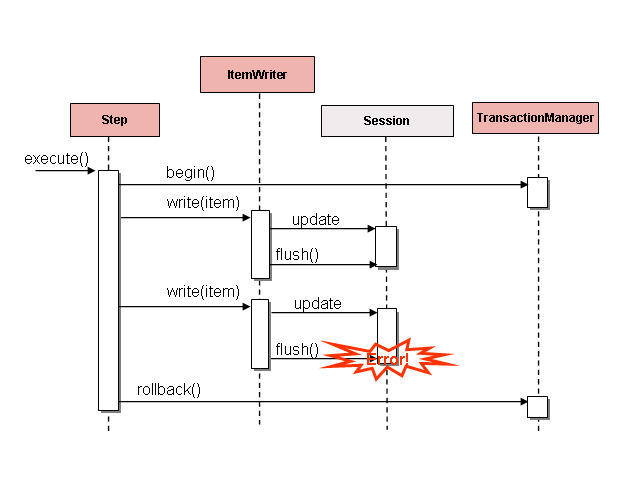
This is a common use case, especially when using Hibernate, and
the simple guideline for implementations of
ItemWriter, is to flush on each call to
write(). Doing so allows for items to be
skipped reliably, with Spring Batch taking care internally of the
granularity of the calls to ItemWriter after an
error.
Batch systems are often used in conjunction with other application
styles. The most common is an online system, but it may also support
integration or even a thick client application by moving necessary bulk
data that each application style uses. For this reason, it is common that
many users want to reuse existing DAOs or other services within their
batch jobs. The Spring container itself makes this fairly easy by allowing
any necessary class to be injected. However, there may be cases where the
existing service needs to act as an ItemReader or
ItemWriter, either to satisfy the dependency of
another Spring Batch class, or because it truly is the main
ItemReader for a step. It is fairly trivial to
write an adaptor class for each service that needs wrapping, but because
it is such a common concern, Spring Batch provides implementations:
ItemReaderAdapter and
ItemWriterAdapter. Both classes implement the
standard Spring method invoking the delegate pattern and are fairly simple
to set up. Below is an example of the reader:
<bean id="itemReader" class="org.springframework.batch.item.adapter.ItemReaderAdapter">
    <property name="targetObject" ref="fooService" />
    <property name="targetMethod" value="generateFoo" />
</bean>

<bean id="fooService" class="org.springframework.batch.item.sample.FooService" />
One important point to note is that the contract of the targetMethod
must be the same as the contract for read: when
exhausted it will return null, otherwise an Object.
Anything else will prevent the framework from knowing when processing
should end, either causing an infinite loop or incorrect failure,
depending upon the implementation of the
ItemWriter. The ItemWriter
implementation is equally as simple:
<bean id="itemWriter" class="org.springframework.batch.item.adapter.ItemWriterAdapter">
    <property name="targetObject" ref="fooService" />
    <property name="targetMethod" value="processFoo" />
</bean>

<bean id="fooService" class="org.springframework.batch.item.sample.FooService" />
During the course of this chapter, multiple approaches to parsing
input have been discussed. Each major implementation will throw an
exception if it is not 'well-formed'. The
FixedLengthTokenizer will throw an exception if a
range of data is missing. Similarly, attempting to access an index in a
RowMapper of FieldSetMapper
that doesn't exist or is in a different format than the one expected will
cause an exception to be thrown. All of these types of exceptions will be
thrown before read returns. However, they don't
address the issue of whether or not the returned item is valid. For
example, if one of the fields is an age, it obviously cannot be negative.
It will parse correctly, because it existed and is a number, but it won't
cause an exception. Since there are already a plethora of Validation
frameworks, Spring Batch does not attempt to provide yet another, but
rather provides a very simple interface that can be implemented by any
number of frameworks:
public interface Validator {

    void validate(Object value) throws ValidationException;

}
The contract is that the validate method
will throw an exception if the object is invalid, and return normally if
it is valid. Spring Batch provides an out of the box
ItemProcessor:
<bean class="org.springframework.batch.item.validator.ValidatingItemProcessor">
    <property name="validator" ref="validator" />
</bean>

<bean id="validator"
      class="org.springframework.batch.item.validator.SpringValidator">
    <property name="validator">
        <bean id="orderValidator"
              class="org.springmodules.validation.valang.ValangValidator">
            <property name="valang">
                <value>
                    <![CDATA[
           { orderId : ? > 0 AND ? <= 9999999999 : 'Incorrect order ID' : 'error.order.id' }
           { totalLines : ? = size(lineItems) : 'Bad count of order lines'
                                              : 'error.order.lines.badcount'}
           { customer.registered : customer.businessCustomer = FALSE OR ? = TRUE
                                 : 'Business customer must be registered'
                                 : 'error.customer.registration'}
           { customer.companyName : customer.businessCustomer = FALSE OR ? HAS TEXT
                                  : 'Company name for business customer is mandatory'
                                  :'error.customer.companyname'}
                    ]]>
                </value>
            </property>
        </bean>
    </property>
</bean>
This simple example shows a simple
ValangValidator that is used to validate an order
object. The intent is not to show Valang functionality as much as to show
how a validator could be added.
By default, all of the ItemReader and
ItemWriter implementations store their current
state in the ExecutionContext before it is
committed. However, this may not always be the desired behavior. For
example, many developers choose to make their database readers
'rerunnable' by using a process indicator. An extra column is added to the
input data to indicate whether or not it has been processed. When a
particular record is being read (or written out) the processed flag is
flipped from false to true. The SQL statement can then contain an extra
statement in the where clause, such as "where PROCESSED_IND = false",
thereby ensuring that only unprocessed records will be returned in the
case of a restart. In this scenario, it is preferable to not store any
state, such as the current row number, since it will be irrelevant upon
restart. For this reason, all readers and writers include the 'saveState'
property:
<bean id="playerSummarizationSource" class="org.spr...JdbcCursorItemReader">
    <property name="dataSource" ref="dataSource" />
    <property name="rowMapper">
        <bean class="org.springframework.batch.sample.PlayerSummaryMapper" />
    </property>
    <property name="saveState" value="false" />
    <property name="sql">
        <value>
            SELECT games.player_id, games.year_no, SUM(COMPLETES),
            SUM(ATTEMPTS), SUM(PASSING_YARDS), SUM(PASSING_TD),
            SUM(INTERCEPTIONS), SUM(RUSHES), SUM(RUSH_YARDS),
            SUM(RECEPTIONS), SUM(RECEPTIONS_YARDS), SUM(TOTAL_TD)
            from games, players where players.player_id =
            games.player_id group by games.player_id, games.year_no
        </value>
    </property>
</bean>
The ItemReader configured above will not make
any entries in the ExecutionContext for any
executions in which it participates.
So far in this chapter the basic contracts that exist for reading
and writing in Spring Batch and some common implementations have been
discussed. However, these are all fairly generic, and there are many
potential scenarios that may not be covered by out of the box
implementations. This section will show, using a simple example, how to
create a custom ItemReader and
ItemWriter implementation and implement their
contracts correctly. The ItemReader will also
implement ItemStream, in order to illustrate how to
make a reader or writer restartable.
For the purpose of this example, a simple
ItemReader implementation that reads from a
provided list will be created. We'll start out by implementing the most
basic contract of ItemReader,
read:
public class CustomItemReader<T> implements ItemReader<T>{

    List<T> items;

    public CustomItemReader(List<T> items) {
        this.items = items;
    }

    public T read() throws Exception, UnexpectedInputException,
       NoWorkFoundException, ParseException {

        if (!items.isEmpty()) {
            return items.remove(0);
        }
        return null;
    }
}
This very simple class takes a list of items, and returns them one
at a time, removing each from the list. When the list is empty, it
returns null, thus satisfying the most basic requirements of an
ItemReader, as illustrated below:
List<String> items = new ArrayList<String>();
items.add("1");
items.add("2");
items.add("3");

ItemReader itemReader = new CustomItemReader<String>(items);
assertEquals("1", itemReader.read());
assertEquals("2", itemReader.read());
assertEquals("3", itemReader.read());
assertNull(itemReader.read());The final challenge now is to make the
ItemReader restartable. Currently, if the power
goes out, and processing begins again, the
ItemReader must start at the beginning. This is
actually valid in many scenarios, but it is sometimes preferable that
a batch job starts where it left off. The key discriminant is often
whether the reader is stateful or stateless. A stateless reader does
not need to worry about restartability, but a stateful one has to try
and reconstitute its last known state on restart. For this reason, we
recommend that you keep custom readers stateless if possible, so you
don't have to worry about restartability.
If you do need to store state, then the
ItemStream interface should be used:
public class CustomItemReader<T> implements ItemReader<T>, ItemStream {

    List<T> items;
    int currentIndex = 0;
    private static final String CURRENT_INDEX = "current.index";

    public CustomItemReader(List<T> items) {
        this.items = items;
    }

    public T read() throws Exception, UnexpectedInputException,
        ParseException {

        if (currentIndex < items.size()) {
            return items.get(currentIndex++);
        }

        return null;
    }

    public void open(ExecutionContext executionContext) throws ItemStreamException {
        if(executionContext.containsKey(CURRENT_INDEX)){
            currentIndex = new Long(executionContext.getLong(CURRENT_INDEX)).intValue();
        }
        else{
            currentIndex = 0;
        }
    }

    public void update(ExecutionContext executionContext) throws ItemStreamException {
        executionContext.putLong(CURRENT_INDEX, new Long(currentIndex).longValue());
    }

    public void close() throws ItemStreamException {}
}
On each call to the ItemStream
update method, the current index of the
ItemReader will be stored in the provided
ExecutionContext with a key of 'current.index'.
When the ItemStream open
method is called, the ExecutionContext is
checked to see if it contains an entry with that key. If the key is
found, then the current index is moved to that location. This is a
fairly trivial example, but it still meets the general
contract:
ExecutionContext executionContext = new ExecutionContext();
((ItemStream)itemReader).open(executionContext);
assertEquals("1", itemReader.read());
((ItemStream)itemReader).update(executionContext);

List<String> items = new ArrayList<String>();
items.add("1");
items.add("2");
items.add("3");
itemReader = new CustomItemReader<String>(items);

((ItemStream)itemReader).open(executionContext);
assertEquals("2", itemReader.read());
Most ItemReaders have much more sophisticated restart logic. The
JdbcCursorItemReader, for example, stores the
row id of the last processed row in the Cursor.
It is also worth noting that the key used within the
ExecutionContext should not be trivial. That is
because the same ExecutionContext is used for
all ItemStreams within a
Step. In most cases, simply prepending the key
with the class name should be enough to guarantee uniqueness. However,
in the rare cases where two of the same type of
ItemStream are used in the same step (which can
happen if two files are need for output) then a more unique name will
be needed. For this reason, many of the Spring Batch
ItemReader and
ItemWriter implementations have a
setName() property that allows this key name
to be overridden.
Implementing a Custom ItemWriter is similar
in many ways to the ItemReader example above, but
differs in enough ways as to warrant its own example. However, adding
restartability is essentially the same, so it won't be covered in this
example. As with the ItemReader example, a
List will be used in order to keep the example as
simple as possible:
public class CustomItemWriter<T> implements ItemWriter<T> {

    List<T> output = TransactionAwareProxyFactory.createTransactionalList();

    public void write(List<? extends T> items) throws Exception {
        output.addAll(items);
    }

    public List<T> getOutput() {
        return output;
    }
}To make the ItemWriter restartable we would follow the same
process as for the ItemReader, adding and
implementing the ItemStream interface to
synchronize the execution context. In the example we might have to
count the number of items processed and add that as a footer record.
If we needed to do that, we could implement
ItemStream in our
ItemWriter so that the counter was
reconstituted from the execution context if the stream was
re-opened.
In many realistic cases, custom ItemWriters also delegate to
another writer that itself is restartable (e.g. when writing to a
file), or else it writes to a transactional resource so doesn't need
to be restartable because it is stateless. When you have a stateful
writer you should probably also be sure to implement
ItemStream as well as
ItemWriter. Remember also that the client of
the writer needs to be aware of the ItemStream,
so you may need to register it as a stream in the configuration
xml.
Many batch processing problems can be solved with single threaded, single process jobs, so it is always a good idea to properly check if that meets your needs before thinking about more complex implementations. Measure the performance of a realistic job and see if the simplest implementation meets your needs first: you can read and write a file of several hundred megabytes in well under a minute, even with bog standard hardware.
When you are ready to start implementing a job with some parallel processing, Spring Batch offers a range of options, which are described in this chapter, although some features are covered elsewhere. At a high level there are two modes of parallel processing: single process, multi-threaded; and multi-process. These break down into categories as well, as follows:
Multi-threaded Step (single process)
Parallel Steps (single process)
Remote Chunking of Step (multi process)
Partitioning a Step (single or multi process)
Next we review the single-process options first, and then the multi-process options.
The simplest way to start parallel processing is to add a
TaskExecutor to your Step configuration, e.g. as an
attribute of the chunk:
<step id="loading">
	<tasklet>
        <chunk reader="stagingReader"
             processor="stagingProcessor"
             writer="tradeWriter"
             commit-interval="1"
             task-executor="taskExecutor"/>
    </tasklet>
</step>
In this example the taskExecutor is a reference to another bean
definition, implementing the TaskExecutor
interface. TaskExecutor is a standard Spring
interface, so consult the Spring User Guide for details of available
implementations. The simplest multi-threaded
TaskExecutor is a
SimpleAsyncTaskExecutor.
The result of the above configuration will be that the Step executes by reading, processing and writing each chunk of items (each commit interval) in a separate thread of execution.
There are some practical limitations of using multi-threaded Steps for some common Batch use cases. Many participants in a Step (e.g. readers and writers) are stateful, and if the state is not segregated by thread, then those components are not usable in a multi-threaded Step. In particular most of the off-the-shelf readers and writers from Spring Batch are not designed for multi-threaded use. It is, however, possible to work with stateless or thread safe readers and writers, and there is a sample (parallelJob) in the Spring Batch Samples that show the use of a process indicator (see Section 6.12, “Preventing State Persistence”) to keep track of items that have been processed in a database input table.
As long as the application logic that needs to be parallelized can
be split into distinct responsibilities, and assigned to individual steps
then it can be parallelized in a single process. Parallel Step execution
is easy to configure and use, for example, to execute steps
(step1,step2) in parallel with
step3, you could configure a flow like this:
<job id="job1">
    <split id="split1" task-executor="taskExecutor" next="step4">
        <flow>
            <step id="step1" parent="s1" next="step2"/>
            <step id="step2" parent="s2"/>
        </flow>
        <flow>
            <step id="step3" parent="s3"/>
        </flow>
    </split>
    <step id="step4" parent="s4"/>
</job>

<beans:bean id="taskExecutor" class="org.spr...SimpleAsyncTaskExecutor"/>
The configurable "task-executor" attribute is used to specify which
TaskExecutor implementation should be used to execute the individual
flows. The default is SyncTaskExecutor, but an
asynchronous TaskExecutor is required to run the steps in parallel. Note
that the job will ensure that every flow in the split completes before
aggregating the exit statuses and transitioning.
See the section on Section 5.3.5, “Split Flows” for more detail.
In Remote Chunking the Step processing is split across multiple processes, communicating with each other through some middleware. Here is a picture of the pattern in action:
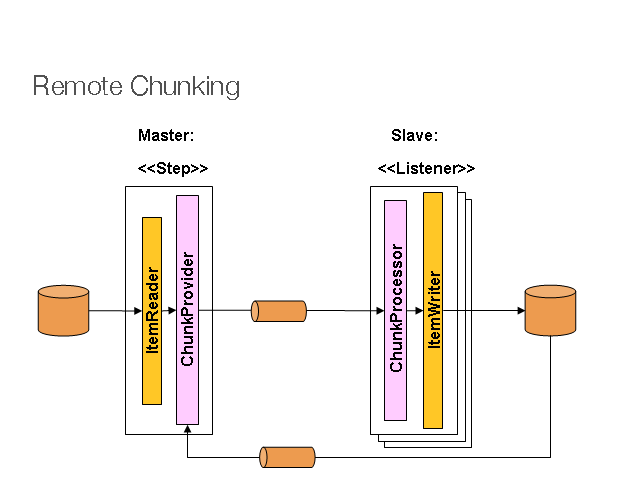
The Master component is a single process, and the Slaves are multiple remote processes. Clearly this pattern works best if the Master is not a bottleneck, so the processing must be more expensive than the reading of items (this is often the case in practice).
The Master is just an implementation of a Spring Batch
Step, with the ItemWriter replaced with a generic
version that knows how to send chunks of items to the middleware as
messages. The Slaves are standard listeners for whatever middleware is
being used (e.g. with JMS they would be
MesssageListeners), and their role is to process
the chunks of items using a standard ItemWriter or
ItemProcessor plus
ItemWriter, through the
ChunkProcessor interface. One of the advantages of
using this pattern is that the reader, processor and writer components are
off-the-shelf (the same as would be used for a local execution of the
step). The items are divided up dynamically and work is shared through the
middleware, so if the listeners are all eager consumers, then load
balancing is automatic.
The middleware has to be durable, with guaranteed delivery and single consumer for each message. JMS is the obvious candidate, but other options exist in the grid computing and shared memory product space (e.g. Java Spaces).
Spring Batch has a sub-project (Spring Batch Integration), providing implementations of various patterns like this one using Spring Integration. Spring Batch Integration is available in subversion for people to use, but is not intended to be part of the official general release of Spring Batch until it builds up more of a community of users.
Spring Batch also provides an SPI for partitioning a Step execution and executing it remotely. In this case the remote participants are simply Step instances that could just as easily have been configured and used for local processing. Here is a picture of the pattern in action:
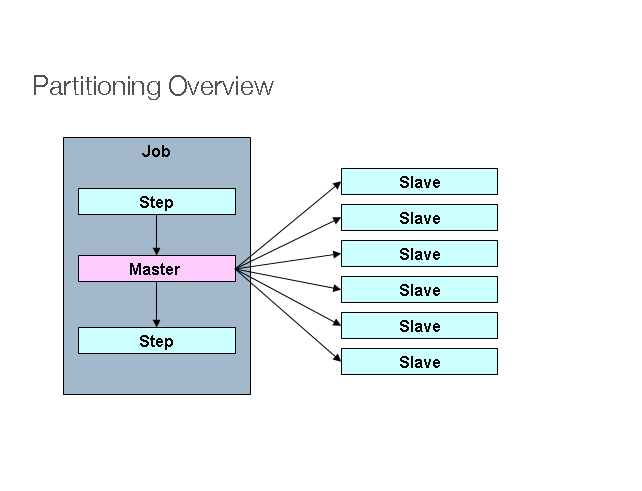
The Job is executing on the left hand side as a sequence of Steps,
and one of the Steps is labelled as a Master. The Slaves in this picture
are all identical instances of a Step, which could in fact take the place
of the Master resulting in the same outcome for the Job. The Slaves are
typically going to be remote services, but could also be local threads of
execution. The messages sent by the Master to the Slaves in this pattern
do not need to be durable, or have guaranteed delivery: Spring Batch
meta-data in the JobRepository will ensure that
each Slave is executed once and only once for each Job execution.
The SPI in Spring Batch consists of a special implementation of Step
(the PartitionStep), and two strategy interfaces
that need to be implemented for the specific environment. The strategy
interfaces are PartitionHandler and
StepExecutionSplitter, and their role is show in
the sequence diagram below:
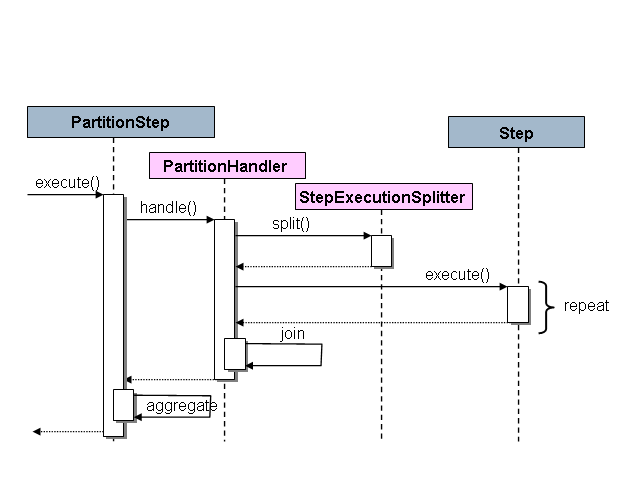
The Step on the right in this case is the "remote" Slave, so potentially there are many objects and or processes playing this role, and the PartitionStep is shown driving the execution. The PartitionStep configuration looks like this:
<bean name="step1:master" class="org.sfw...PartitionStep">
    <property name="partitionHandler" ref="partitionHandler"/>
    <property name="stepExecutionSplitter" ref="stepExecutionSplitter"/>
    <property name="jobRepository" ref="jobRepository" />
</bean>
There is a simple example which can be copied and extended in the
unit test suite for Spring Batch Core (see
org.springframework.batch.core.partition
package).
The PartitionHandler is the component that
knows about the fabric of the remoting or grid environment. It is able
to send StepExecution requests to the remote
Steps, wrapped in some fabric-specific format, like a DTO. It does not
have to know how to split up the input data, or how to aggregate the
result of multiple Step executions. Generally speaking it probably also
doesn't need to know about resilience or failover, since those are
features of the fabric in many cases, and anyway Spring Batch always
provides restartability independent of the fabric: a failed Job can
always be restarted and only the failed Steps will be
re-executed.
The PartitionHandler interface can have
specialized implementations for a variety of fabric types: e.g. simple
RMI remoting, EJB remoting, custom web service, JMS, Java Spaces, shared
memory grids (like Terracotta or Coherence), grid execution fabrics
(like GridGain). Spring Batch does not contain implementations for any
proprietary grid or remoting fabrics.
Spring Batch does however provide a useful implementation of
PartitionHandler that executes Steps locally in
separate threads of execution, using the
TaskExecutor strategy from Spring. The
implementation is called
TaskExecutorPartitionHandler, and it can be
configured like this:
<bean class="org.spr...TaskExecutorPartitionHandler">
    <property name="taskExecutor" ref="taskExecutor"/>
    <property name="step" ref="step1" />
    <property name="gridSize" value="10" />
</bean>
The gridSize determines the number of separate
step executions to create, so it can be matched to the size of the
thread pool in the TaskExecutor, or else it can
be set to be larger than the number of threads available, in which case
the blocks of work are smaller.
The TaskExecutorPartitionHandler is quite
useful for IO intensive Steps, like copying large numbers of files or
replicating filesystems into content management systems.
The StepExecutionSplitter is responsible
for splitting up a StepExecution into blocks of
work, and providing input parameters for the remote Slaves in the form
of an ExecutionContext for each one. The
principal method for this in the interface is
public interface StepExecutionSplitter {
    ...
    Set<StepExecution> split(StepExecution stepExecution, int gridSize)
          throws JobExecutionException;
}
So an execution instance for the Master step is passed in, along
with a hint about the grid size, and the splitter has to create a set of
partitioned StepExecution instances, each with a
different ExecutionContext.
A convenient generic implementation of StepExecutionSplitter is
provided by Spring Batch, which handles concerns like interpreting the
grid size and handling restart. It is recommended that you use this
implementation (the SimpleStepExecutionSplitter)
and inject specific knowledge of the input data through its
Partitioner property. The Partitioner has a
simpler responsibility: to generate execution contexts as input
parameters for new step executions only (no need to worry about
restarts). It has a single method:
public interface Partitioner {
    Map<String, ExecutionContext> partition(int gridSize);
}
The return value from this method associates a unique name for
each step execution (the String), with input
parameters in the form of an ExecutionContext.
The names show up later in the Batch meta data as the step name in the
partitioned StepExecutions. The
ExecutionContext is just a bag of name-value
pairs, so it might contain a range of primary keys, or line numbers, or
the location of an input file. The remote Step
then normally binds to the context input using #{...}
placeholders (late binding in step scope), as illustrated in the next
section.
The names of the step executions (the keys in the
Map returned by
Partitioner) need to be unique amongst the step
executions of a Job, but do not have any other specific requirements.
The easiest way to do this, and to make the names meaningful for users,
is to use a prefix+suffix naming convention, where the prefix is the
name of the step that is being executed (which itself is unique in the
Job), and the suffix is just a counter. There is
a SimplePartitioner in the framework that uses
this convention.
It is very efficient for the steps that are executed by the
PartitionHandler to have identical configuration, and for their input
parameters to be bound at runtime from the ExecutionContext. This is
easy to do with the StepScope feature of Spring Batch (covered in more
detail in the section on Late Binding). For example
if the Partitioner creates
ExecutionContext instances with an attribute key
fileName, pointing to a different file (or
directlory) for each step invocation, the
Partitioner output might look like this:
Table 7.1. Example step execution name to execution context provided by Partitioner targeting directory processing
| Step Execution Name (key) | ExecutionContext (value) |
| filecopy:partition0 | fileName=/home/data/one |
| filecopy:partition1 | fileName=/home/data/two |
| filecopy:partition2 | fileName=/home/data/three |
Then the file name can be bound to a step using late binding to the execution context:
<bean id="itemReader" scope="step"
      class="org.spr...MultiResourceItemReader">
    <property name="resource" value="#{stepExecutionContext[fileName]}/*"/>
</bean>Batch processing is about repetitive actions - either as a simple
optimization, or as part of a job. To strategize and generalize the
repetition as well as to provide what amounts to an iterator framework,
Spring Batch has the RepeatOperations interface.
The RepeatOperations interface looks like
this:
public interface RepeatOperations {

    RepeatStatus iterate(RepeatCallback callback) throws RepeatException;

}
The callback is a simple interface that allows you to insert some business logic to be repeated:
public interface RepeatCallback {

    RepeatStatus doInIteration(RepeatContext context) throws Exception;

}
The callback is executed repeatedly until the implementation
decides that the iteration should end. The return value in these
interfaces is an enumeration that can either be
RepeatStatus.CONTINUABLE or
RepeatStatus.FINISHED. A RepeatStatus
conveys information to the caller of the repeat operations about whether
there is any more work to do. Generally speaking, implementations of
RepeatOperations should inspect the
RepeatStatus and use it as part of the decision to
end the iteration. Any callback that wishes to signal to the caller that
there is no more work to do can return
RepeatStatus.FINISHED.
The simplest general purpose implementation of
RepeatOperations is
RepeatTemplate. It could be used like this:
RepeatTemplate template = new RepeatTemplate();

template.setCompletionPolicy(new FixedChunkSizeCompletionPolicy(2));

template.iterate(new RepeatCallback() {

    public ExitStatus doInIteration(RepeatContext context) {
        // Do stuff in batch...
        return ExitStatus.CONTINUABLE;
    }

});
In the example we return RepeatStatus.CONTINUABLE to
show that there is more work to do. The callback can also return
ExitStatus.FINISHED if it wants to signal to the caller that
there is no more work to do. Some iterations can be terminated by
considerations intrinsic to the work being done in the callback, others
are effectively infinite loops as far as the callback is concerned and the
completion decision is delegated to an external policy as in the case
above.
The method parameter for the RepeatCallback
is a RepeatContext. Many callbacks will simply
ignore the context, but if necessary it can be used as an attribute bag
to store transient data for the duration of the iteration. After the
iterate method returns, the context will no
longer exist.
A RepeatContext will have a parent context
if there is a nested iteration in progress. The parent context is
occasionally useful for storing data that need to be shared between
calls to iterate. This is the case for instance
if you want to count the number of occurrences of an event in the
iteration and remember it across subsequent calls.
RepeatStatus is an enumeration used by
Spring Batch to indicate whether processing has finished. These are
possible RepeatStatus values:
Table 8.1. ExitStatus Properties
| Value | Description |
| CONTINUABLE | There is more work to do. |
| FINISHED | No more repetitions should take place. |
RepeatStatus values can also be combined
with a logical AND operation using the and()
method in RepeatStatus. The effect of this is to
do a logical AND on the continuable flag. In other words, if either
status is FINISHED, then the result will be
FINISHED.
Inside a RepeatTemplate the termination of
the loop in the iterate method is determined by a
CompletionPolicy which is also a factory for the
RepeatContext. The
RepeatTemplate has the responsibility to use the
current policy to create a RepeatContext and pass
that in to the RepeatCallback at every stage in the
iteration. After a callback completes its
doInIteration, the
RepeatTemplate has to make a call to the
CompletionPolicy to ask it to update its state
(which will be stored in the RepeatContext). Then
it asks the policy if the iteration is complete.
Spring Batch provides some simple general purpose implementations of
CompletionPolicy. The
SimpleCompletionPolicy just allows an execution up
to a fixed number of times (with RepeatStatus.FINISHED
forcing early completion at any time).
Users might need to implement their own completion policies for more complicated decisions. For example, a batch processing window that prevents batch jobs from executing once the online systems are in use would require a custom policy.
If there is an exception thrown inside a
RepeatCallback, the
RepeatTemplate consults an
ExceptionHandler which can decide whether or not to
re-throw the exception.
public interface ExceptionHandler {

    void handleException(RepeatContext context, Throwable throwable)
        throws RuntimeException;

}
A common use case is to count the number of exceptions of a
given type, and fail when a limit is reached. For this purpose Spring
Batch provides the SimpleLimitExceptionHandler and
slightly more flexible
RethrowOnThresholdExceptionHandler. The
SimpleLimitExceptionHandler has a limit property
and an exception type that should be compared with the current exception -
all subclasses of the provided type are also counted. Exceptions of the
given type are ignored until the limit is reached, and then rethrown.
Those of other types are always rethrown.
An important optional property of the
SimpleLimitExceptionHandler is the boolean flag
useParent. It is false by default, so the limit is only
accounted for in the current RepeatContext. When
set to true, the limit is kept across sibling contexts in a nested
iteration (e.g. a set of chunks inside a step).
Often it is useful to be able to receive additional callbacks for
cross cutting concerns across a number of different iterations. For this
purpose Spring Batch provides the RepeatListener
interface. The RepeatTemplate allows users to
register RepeatListeners, and they will be given
callbacks with the RepeatContext and
RepeatStatus where available during the
iteration.
The interface looks like this:
public interface RepeatListener {
    void before(RepeatContext context);

    void after(RepeatContext context, RepeatStatus result);

    void open(RepeatContext context);

    void onError(RepeatContext context, Throwable e);

    void close(RepeatContext context);
}
The open and
close callbacks come before and after the entire
iteration. before, after
and onError apply to the individual
RepeatCallback calls.
Note that when there is more than one listener, they are in a list,
so there is an order. In this case open and
before are called in the same order while
after, onError and
close are called in reverse order.
Implementations of RepeatOperations are not
restricted to executing the callback sequentially. It is quite important
that some implementations are able to execute their callbacks in parallel.
To this end, Spring Batch provides the
TaskExecutorRepeatTemplate, which uses the Spring
TaskExecutor strategy to run the
RepeatCallback. The default is to use a
SynchronousTaskExecutor, which has the effect of
executing the whole iteration in the same thread (the same as a normal
RepeatTemplate).
Sometimes there is some business processing that you know you want
to repeat every time it happens. The classic example of this is the
optimization of a message pipeline - it is more efficient to process a
batch of messages, if they are arriving frequently, than to bear the cost
of a separate transaction for every message. Spring Batch provides an AOP
interceptor that wraps a method call in a
RepeatOperations for just this purpose. The
RepeatOperationsInterceptor executes the
intercepted method and repeats according to the
CompetionPolicy in the provided
RepeatTemplate.
Here is an example of declarative iteration using the Spring AOP
namespace to repeat a service call to a method called
processMessage (for more detail on how to
configure AOP interceptors see the Spring User Guide):
<aop:config>
    <aop:pointcut id="transactional"
        expression="execution(* com...*Service.processMessage(..))" />
    <aop:advisor pointcut-ref="transactional"
        advice-ref="retryAdvice" order="-1"/>
</aop:config>

<bean id="retryAdvice" class="org.spr...RepeatOperationsInterceptor"/>
The example above uses a default
RepeatTemplate inside the interceptor. To change
the policies, listeners etc. you only need to inject an instance of
RepeatTemplate into the interceptor.
If the intercepted method returns void then the
interceptor always returns ExitStatus.CONTINUABLE (so there is a danger of
an infinite loop if the CompletionPolicy does not
have a finite end point). Otherwise it returns
ExitStatus.CONTINUABLE until the return value from the
intercepted method is null, at which point it returns
ExitStatus.FINISHED. So the business logic inside the target
method can signal that there is no more work to do by returning
null, or by throwing an exception that is re-thrown by the
ExceptionHandler in the provided
RepeatTemplate.
To make processing more robust and less prone to failure, sometimes
it helps to automatically retry a failed operation in case it might
succeed on a subsequent attempt. Errors that are susceptible to this kind
of treatment are transient in nature. For example a remote call to a web
service or RMI service that fails because of a network glitch or a
DeadLockLoserException in a database update may
resolve themselves after a short wait. To automate the retry of such
operations Spring Batch has the RetryOperations
strategy. The RetryOperations interface looks like
this:
public interface RetryOperations {

    <T> T execute(RetryCallback<T> retryCallback) throws Exception;

    <T> T execute(RetryCallback<T> retryCallback, RecoveryCallback<T> recoveryCallback)
        throws Exception;

    <T> T execute(RetryCallback<T> retryCallback, RetryState retryState)
        throws Exception, ExhaustedRetryException;

    <T> T execute(RetryCallback<T> retryCallback, RecoveryCallback<T> recoveryCallback,
        RetryState retryState) throws Exception;

}
The basic callback is a simple interface that allows you to insert some business logic to be retried:
public interface RetryCallback<T> {

    T doWithRetry(RetryContext context) throws Throwable;

}
The callback is executed and if it fails (by throwing an
Exception), it will be retried until either it is
successful, or the implementation decides to abort. There are a number of
overloaded execute methods in the
RetryOperations interface dealing with various use
cases for recovery when all retry attempts are exhausted, and also with
retry state, which allows clients and implementations to store information
between calls (more on this later).
The simplest general purpose implementation of
RetryOperations is
RetryTemplate. It could be used like this
RetryTemplate template = new RetryTemplate();

template.setRetryPolicy(new TimeoutRetryPolicy(30000L));

Foo result = template.execute(new RetryCallback<Foo>() {

    public Foo doWithRetry(RetryContext context) {
        // Do stuff that might fail, e.g. webservice operation
        return result;
    }

});
In the example we execute a web service call and return the result to the user. If that call fails then it is retried until a timeout is reached.
The method parameter for the RetryCallback
is a RetryContext. Many callbacks will simply
ignore the context, but if necessary it can be used as an attribute bag
to store data for the duration of the iteration.
A RetryContext will have a parent context
if there is a nested retry in progress in the same thread. The parent
context is occasionally useful for storing data that need to be shared
between calls to execute.
When a retry is exhausted the
RetryOperations can pass control to a different
callback, the RecoveryCallback. To use this
feature clients just pass in the callbacks together to the same method,
for example:
Foo foo = template.execute(new RetryCallback<Foo>() {
    public Foo doWithRetry(RetryContext context) {
        // business logic here
    },
  new RecoveryCallback<Foo>() {
    Foo recover(RetryContext context) throws Exception {
          // recover logic here
    }
});
If the business logic does not succeed before the template decides to abort, then the client is given the chance to do some alternate processing through the recovery callback.
In the simplest case, a retry is just a while loop: the
RetryTemplate can just keep trying until it
either succeeds or fails. The RetryContext
contains some state to determine whether to retry or abort, but this
state is on the stack and there is no need to store it anywhere
globally, so we call this stateless retry. The distinction between
stateless and stateful retry is contained in the implementation of the
RetryPolicy (the
RetryTemplate can handle both). In a stateless
retry, the callback is always executed in the same thread on retry as
when it failed.
Where the failure has caused a transactional resource to become invalid, there are some special considerations. This does not apply to a simple remote call because there is no transactional resource (usually), but it does sometimes apply to a database update, especially when using Hibernate. In this case it only makes sense to rethrow the exception that called the failure immediately so that the transaction can roll back and we can start a new valid one.
In these cases a stateless retry is not good enough because the
re-throw and roll back necessarily involve leaving the
RetryOperations.execute() method and potentially losing the
context that was on the stack. To avoid losing it we have to introduce a
storage strategy to lift it off the stack and put it (at a minimum) in
heap storage. For this purpose Spring Batch provides a storage strategy
RetryContextCache which can be injected into the
RetryTemplate. The default implementation of the
RetryContextCache is in memory, using a simple
Map. Advanced usage with multiple processes in a
clustered environment might also consider implementing the
RetryContextCache with a cluster cache of some
sort (though, even in a clustered environment this might be
overkill).
Part of the responsibility of the
RetryOperations is to recognize the failed
operations when they come back in a new execution (and usually wrapped
in a new transaction). To facilitate this, Spring Batch provides the
RetryState abstraction. This works in conjunction
with a special execute methods in the
RetryOperations.
The way the failed operations are recognized is by identifying the
state across multiple invocations of the retry. To identify the state,
the user can provide an RetryState object that is
responsible for returning a unique key identifying the item. The
identifier is used as a key in the
RetryContextCache.
Warning
Be very careful with the implementation of
Object.equals() and Object.hashCode() in the
key returned by RetryState. The best advice is
to use a business key to identify the items. In the case of a JMS
message the message ID can be used.
When the retry is exhausted there is also the option to handle the
failed item in a different way, instead of calling the
RetryCallback (which is presumed now to be likely
to fail). Just like in the stateless case, this option is provided by
the RecoveryCallback, which can be provided by
passing it in to the execute method of
RetryOperations.
The decision to retry or not is actually delegated to a regular
RetryPolicy, so the usual concerns about limits
and timeouts can be injected there (see below).
Inside a RetryTemplate the decision to retry
or fail in the execute method is determined by a
RetryPolicy which is also a factory for the
RetryContext. The
RetryTemplate has the responsibility to use the
current policy to create a RetryContext and pass
that in to the RetryCallback at every attempt.
After a callback fails the RetryTemplate has to
make a call to the RetryPolicy to ask it to update
its state (which will be stored in the
RetryContext), and then it asks the policy if
another attempt can be made. If another attempt cannot be made (e.g. a
limit is reached or a timeout is detected) then the policy is also
responsible for handling the exhausted state. Simple implementations will
just throw RetryExhaustedException which will cause
any enclosing transaction to be rolled back. More sophisticated
implementations might attempt to take some recovery action, in which case
the transaction can remain intact.
Tip
Failures are inherently either retryable or not - if the same exception is always going to be thrown from the business logic, it doesn't help to retry it. So don't retry on all exception types - try to focus on only those exceptions that you expect to be retryable. It's not usually harmful to the business logic to retry more aggressively, but it's wasteful because if a failure is deterministic there will be time spent retrying something that you know in advance is fatal.
Spring Batch provides some simple general purpose implementations of
stateless RetryPolicy, for example a
SimpleRetryPolicy, and the
TimeoutRetryPolicy used in the example
above.
The SimpleRetryPolicy just allows a retry on
any of a named list of exception types, up to a fixed number of times. It
also has a list of "fatal" exceptions that should never be retried, and
this list overrides the retryable list so that it can be used to give
finer control over the retry behavior:
SimpleRetryPolicy policy = new SimpleRetryPolicy(5);
// Retry on all exceptions (this is the default)
policy.setRetryableExceptions(new Class[] {Exception.class});
// ... but never retry IllegalStateException
policy.setFatalExceptions(new Class[] {ILlegalStateException.class});

// Use the policy...
RetryTemplate template = new RetryTemplate();
template.setRetryPolicy(policy);
template.execute(new RetryCallback<Foo>() {
    public Foo doWithRetry(RetryContext context) {
        // business logic here
    }
});
There is also a more flexible implementation called
ExceptionClassifierRetryPolicy, which allows the
user to configure different retry behavior for an arbitrary set of
exception types though the ExceptionClassifier
abstraction. The policy works by calling on the classifier to convert an
exception into a delegate RetryPolicy, so for
example, one exception type can be retried more times before failure than
another by mapping it to a different policy.
Users might need to implement their own retry policies for more customized decisions. For instance, if there is a well-known, solution-specific, classification of exceptions into retryable and not retryable.
When retrying after a transient failure it often helps to wait a bit
before trying again, because usually the failure is caused by some problem
that will only be resolved by waiting. If a
RetryCallback fails, the
RetryTemplate can pause execution according to the
BackoffPolicy in place.
public interface BackoffPolicy {

    BackOffContext start(RetryContext context);

    void backOff(BackOffContext backOffContext)
        throws BackOffInterruptedException;

}
A BackoffPolicy is free to implement
the backOff in any way it chooses. The policies provided by Spring Batch
out of the box all use Object.wait(). A common use case is to
backoff with an exponentially increasing wait period, to avoid two retries
getting into lock step and both failing - this is a lesson learned from
the ethernet. For this purpose Spring Batch provides the
ExponentialBackoffPolicy.
Often it is useful to be able to receive additional callbacks for
cross cutting concerns across a number of different retries. For this
purpose Spring Batch provides the RetryListener
interface. The RetryTemplate allows users to
register RetryListeners, and they will be given
callbacks with the RetryContext and
Throwable where available during the
iteration.
The interface looks like this:
public interface RetryListener {

    void open(RetryContext context, RetryCallback<T> callback);

    void onError(RetryContext context, RetryCallback<T> callback, Throwable e);

    void close(RetryContext context, RetryCallback<T> callback, Throwable e);
}
The open and
close callbacks come before and after the entire
retry in the simplest case and onError applies to
the individual RetryCallback calls. The
close method might also receive a
Throwable; if there has been an error it is the
last one thrown by the RetryCallback.
Note that when there is more than one listener, they are in a list,
so there is an order. In this case open will be
called in the same order while onError and
close will be called in reverse order.
Sometimes there is some business processing that you know you want
to retry every time it happens. The classic example of this is the remote
service call. Spring Batch provides an AOP interceptor that wraps a method
call in a RetryOperations for just this purpose.
The RetryOperationsInterceptor executes the
intercepted method and retries on failure according to the
RetryPolicy in the provided
RepeatTemplate.
Here is an example of declarative iteration using the Spring AOP
namespace to repeat a service call to a method called
remoteCall (for more detail on how to configure
AOP interceptors see the Spring User Guide):
<aop:config>
    <aop:pointcut id="transactional"
        expression="execution(* com...*Service.remoteCall(..))" />
    <aop:advisor pointcut-ref="transactional"
        advice-ref="retryAdvice" order="-1"/>
</aop:config>

<bean id="retryAdvice"
    class="org.springframework.batch.retry.interceptor.RetryOperationsInterceptor"/>
The example above uses a default
RetryTemplate inside the interceptor. To change the
policies or listeners, you only need to inject an instance of
RetryTemplate into the interceptor.
Just as with other application styles, it is extremely important to unit test any code written as part of a batch job as well. The Spring core documentation covers how to unit and integration test with Spring in great detail, so it won't be repeated here. It is important, however, to think about how to 'end to end' test a batch job, which is what this chapter will focus on. The spring-batch-test project includes classes that will help facilitate this end-to-end test approach.
In order for the unit test to run a batch job, the framework must load the job's ApplicationContext. Two annotations are used to trigger this:
@RunWith(SpringJUnit4ClassRunner.class): Indicates that the class should use Spring's JUnit facilities@ContextConfiguration(locations = {...}): Indicates which XML files contain the ApplicationContext.
@RunWith(SpringJUnit4ClassRunner.class)
@ContextConfiguration(locations = { "/simple-job-launcher-context.xml",
                                    "/jobs/skipSampleJob.xml" })
public class SkipSampleFunctionalTests extends AbstractJobTests { ... }'End To End' testing can be defined as testing the complete run of a batch job from beginning to end. This allows for a test that sets up a test condition, executes the job, and verifies the end result.
In the example below, the batch job reads from the database and
writes to a flat file. The test method begins by setting up the database
with test data. It clears the CUSTOMER table and then inserts 10 new
records. The test then launches the Job using the
launchJob() method. The
launchJob() method is provided by the
AbstractJobTests parent class. Also provided by the
super class is launchJob(JobParameters), which
allows the test to give particular parameters. The
launchJob() method returns the
JobExecution object which is useful for asserting
particular information about the Job run. In the
case below, the test verifies that the Job ended
with status "COMPLETED".
@RunWith(SpringJUnit4ClassRunner.class)
@ContextConfiguration(locations = { "/simple-job-launcher-context.xml",
                                    "/jobs/skipSampleJob.xml" })
public class SkipSampleFunctionalTests extends AbstractJobTests {

    private SimpleJdbcTemplate simpleJdbcTemplate;

    @Autowired
    public void setDataSource(DataSource dataSource) {
        this.simpleJdbcTemplate = new SimpleJdbcTemplate(dataSource);
    }

    @Transactional
    @Test
    public void testJob() throws Exception {
        simpleJdbcTemplate.update("delete from CUSTOMER");
        for (int i = 1; i <= 10; i++) {
            simpleJdbcTemplate.update("insert into CUSTOMER values (?, 0, ?, 100000)",
                                      i, "customer" + i);
        }

        JobExecution jobExecution = this.launchJob();

        Assert.assertEquals("COMPLETED", jobExecution.getExitStatus());
    }
}For complex batch jobs, test cases in the end-to-end testing
approach may become unmanageable. It these cases, it may be more useful to
have test cases to test individual steps on their own. The
AbstractJobTests class contains a method
launchStep that takes a step name and runs just
that particular Step. This approach allows for more
targeted tests by allowing the test to set up data for just that step and
to validate its results directly.
JobExecution jobExecution = this.launchStep("loadFileStep");When a batch job writes to the database, it is easy to query the
database to verify that the output is as expected. However, if the batch
job writes to a file, it is equally important that the output be verified.
Spring Batch provides a class AssertFile to
facilitate the verification of output files. The method
assertFileEquals takes two
File objects (or two
Resource objects) and asserts, line by line, that
the two files have the same content. Therefore, it is possible to create a
file with the expected output and to compare it to the actual
result:
private static final String EXPECTED_FILE = "src/main/resources/data/input.txt";
private static final String OUTPUT_FILE = "target/test-outputs/output.txt";

AssertFile.assertFileEquals(new FileSystemResource(EXPECTED_FILE),
new FileSystemResource(OUTPUT_FILE));Another common issue encountered while writing unit and integration
tests for Spring Batch components is how to mock domain objects. A good
example is a StepExecutionListener, as illustrated
below:
public class NoWorkFoundStepExecutionListener extends StepExecutionListenerSupport {

    public ExitStatus afterStep(StepExecution stepExecution) {
        if (stepExecution.getReadCount() == 0) {
            throw new NoWorkFoundException("Step has not processed any items");
        }
        return stepExecution.getExitStatus();
    }
}
The above listener is provided by the framework and checks a
StepExecution for an empty read count, thus
signifying that no work was done. While this example is fairly simple, it
serves to illustrate the types of problems that may be encountered when
attempting to unit test classes that implement interfaces requiring Spring
Batch domain objects. Consider the above listener's unit test:
private NoWorkFoundStepExecutionListener tested = new NoWorkFoundStepExecutionListener();

@Test
public void testAfterStep() {
    StepExecution stepExecution = new StepExecution("NoProcessingStep",
                new JobExecution(new JobInstance(1L, new JobParameters(),
                                 "NoProcessingJob")));

    stepExecution.setReadCount(0);

    try {
        tested.afterStep(stepExecution);
        fail();
    } catch (NoWorkFoundException e) {
        assertEquals("Step has not processed any items", e.getMessage());
    }
}
Because the Spring Batch domain model follows good object orientated
principles, the StepExecution requires a
JobExecution, which requires a
JobInstance and
JobParameters in order to create a valid
StepExecution. While this is good in a solid domain
model, it does make creating stub objects for unit testing verbose. To
address this issue, the Spring Batch test module includes a factory for
creating domain objects: MetaDataInstanceFactory.
Given this factory, the unit test can be updated to be more
concise:
private NoWorkFoundStepExecutionListener tested = new NoWorkFoundStepExecutionListener();

@Test
public void testAfterStep() {
    StepExecution stepExecution = MetaDataInstanceFactory.createStepExecution();

    stepExecution.setReadCount(0);

    try {
        tested.afterStep(stepExecution);
        fail();
    } catch (NoWorkFoundException e) {
        assertEquals("Step has not processed any items", e.getMessage());
    }
}
The above method for creating a simple
StepExecution is just one convenience method
available within the factory. A full method listing can be found in its
Javadoc.
Some batch jobs can be assembled purely from off-the-shelf components
in Spring Batch. For instance the ItemReader and
ItemWriter implementations can be configured to cover
a wide range of scenarios. However, for the majority of cases, custom code
will have to be written. The main API entry points for application
developers are the Tasklet,
ItemReader, ItemWriter and the
various listener interfaces. Most simple batch jobs will be able to use
off-the-shelf input from a Spring Batch ItemReader,
but it is often the case that there are custom concerns in the processing
and writing, which require developers to implement an
ItemWriter or
ItemProcessor.
Here, we provide a few examples of common patterns in custom business
logic. These examples primarily feature the listener interfaces. It should
be noted that an ItemReader or
ItemWriter can implement a listener interface as
well, if appropriate.
A common use case is the need for special handling of errors in a
step, item by item, perhaps logging to a special channel, or inserting a
record into a database. A chunk-oriented Step
(created from the step factory beans) allows users to implement this use
case with a simple ItemReadListener, for errors on
read, and an ItemWriteListener, for errors on
write. The below code snippets illustrate a listener that logs both read
and write failures:
public class ItemFailureLoggerListener extends ItemListenerSupport {

    private static Log logger = LogFactory.getLog("item.error");

    public void onReadError(Exception ex) {
        logger.error("Encountered error on read", e);
    }

    public void onWriteError(Exception ex, Object item) {
        logger.error("Encountered error on write", e);
    }

}
Having implemented this listener it must be registered with the step:
<step id="simpleStep">
    ...
    <listeners>
        <listener class="org.example...ItemFailureLoggerListener"/>
    </listeners>
</step>
Remember that if your listener does anything in an
onError() method, it will be inside a transaction that is
going to be rolled back. If you need to use a transactional resource such
as a database inside an onError() method, consider adding a
declarative transaction to that method (see Spring Core Reference Guide
for details), and giving its propagation attribute the value
REQUIRES_NEW.
Spring Batch provides a stop() method
through the JobLauncher interface, but this is
really for use by the operator rather than the application programmer.
Sometimes it is more convenient or makes more sense to stop a job
execution from within the business logic.
The simplest thing to do is to throw a
RuntimeException (one that isn't retried
indefinitely or skipped). For example, a custom exception type could be
used, as in the example below:
public class PoisonPillItemWriter implements ItemWriter<T> {

    public void write(T item) throws Exception {
        if (isPoisonPill(item)) {
            throw new PoisonPillException("Posion pill detected: " + item);
       }
    }

}
Another simple way to stop a step from executing is to simply return
null from the ItemReader:
public class EarlyCompletionItemReader implements ItemReader<T> {

    private ItemReader<T> delegate;

    public void setDelegate(ItemReader<T> delegate) { ... }

    public T read() throws Exception {
        T item = delegate.read();
        if (isEndItem(item)) {
            return null; // end the step here
        }
        return item;
    }

}
The previous example actually relies on the fact that there is a
default implementation of the CompletionPolicy
strategy which signals a complete batch when the item to be processed is
null. A more sophisticated completion policy could be implemented and
injected into the Step through the
SimpleStepFactoryBean:
<step id="simpleStep">
    <tasklet>
        <chunk reader="reader" writer="writer" commit-interval="10"
               chunk-completion-policy="completionPolicy"/>
    </tasklet>
</step>

<bean id="completionPolicy" class="org.example...SpecialCompletionPolicy"/>
An alternative is to set a flag in the
StepExecution, which is checked by the
Step implementations in the framework in between
item processing. To implement this alternative, we need access to the
current StepExecution, and this can be achieved by
implementing a StepListener and registering it with
the Step. Here is an example of a listener that
sets the flag:
public class CustomItemWriter extends ItemListenerSupport implements StepListener {

    private StepExecution stepExecution;

    public void beforeStep(StepExecution stepExecution) {
        this.stepExecution = stepExecution;
    }

    public void afterRead(Object item) {
        if (isPoisonPill(item)) {
            stepExecution.setTerminateOnly(true);
       }
    }

}
The default behavior here when the flag is set is for the step to
throw a JobInterruptedException. This can be
controlled through the StepInterruptionPolicy, but
the only choice is to throw or not throw an exception, so this is always
an abnormal ending to a job.
Often when writing to flat files, a "footer" record must be appended
to the end of the file, after all processing has be completed. This can
also be achieved using the FlatFileFooterCallback
interface provided by Spring Batch. The
FlatFileFooterCallback (and its counterpart, the
FlatFileHeaderCallback) are optional properties of
the FlatFileItemWriter:
<bean id="itemWriter" class="org.spr...FlatFileItemWriter">
    <property name="resource" ref="outputResource" />
    <property name="lineAggregator" ref="lineAggregator"/>
    <property name="headerCallback" ref="headerCallback" />
    <property name="footerCallback" ref="footerCallback" />
</bean>
The footer callback interface is very simple. It has just one method that is called when the footer must be written:
public interface FlatFileFooterCallback {

    void writeFooter(Writer writer) throws IOException;

}A very common requirement involving footer records is to aggregate information during the output process and to append this information to the end of the file. This footer serves as a summarization of the file or provides a checksum.
For example, if a batch job is writing
Trade records to a flat file, and there is a
requirement that the total amount from all the
Trades is placed in a footer, then the following
ItemWriter implementation can be used:
public class TradeItemWriter implements ItemWriter<Trade>,
                                        FlatFileFooterCallback {

    private ItemWriter<Trade> delegate;

    private BigDecimal totalAmount = BigDecimal.ZERO;

    public void write(List<? extends Trade> items) {
        BigDecimal chunkTotal = BigDecimal.ZERO;
        for (Trade trade : items) {
            chunkTotal = chunkTotal.add(trade.getAmount());
        }

        delegate.write(items);

        // After successfully writing all items
        totalAmount = totalAmount.add(chunkTotal);
    }

    public void writeFooter(Writer writer) throws IOException {
        writer.write("Total Amount Processed: " + totalAmount);
    }

    public void setDelegate(ItemWriter delegate) {...}
}
This TradeItemWriter stores a
totalAmount value that is increased with the
amount from each Trade item written.
After the last Trade is processed, the framework
will call writeFooter, which will put that
totalAmount into the file. Note that the
write method makes use of a temporary variable,
chunkTotalAmount, that stores the total of the trades
in the chunk. This is done to ensure that if a skip occurs in the
write method, that the
totalAmount will be left unchanged. It is only at
the end of the write method, once we are
guaranteed that no exceptions will be thrown, that we update the
totalAmount.
In order for the writeFooter method to be
called, the TradeItemWriter (which implements
FlatFileFooterCallback) must be wired into the
FlatFileItemWriter as the
footerCallback:
<bean id="tradeItemWriter" class="..TradeItemWriter">
    <property name="delegate" ref="flatFileItemWriter" />
</bean>

<bean id="flatFileItemWriter" class="org.spr...FlatFileItemWriter">
   <property name="resource" ref="outputResource" />
   <property name="lineAggregator" ref="lineAggregator"/>
   <property name="footerCallback" ref="tradeItemWriter" />
</bean>
The way that the TradeItemWriter has been
so far will only function correctly if the Step
is not restartable. This is because the class is stateful (since it
stores the totalAmount), but the totalAmount
is not persisted to the database, and therefore, it cannot be retrieved
in the event of a restart. In order to make this class restartable, the
ItemStream interface should be implemented along
with the methods open and
update:
public void open(ExecutionContext executionContext) {
    if (executionContext.containsKey("total.amount") {
        totalAmount = (BigDecimal) executionContext.get("total.amount");
    }
}

public void update(ExecutionContext executionContext) {
    executionContext.put("total.amount", totalAmount);
}
The update method will store the most
current version of totalAmount to the
ExecutionContext just before that object is
persisted to the database. The open method will
retrieve any existing totalAmount from the
ExecutionContext and use it as the starting point
for processing, allowing the TradeItemWriter to
pick up on restart where it left off the previous time the
Step was executed.
In the chapter on readers and writers, database input using paging was discussed. Many database vendors, such as DB2, have extremely pessimistic locking strategies that can cause issues if the table being read also needs to be used by other portions of the online application. Furthermore, opening cursors over extremely large datasets can cause issues on certain vendors. Therefore, many projects prefer to use a 'Driving Query' approach to reading in data. This approach works by iterating over keys, rather than the entire object that needs to be returned, as the following example illustrates:
As you can see, this example uses the same 'FOO' table as was used
in the cursor based example. However, rather than selecting the entire
row, only the ID's were selected in the SQL statement. So, rather than a
FOO object being returned from read, an Integer
will be returned. This number can then be used to query for the 'details',
which is a complete Foo object:
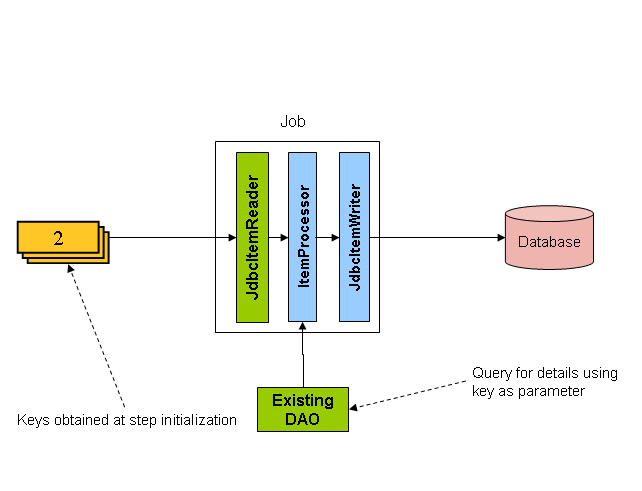
An ItemProcessor should be used to transform the key obtained from the driving query into a full 'Foo' object. An existing DAO can be used to query for the full object based on the key.
While it is usually the case with flat files that one each record is confined to a single line, it is common that a file might have records spanning multiple lines with multiple formats. The following excerpt from a file illustrates this:
HEA;0013100345;2007-02-15
NCU;Smith;Peter;;T;20014539;F
BAD;;Oak Street 31/A;;Small Town;00235;IL;US
FOT;2;2;267.34
Everything between the line starting with 'HEA' and the line starting with 'FOT' is considered one record. There are a few considerations that must be made in order to handle this situation correctly:
Instead of reading one record at a time, the
ItemReadermust read every line of the multi-line record as a group, so that it can be passed to theItemWriterintact.Each line type may need to be tokenized differently.
Because a single record spans multiple lines, and we may not know
how many lines there are, the ItemReader must be
careful to always read an entire record. In order to do this, a custom
ItemReader should be implemented as a wrapper for
the FlatFileItemReader.
<bean id="itemReader" class="org.spr...MultiLineTradeItemReader">
    <property name="delegate">
        <bean class="org.springframework.batch.item.file.FlatFileItemReader">
            <property name="resource" value="data/iosample/input/multiLine.txt" />
            <property name="lineMapper">
                <bean class="org.spr...DefaultLineMapper">
                    <property name="lineTokenizer" ref="orderFileTokenizer"/>
                    <property name="fieldSetMapper">
                        <bean class="org.spr...PassThroughFieldSetMapper" />
                    </property>
                </bean>
            </property>
        </bean>
    </property>
</bean>
To ensure that each line is tokenized properly, which is especially
important for fixed length input, the
PatternMatchingCompositeLineTokenizer can be used
on the delegate FlatFileItemReader. See Section 6.6.2.9, “Multiple Record Types within a Single File” for more details. The delegate
reader will then use a PassThroughFieldSetMapper to
deliver a FieldSet for each line back to the
wrapping ItemReader.
<bean id="orderFileTokenizer" class="org.spr...PatternMatchingCompositeLineTokenizer">
    <property name="tokenizers">
        <map>
            <entry key="HEA*" value-ref="headerRecordTokenizer" />
            <entry key="FOT*" value-ref="footerRecordTokenizer" />
            <entry key="NCU*" value-ref="customerLineTokenizer" />
            <entry key="BAD*" value-ref="billingAddressLineTokenizer" />
        </map>
    </property>
</bean>
This wrapper will have to be able recognize the end of a record so
that it can continually call read() on its
delegate until the end is reached. For each line that is read, the wrapper
should build up the item to be returned. Once the footer is reached, the
item can be returned for delivery to the
ItemProcessor and
ItemWriter.
private FlatFileItemReader<FieldSet> delegate;

public Trade read() throws Exception {
    Trade t = null;

    for (FieldSet line = null; (line = this.delegate.read()) != null;) {
        String prefix = line.readString(0);
        if (prefix.equals("HEA")) {
            t = new Trade(); // Record must start with header
        }
        else if (prefix.equals("NCU")) {
            Assert.notNull(t, "No header was found.");
            t.setLast(line.readString(1));
            t.setFirst(line.readString(2));
            ...
        }
        else if (prefix.equals("BAD")) {
            Assert.notNull(t, "No header was found.");
            t.setCity(line.readString(4));
            t.setState(line.readString(6));
          ...
        }
        else if (prefix.equals("FOT")) {
            return t; // Record must end with footer
        }
    }
    Assert.isNull(t, "No 'END' was found.");
    return null;
}Many batch jobs may require that an external command be called from within the batch job. Such a process could be kicked off separately by the scheduler, but the advantage of common meta-data about the run would be lost. Furthermore, a multi-step job would also need to be split up into multiple jobs as well.
Because the need is so common, Spring Batch provides a
Tasklet implementation for calling system
commands:
<bean class="org.springframework.batch.core.step.tasklet.SystemCommandTasklet">
    <property name="command" value="echo hello" />
    <!-- 5 second timeout for the command to complete -->
    <property name="timeout" value="5000" />
</bean>In many batch scenarios, finding no rows in a database or file to
process is not exceptional. The Step is simply
considered to have found no work and completes with 0 items read. All of
the ItemReader implementations provided out of the
box in Spring Batch default to this approach. This can lead to some
confusion if nothing is written out even when input is present. (which
usually happens if a file was misnamed, etc) For this reason, the meta
data itself should be inspected to determine how much work the framework
found to be processed. However, what if finding no input is considered
exceptional? In this case, programmatically checking the meta data for no
items processed and causing failure is the best solution. Because this is
a common use case, a listener is provided with just this
functionality:
public class NoWorkFoundStepExecutionListener extends StepExecutionListenerSupport {
public ExitStatus afterStep(StepExecution stepExecution) {
if (stepExecution.getReadCount() == 0) {
return ExitStatus.FAILED;
}
return null;
}
}The above StepExecutionListener inspects the
readCount property of the StepExecution during the
'afterStep' phase to determine if no items were read. If that is the case,
an exit code of FAILED is returned, indicating that the
Step should fail. Otherwise, null is returned,
which will not affect the status of the
Step.
It is often useful to pass information from one step to another.
This can be done using the ExecutionContext. The
catch is that there are two ExecutionContexts: one
at the Step level and one at the
Job level. The Step
ExecutionContext lives only as long as the step
while the Job
ExecutionContext lives through the whole
Job. On the other hand, the
Step ExecutionContext is
updated every time the Step commits a chunk while
the Job ExecutionContext is
updated only at the end of each Step.
The consequence of this separation is that all data must be placed
in the Step ExecutionContext
while the Step is executing. This will ensure that
the data will be stored properly while the Step is
on-going. If data is stored to the Job
ExecutionContext, then it will not be persisted
during Step execution and if the
Step fails, that data will be lost.
public void SavingItemWriter implements ItemWriter<Object> {
private StepExecution stepExecution;
public void write(List<? extends Object> items) throws Exception {
// ...
ExecutionContext stepContext = this.stepExecution.getExecutionContext();
stepContext.put("someKey", someObject);
}
@BeforeStep
public void saveStepExecution(StepExecution stepExecution) {
this.stepExecution = stepExecution;
}
}To make the data available to future Steps,
it will have to be "promoted" to the Job
ExecutionContext after the step has finished.
Spring Batch provides the
ExecutionContextPromotionListener for this purpose.
The listener must be configured with the keys related to the data in the
ExecutionContext that must be promoted. It can
also, optionally, be configured with a list of exit code patterns for
which the promotion should occur ("COMPLETED" is the default). As with all
listeners, it must be registered on the
Step.
<job id="job1">
<step id="step1">
<tasket>
<chunk reader="reader" writer="savingWriter" commit-interval="10"/>
<listeners>
<listener ref="promotionListener"/>
</listeners>
</tasklet>
</step>
<step id="step2">
...
</step>
</job>
<beans:bean id="promotionListener" class="org.spr....ExecutionContextPromotionListener">
<beans:property name="keys" value="someKey"/>
</beans:bean>Finally, to the saved values must be retrieved from the
Job ExeuctionContext:
public void RetrievingItemWriter implements ItemWriter<Object> {
private Object someObject;
public void write(List<? extends Object> items) throws Exception {
// ...
}
@BeforeStep
public void saveStepExecution(StepExecution stepExecution) {
JobExecution jobExecution = stepExecution.getJobExecution();
ExecutionContext jobContext = jobExecution.getExecutionContext();
this.someObject = jobContext.get("someKey");
}
}Table A.1. Available Item Readers
| Item Reader | Description |
|---|---|
| AbstractItemCountingItemStreamItemReader | Abstract base class that provides basic
restart capabilities by counting the number of items returned from
an ItemReader. |
| ListItemReader | Provides the items from a list, one at a time |
| ItemReaderAdapter | Adapts any class to the
ItemReader interface. |
| AggregateItemReader | An ItemReader that delivers a list as its item, storing up objects from the injected ItemReader until they are ready to be packed out as a collection. This ItemReader should mark the beginning and end of records with the constant values in FieldSetMapper AggregateItemReader#BEGIN_RECORD and AggregateItemReader#END_RECORD |
| FlatFileItemReader | Reads from a flat file. Includes ItemStream and Skippable functionality. See section on Read from a File |
| StaxEventItemReader | Reads via StAX. See HOWTO - Read from a File |
| JdbcCursorItemReader | Reads from a database cursor via JDBC. See HOWTO - Read from a Database |
| HibernateCursorItemReader | Reads from a cursor based on an HQL query. See section on Reading from a Database |
| IbatisPagingItemReader | Reads via iBATIS based on a query. Pages through the rows so that large datasets can be read without running out of memory. See HOWTO - Read from a Database |
| JmsItemReader | Given a Spring JmsOperations object and a JMS Destination or destination name to send errors, provides items received through the injected JmsOperations receive() method |
| JpaPagingItemReader | Given a JPQL statement, pages through the rows, such that large datasets can be read without running out of memory |
| JdbcPagingItemReader | Given a SQL statement, pages through the rows, such that large datasets can be read without running out of memory |
Table A.2. Available Item Writers
| Item Writer | Description |
|---|---|
| AbstractItemStreamItemWriter | Abstract base class that combines the
ItemStream and
ItemWriter interfaces. |
| CompositeItemWriter | Passes an item to the process method of each in an injected List of ItemWriter objects |
| ItemWriterAdapter | Adapts any class to the
ItemWriter interface. |
| PropertyExtractingDelegatingItemWriter | Extends AbstractMethodInvokingDelegator creating arguments on the fly. Arguments are created by retrieving the values from the fields in the item to be processed (via a SpringBeanWrapper) based on an injected array of field name |
| FlatFileItemWriter | Writes to a flat file. Includes ItemStream and Skippable functionality. See section on Writing to a File |
| HibernateItemWriter | This item writer is hibernate session aware and handles some transaction-related work that a non-"hibernate aware" item writer would not need to know about and then delegates to another item writer to do the actual writing. |
| JdbcBatchItemWriter | Uses batching features from a
PreparedStatement, if available, and can
take rudimentary steps to locate a failure during a
flush. |
| JpaItemWriter | This item writer is JPA EntityManager aware
and handles some transaction-related work that a non-"jpa aware"
ItemWriter would not need to know about and
then delegates to another writer to do the actual writing. |
| StaxEventItemWriter | Uses an ObjectToXmlSerializer implementation to convert each item to XML and then writes it to an XML file using StAX. |
The Spring Batch Meta-Data tables very closely match the Domain
objects that represent them in Java. For example,
JobInstance, JobExecution,
JobParameters, and
StepExecution map to BATCH_JOB_INSTANCE,
BATCH_JOB_EXECUTION, BATCH_JOB_PARAMS, and BATCH_STEP_EXECUTION,
respectively. ExecutionContext maps to both
BATCH_JOB_EXECUTION_CONTEXT and BATCH_STEP_EXECUTION_CONTEXT. The
JobRepository is responsible for saving and storing
each Java object into its correct table. The following appendix describes
the meta-data tables in detail, along with many of the design decisions
that were made when creating them. When viewing the various table creation
statements below, it is important to realize that the data types used are
as generic as possible. Spring Batch provides many schemas as examples,
which all have varying data types due to variations in individual database
vendors' handling of data types. Below is an ERD model of all 6 tables and
their relationships to one another:
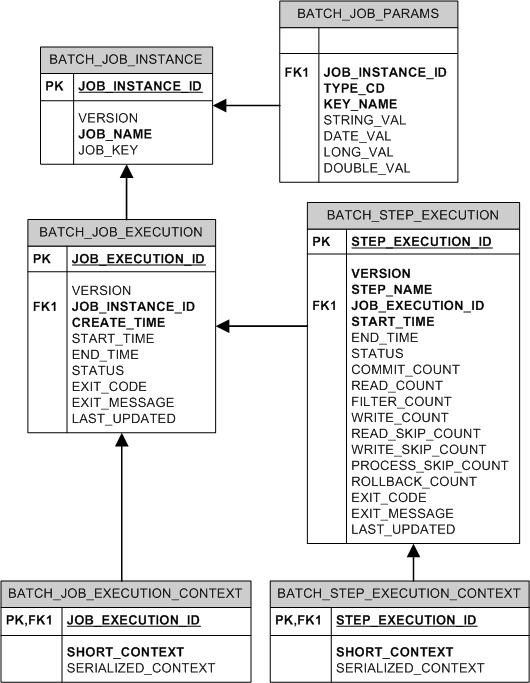
The root of the Spring Batch Core JAR file contains example
scripts to create the relational tables for a number of database
platforms (which are in turn auto-detected by the job repository factory
bean or namespace equivalent). These scripts can be used as is, or
modified with additional indexes and constraints as desired. The file
names are in the form schema-*.sql, where "*" is the
short name of the target database platform.
Many of the database tables discussed in this appendix contain a
version column. This column is important because Spring Batch employs an
optimistic locking strategy when dealing with updates to the database.
This means that each time a record is 'touched' (updated) the value in
the version column is incremented by one. When the repository goes back
to try and save the value, if the version number has change it will
throw OptimisticLockingFailureException,
indicating there has been an error with concurrent access. This check is
necessary since, even though different batch jobs may be running in
different machines, they are all using the same database tables.
BATCH_JOB_INSTANCE, BATCH_JOB_EXECUTION, and BATCH_STEP_EXECUTION each contain columns ending in _ID. These fields act as primary keys for their respective tables. However, they are not database generated keys, but rather they are generated by separate sequences. This is necessary because after inserting one of the domain objects into the database, the key it is given needs to be set on the actual object so that they can be uniquely identified in Java. Newer database drivers (Jdbc 3.0 and up) support this feature with database generated keys, but rather than requiring it, sequences were used. Each variation of the schema will contain some form of the following:
CREATE SEQUENCE BATCH_STEP_EXECUTION_SEQ; CREATE SEQUENCE BATCH_JOB_EXECUTION_SEQ; CREATE SEQUENCE BATCH_JOB_SEQ;
Many database vendors don't support sequences. In these cases, work-arounds are used, such as the following for mySQL:
CREATE TABLE BATCH_STEP_EXECUTION_SEQ (ID BIGINT NOT NULL) type=MYISAM; INSERT INTO BATCH_STEP_EXECUTION_SEQ values(0); CREATE TABLE BATCH_JOB_EXECUTION_SEQ (ID BIGINT NOT NULL) type=MYISAM; INSERT INTO BATCH_JOB_EXECUTION_SEQ values(0); CREATE TABLE BATCH_JOB_SEQ (ID BIGINT NOT NULL) type=MYISAM; INSERT INTO BATCH_JOB_SEQ values(0);
In the above case, a table is used in place of each sequence. The
Spring core class MySQLMaxValueIncrementer will
then increment the one column in this sequence in order to give similar
functionality.
The BATCH_JOB_INSTANCE table holds all information relevant to a
JobInstance, and serves as the top of the overall
hierarchy. The following generic DDL statement is used to create
it:
CREATE TABLE BATCH_JOB_INSTANCE ( JOB_INSTANCE_ID BIGINT PRIMARY KEY , VERSION BIGINT, JOB_NAME VARCHAR(100) NOT NULL , JOB_KEY VARCHAR(2500) );
Below are descriptions of each column in the table:
JOB_INSTANCE_ID: The unique id that will identify the instance, which is also the primary key. The value of this column should be obtainable by calling the
getIdmethod onJobInstance.VERSION: See above section.
JOB_NAME: Name of the job obtained from the
Jobobject. Because it is required to identify the instance, it must not be null.JOB_KEY: A serialization of the
JobParametersthat uniquely identifies separate instances of the same job from one another. (JobInstanceswith the same job name must have differentJobParameters, and thus, different JOB_KEY values).
The BATCH_JOB_PARAMS table holds all information relevant to the
JobParameters object. It contains 0 or more
key/value pairs that together uniquely identify a
JobInstance and serve as a record of the parameters
a job was run with. It should be noted that the table has been
denormalized. Rather than creating a separate table for each type, there
is one table with a column indicating the type:
CREATE TABLE BATCH_JOB_PARAMS ( JOB_INSTANCE_ID BIGINT NOT NULL , TYPE_CD VARCHAR(6) NOT NULL , KEY_NAME VARCHAR(100) NOT NULL , STRING_VAL VARCHAR(250) , DATE_VAL TIMESTAMP DEFAULT NULL, LONG_VAL BIGINT , DOUBLE_VAL DOUBLE PRECISION, constraint JOB_INSTANCE_PARAMS_FK foreign key (JOB_INSTANCE_ID) references BATCH_JOB_INSTANCE(JOB_INSTANCE_ID) );
Below are descriptions for each column:
JOB_INSTANCE_ID: Foreign Key from the BATCH_JOB_INSTANCE table that indicates the job instance the parameter entry belongs to. It should be noted that multiple rows (i.e key/value pairs) may exist for each instance.
TYPE_CD: String representation of the type of value stored, which can be either a string, date, long, or double. Because the type must be known, it cannot be null.
KEY_NAME: The parameter key.
STRING_VAL: Parameter value, if the type is string.
DATE_VAL: Parameter value, if the type is date.
LONG_VAL: Parameter value, if the type is a long.
DOUBLE_VAL: Parameter value, if the type is double.
It is worth noting that there is no primary key for this table. This is simply because the framework has no use for one, and thus doesn't require it. If a user so chooses, one may be added with a database generated key, without causing any issues to the framework itself.
The BATCH_JOB_EXECUTION table holds all information relevant to the
JobExecution object. Every time a
Job is run there will always be a new
JobExecution, and a new row in this table:
CREATE TABLE BATCH_JOB_EXECUTION ( JOB_EXECUTION_ID BIGINT PRIMARY KEY , VERSION BIGINT, JOB_INSTANCE_ID BIGINT NOT NULL, CREATE_TIME TIMESTAMP NOT NULL, START_TIME TIMESTAMP DEFAULT NULL, END_TIME TIMESTAMP DEFAULT NULL, STATUS VARCHAR(10), EXIT_CODE VARCHAR(20), EXIT_MESSAGE VARCHAR(2500), LAST_UPDATED TIMESTAMP, constraint JOB_INSTANCE_EXECUTION_FK foreign key (JOB_INSTANCE_ID) references BATCH_JOB_INSTANCE(JOB_INSTANCE_ID) ) ;
Below are descriptions for each column:
JOB_EXECUTION_ID: Primary key that uniquely identifies this execution. The value of this column is obtainable by calling the
getIdmethod of theJobExecutionobject.VERSION: See above section.
JOB_INSTANCE_ID: Foreign key from the BATCH_JOB_INSTANCE table indicating the instance to which this execution belongs. There may be more than one execution per instance.
CREATE_TIME: Timestamp representing the time that the execution was created.
START_TIME: Timestamp representing the time the execution was started.
END_TIME: Timestamp representing the time the execution was finished, regardless of success or failure. An empty value in this column even though the job is not currently running indicates that there has been some type of error and the framework was unable to perform a last save before failing.
STATUS: Character string representing the status of the execution. This may be COMPLETED, STARTED, etc. The object representation of this column is the
BatchStatusenumeration.EXIT_CODE: Character string representing the exit code of the execution. In the case of a command line job, this may be converted into a number.
EXIT_MESSAGE: Character string representing a more detailed description of how the job exited. In the case of failure, this might include as much of the stack trace as is possible.
LAST_UPDATED: Timestamp representing the last time this execution was persisted.
The BATCH_STEP_EXECUTION table holds all information relevant to the
StepExecution object. This table is very similar in
many ways to the BATCH_JOB_EXECUTION table and there will always be at
least one entry per Step for each
JobExecution created:
CREATE TABLE BATCH_STEP_EXECUTION ( STEP_EXECUTION_ID BIGINT PRIMARY KEY , VERSION BIGINT NOT NULL, STEP_NAME VARCHAR(100) NOT NULL, JOB_EXECUTION_ID BIGINT NOT NULL, START_TIME TIMESTAMP NOT NULL , END_TIME TIMESTAMP DEFAULT NULL, STATUS VARCHAR(10), COMMIT_COUNT BIGINT , READ_COUNT BIGINT , FILTER_COUNT BIGINT , WRITE_COUNT BIGINT , READ_SKIP_COUNT BIGINT , WRITE_SKIP_COUNT BIGINT , PROCESS_SKIP_COUNT BIGINT , ROLLBACK_COUNT BIGINT , EXIT_CODE VARCHAR(20) , EXIT_MESSAGE VARCHAR(2500) , LAST_UPDATED TIMESTAMP, constraint JOB_EXECUTION_STEP_FK foreign key (JOB_EXECUTION_ID) references BATCH_JOB_EXECUTION(JOB_EXECUTION_ID) ) ;
Below are descriptions for each column:
STEP_EXECUTION_ID: Primary key that uniquely identifies this execution. The value of this column should be obtainable by calling the
getIdmethod of theStepExecutionobject.VERSION: See above section.
STEP_NAME: The name of the step to which this execution belongs.
JOB_EXECUTION_ID: Foreign key from the BATCH_JOB_EXECUTION table indicating the JobExecution to which this StepExecution belongs. There may be only one
StepExecutionfor a givenJobExecutionfor a givenStepname.START_TIME: Timestamp representing the time the execution was started.
END_TIME: Timestamp representing the time the execution was finished, regardless of success or failure. An empty value in this column even though the job is not currently running indicates that there has been some type of error and the framework was unable to perform a last save before failing.
STATUS: Character string representing the status of the execution. This may be COMPLETED, STARTED, etc. The object representation of this column is the
BatchStatusenumeration.COMMIT_COUNT: The number of times in which the step has committed a transaction during this execution.
READ_COUNT: The number of items read during this execution.
FILTER_COUNT: The number of items filtered out of this execution.
WRITE_COUNT: The number of items written and committed during this execution.
READ_SKIP_COUNT: The number of items skipped on read during this execution.
WRITE_SKIP_COUNT: The number of items skipped on write during this execution.
PROCESS_SKIP_COUNT: The number of items skipped during processing during this execution.
ROLLBACK_COUNT: The number of rollbacks during this execution. Note that this count includes each time rollback occurs, including rollbacks for retry and those in the skip recovery procedure.
EXIT_CODE: Character string representing the exit code of the execution. In the case of a command line job, this may be converted into a number.
EXIT_MESSAGE: Character string representing a more detailed description of how the job exited. In the case of failure, this might include as much of the stack trace as is possible.
LAST_UPDATED: Timestamp representing the last time this execution was persisted.
The BATCH_JOB_EXECUTION_CONTEXT table holds all information relevant
to an Job's
ExecutionContext. There is exactly one
Job ExecutionContext per
JobExecution, and it contains all of the job-level
data that is needed for a particular job execution. This data typically
represents the state that must be retrieved after a failure so that a
JobInstance can 'start from where it left
off'.
CREATE TABLE BATCH_JOB_EXECUTION_CONTEXT ( JOB_EXECUTION_ID BIGINT PRIMARY KEY, SHORT_CONTEXT VARCHAR(2500) NOT NULL, SERIALIZED_CONTEXT CLOB, constraint JOB_EXEC_CTX_FK foreign key (JOB_EXECUTION_ID) references BATCH_JOB_EXECUTION(JOB_EXECUTION_ID) ) ;
Below are descriptions for each column:
JOB_EXECUTION_ID: Foreign key representing the
JobExecutionto which the context belongs. There may be more than one row associated to a given execution.SHORT_CONTEXT: A string version of the SERIALIZED_CONTEXT.
SERIALIZED_CONTEXT: The entire context, serialized.
The BATCH_STEP_EXECUTION_CONTEXT table holds all information
relevant to an Step's
ExecutionContext. There is exactly one
ExecutionContext per
StepExecution, and it contains all of the data that
needs to persisted for a particular step execution. This data typically
represents the state that must be retrieved after a failure so that a
JobInstance can 'start from where it left
off'.
CREATE TABLE BATCH_STEP_EXECUTION_CONTEXT ( STEP_EXECUTION_ID BIGINT PRIMARY KEY, SHORT_CONTEXT VARCHAR(2500) NOT NULL, SERIALIZED_CONTEXT CLOB, constraint STEP_EXEC_CTX_FK foreign key (STEP_EXECUTION_ID) references BATCH_STEP_EXECUTION(STEP_EXECUTION_ID) ) ;
Below are descriptions for each column:
STEP_EXECUTION_ID: Foreign key representing the
StepExecutionto which the context belongs. There may be more than one row associated to a given execution.SHORT_CONTEXT: A string version of the SERIALIZED_CONTEXT.
SERIALIZED_CONTEXT: The entire context, serialized.
Because there are entries in multiple tables every time a batch job is run, it is common to create an archive strategy for the meta-data tables. The tables themselves are designed to show a record of what happened in the past, and generally won't affect the run of any job, with a couple of notable exceptions pertaining to restart:
The framework will use the meta-data tables to determine if a particular JobInstance has been run before. If it has been run, and the job is not restartable, then an exception will be thrown.
If an entry for a JobInstance is removed without having completed successfully, the framework will think that the job is new, rather than a restart.
If a job is restarted, the framework will use any data that has been persisted to the ExecutionContext to restore the Job's state. Therefore, removing any entries from this table for jobs that haven't completed successfully will prevent them from starting at the correct point if run again.
Spring Batch provides DDL samples for the meta-data tables in the Core jar file for several common database platforms. Index declarations are not included in that DDL because there are too many variations in how users may want to index depending on their precise platform, local conventions and also the business requirements of how the jobs will be operated. The table below provides some indication as to which columns are going to be used in a WHERE clause by the Dao implementations provided by Spring Batch, and how frequently they might be used, so that individual projects can make up their own minds about indexing.
Table B.1. Where clauses in SQL statements (excluding primary keys) and their approximate frequency of use.
| Default Table Name | Where Clause | Frequency |
| BATCH_JOB_INSTANCE | JOB_NAME = ? and JOB_KEY = ? | Every time a job is launched |
| BATCH_JOB_EXECUTION | JOB_INSTANCE_ID = ? | Every time a job is restarted |
| BATCH_EXECUTION_CONTEXT | EXECUTION_ID = ? and KEY_NAME = ? | On commit interval, a.k.a. chunk |
| BATCH_STEP_EXECUTION | VERSION = ? | On commit interval, a.k.a. chunk (and at start and end of step) |
| BATCH_STEP_EXECUTION | STEP_NAME = ? and JOB_EXECUTION_ID = ? | Before each step execution |
Spring Batch Glossary
- Batch
An accumulation of business transactions over time.
- Batch Application Style
Term used to designate batch as an application style in its own right similar to online, Web or SOA. It has standard elements of input, validation, transformation of information to business model, business processing and output. In addition, it requires monitoring at a macro level.
- Batch Processing
The handling of a batch of many business transactions that have accumulated over a period of time (e.g. an hour, day, week, month, or year). It is the application of a process, or set of processes, to many data entities or objects in a repetitive and predictable fashion with either no manual element, or a separate manual element for error processing.
- Batch Window
The time frame within which a batch job must complete. This can be constrained by other systems coming online, other dependent jobs needing to execute or other factors specific to the batch environment.
- Step
It is the main batch task or unit of work controller. It initializes the business logic, and controls the transaction environment based on commit interval setting, etc.
- Tasklet
A component created by application developer to process the business logic for a Step.
- Batch Job Type
Job Types describe application of jobs for particular type of processing. Common areas are interface processing (typically flat files), forms processing (either for online pdf generation or print formats), report processing.
- Driving Query
A driving query identifies the set of work for a job to do; the job then breaks that work into individual units of work. For instance, identify all financial transactions that have a status of "pending transmission" and send them to our partner system. The driving query returns a set of record IDs to process; each record ID then becomes a unit of work. A driving query may involve a join (if the criteria for selection falls across two or more tables) or it may work with a single table.
- Item
An item represents the smallest ammount of complete data for processing. In the simplest terms, this might mean a line in a file, a row in a database table, or a particular element in an XML file.
- Logicial Unit of Work (LUW)
A batch job iterates through a driving query (or another input source such as a file) to perform the set of work that the job must accomplish. Each iteration of work performed is a unit of work.
- Commit Interval
A set of LUWs processed within a single transaction.
- Partitioning
Splitting a job into multiple threads where each thread is responsible for a subset of the overall data to be processed. The threads of execution may be within the same JVM or they may span JVMs in a clustered environment that supports workload balancing.
- Staging Table
A table that holds temporary data while it is being processed.
- Restartable
A job that can be executed again and will assume the same identity as when run initially. In othewords, it is has the same job instance id.
- Rerunnable
A job that is restartable and manages its own state in terms of previous run's record processing. An example of a rerunnable step is one based on a driving query. If the driving query can be formed so that it will limit the processed rows when the job is restarted than it is re-runnable. This is managed by the application logic. Often times a condition is added to the where statement to limit the rows returned by the driving query with something like "and processedFlag != true".
- Repeat
One of the most basic units of batch processing, that defines repeatability calling a portion of code until it is finished, and while there is no error. Typically a batch process would be repeatable as long as there is input.
- Retry
Simplifies the execution of operations with retry semantics most frequently associated with handling transactional output exceptions. Retry is slightly different from repeat, rather than continually calling a block of code, retry is stateful, and continually calls the same block of code with the same input, until it either succeeds, or some type of retry limit has been exceeded. It is only generally useful if a subsequent invocation of the operation might succeed because something in the environment has improved.
- Recover
Recover operations handle an exception in such a way that a repeat process is able to continue.
- Skip
Skip is a recovery strategy often used on file input sources as the strategy for ignoring bad input records that failed validation.